
Interesting read, found over the pond on M3Forum.
Disclaimer/legal:
Do this at your own risk, I assume no liability for the completeness or accuracy of this DIY. By attempting this DIY, you absolve me of any liability and assume all risk yourself. (sorry, Its the lawyer in me, i guess) That being said - I have gathered this information to the best of my ability, but I make no guarantees that this will work for you, etc. Don't attempt this if you don't have a good mechanical knowledge. This
procedure is NOT for the 1st time mechanic.
Credit:
Special thanks to Jorge, a BMW master tech whom I met on here. He told me about this method that doesn't require any of
BMW's pricey and impossible to find special tools. Thanks again dude, you rock.
Background/Story:
So basically the e46 VANOS has THREE main weak points, the bolts tend to back out of the cam gear/spline hub, primarily on the
intake side, the solenoid pack tends to fail, and some people have had their "tabs" break off the exhaust cam gear/spline hub. The 1st situation can lead to a totally awesome catastrophic failure, where the other situations usually don't. At first it seemed that the bolts coming loose problem is more common on later model S54's, however s54's from all years have now been reported to experience this.
The rumor is that a bad batch of bolts made it into production, and eventually these bolts will work themselves loose. Once this happens, the bolts can eventually shear and cause catastrophic destruction of the cam gears/timing chain/valve cover/ and possibly other parts. I had a noticeable rattle coming from under my valve cover. Once I replaced my loose bolts, my rattle went away completely.
Symptoms:
There are sometimes warning signs for loose bolts. If you hear a "marbles in a can" sound coming from under the front area your valve cover, loose bolts could be one of the causes. My car had a nice rattle prior to doing this repair, and after the replacement of the bolts it was very quiet. Sometimes there are no warning signs at all, and the bolts just shear off, and you're pretty much f#$%ed at that point. I was very lucky and caught this early. My suggestion is to periodically check for loose bolts, it can be done during valve adjustments with no extra effort. See post #93 in this thread.
Standard Mechanics tools needed:
-Various Sockets 7,8,10,12,14 mm sockets
-Various crescent/open end wrenches 7,8,10,12,14,24,32 mm
-hex/ Allen wrench 5mm
-Torx sockets T25 and T30, I believe
-phillips and straight screwdrivers
-needlenose pliers
-Sharpies or even better - paint pens
-lots of rags/ cloths
-Safety Glasses
-digital Camera ( very helpful!)
"Special tools" needed:
-flywheel lock - you could use a bolt if you find one the right size, i bought one on ebay for $12
-fan holder- used in conjuction with the 32mm wrench to remove fan - again i bought mine on ebay for $20
Parts needed:
-1 high temp gasket sealer
-1 valve cover gasket ( optional) p/n 11127832034
-1 Vanos Gasket p/n 11367831938
-1 Vanos Solenoid Gasket (optional) p/n 11367831906
-1 Vanos Filter (optional) p/n 11361401971
-12 Bolts to replace defective bolts p/n 07119919965
Final note: This DIY will not cost you much money (under $50 w/ all optional parts), but it is time consuming. I don't
know how long it took from start to finish, as I did mine over several days, while I wrote up this DIY. I would say
that its definitely a weekend project if the M3 is your Daily driver. Having a helper would probably make this go a lot
faster. I am no mechanic, just a regular guy who didn't want a $6000 repair bill. I have some mad skills with a wrech... well, not really. Anyway this DIY is a general guide, it is not going into to detail about every single nut and bolt - I focus mainly on the actual VANOS repair itself. The bottom line - don't do this if you are not comfortable with your tools, your skills, and your knowledge. This process may be different for a SMG car, as this was done on a 2003.5 6MT car.
-----------------------------------------------------------------------------------------------------------------------
-------------------------------------------------------------------------------------
1. Make sure your engine is cool - sitting for 24 hours or more would be ideal. Disconnect the battery. Remove cabin
filter cover, cabin filter, and cabin filter housing. Remove top (black ///M) engine cover. Remove Air filter, and
airbox.
2. remove spark plugs - If you can't do this without step by step instruction, don't go any further with this DIY.
3. remove valve cover - again If you can't do this without instruction, don't go any further with this DIY.

4. remove left and right radiator shrouds - on the driver side one, I cut a slot into mine so I did not have to detach
the radiator hose. If you don't want to cut yours, you must detach the upper radiator hose, you will lose some coolant,
replace the lost coolant later. Take my advice - just cut it and save yourself the headache.

4. remove 14mm top oil bolt on vanos - put a cloth over top of this, as oil will squirt out like it had a big meal from
taco bell. Wear some safetly glasses. Don't lose the copper o-rings. follow this oil line down, there are two 10mm
bolts holding it to the engine block. These might be easier to reach later, once the radiator shroud is off.

5. Remove radiator shroud. There are 4 torx screws holding the shrould on each corner. Remove these, and unplug any
electrical connectors. You also have to remove the fan at the same time. It's really fun. Use the fan holder and 32mm
wrench to loosen the fan ( Counter-clockwise thread). Once the fan and shroud are loose, lift them both out together.


6. Remove the fan from the fan clutch. I put mine in a vice and took out the three 5mm bolts. Once the blades are off,
put the fan clutch back on the engine. You will use this to manually turn the engine with your 32 mm wrench. Now is
also a good time to get familiar with turning your engine by hand. Pay attention to how the engine sounds and what it
feels like to turn it by hand. It should turn quite easily. Also, you will see on your vibration damper, there are two
holes side by side, and then one hole all by itself. THe one all by itself is the one that shows you were TDC (top dead
center) is. More on that later. Practice turning the engine by hand a few times COUNTERCLOCKWISE.


7. Loosen all six hex screws on triangular caps on the end of the vanos. place a towel around and under triangular
caps to catch oil. GENTLY AND SLOWLY pry off the caps. Oil may squirt out violently, depending on how long ago your
engine was running. It may be a good idea to leave some of the bolts in slightly, so the caps cannot come all the way
off. Once the pressure is released from inside, take the caps completely off. If you let the car sit for a few days,
the pressure will dissipate. Wear eye protection. Set the caps aside.


8. using the 32mm wrench on the fan nut, hand turn engine (COUNTERCLOCKWISE) to 180 degrees from TDC. Insert the lock
inot the vibration damper. You will know you are at 180 degrees from TDC, because the valves for cylinder 1 will be
open. At TDC, the valves for CYL1 will be closed.


9. Now that you are 180 degrees from TDC, loosen the 3 accessible 10mm bolts on each intake and exhaust cam gears.
Don't remove them, just loosen them. I also made marks on my cams here to mark 180 deg from TDC to use for future
reference.


10. Remove lock from vibration damper. Hand turn engine back to TDC, insert lock into vibration damper. This is the
most important step of all. Make marks on your cams, cam gears, timing chains, so that you know where to re-align
everything when you re-assemble. I cannot stress this enough. I made marks in several different places so I had many
points of reference. You won't mess up your timing if you mark it before you disassemble. I used a sharpie, but a paint
pen might work also. Also take digital pics if you have a digital camera. This will help you later if you need to
double check everything to make sure nothing moved.


11. Remove the little chain holder thing. there are two 5mm screws and two 10mm bolts. Set that bad boy aside.


12. Now that you are at TDC, everythign marked, you are ready to disassemble. Loosen the remaining six accessible
screws on the cam gears. Get ready for the fun part!!
13. If you haven't already, reach down and unplug that Vanos solenoid plug.
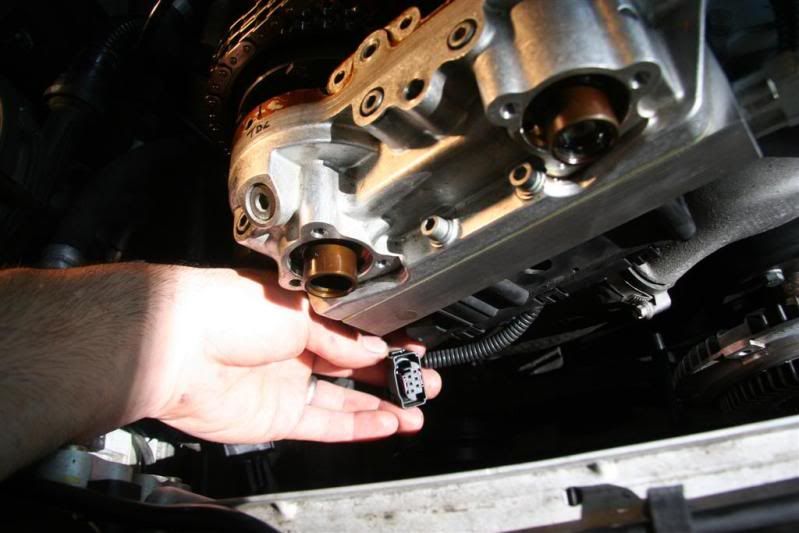
14. Now remove the three 5mm hex screws and the two 10mm nuts holding the Vanos unit on. Carefully start to slide it
towards the front of the car. There will be some resistance. The more you loosen the bolts on the cam gears, the less
resistance there will be. Once it has slid out about 1/2 - 3/4 an inch, you should see where the VANOS solenoids
connect to the internal VANOS helical gears. There is a 7mm nut and a 10mm nut. these are counterclockwise threads.
Take two small wrenches and carefully separate these. Once both the intake and exhaust sides are loose, you should now
be able to take the VANOS unit completely out. Set that aside, and be careful, that is one expensive piece!


15. Now sit back and admire the fine work of BMW engineers. Next you are going to remove the "spline hubs". These are
held on by the 6 bolts that you already loosened. Be careful when removing them, there is a plate and a spring behind
each one, and it likes to fall off when you take these off.
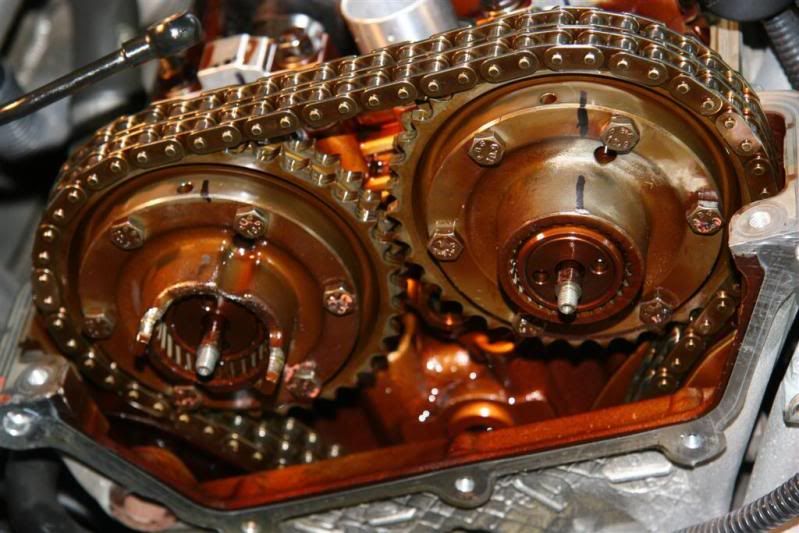

16. Once the spline hubs are off, set them aside. Now you can finally get at those pesky loose bolts. Mine were so
loose that I could literally take them out with my fingers and no tools. Some of mine had actually been "eaten"
halfway through. My egine was a ticking timebomb!! It was only a matter of time until these sheared off and blew the
sh!t out of my engine. Once I saw this, I was really glad I had gone to all this trouble. Anyway, this part is easy.
Just replace the bad bolts one by one. I used a tightening torque of 10 ft-lbs. The old bolts had an allen wrench head, the new bolts had a torx head.


17. Repeat the process for the exhaust side. Strangely, my exhaust bolts were not loose at all. Only the intake side
bolts were loose. Also, I noticed that the "new" bolts I bought from BMW had some sort of blue loc-tite on them. Looks
like BMW recognizes this problem... hmmmmm....


18. Once you're done admiring your shiny new bolts, and you are sure everything is back the way it needs to be, put the
spline hubs back on. Only finger-tight the six bolts. You will need these to be able to freely move a bit so you can
easily re-align the marks you made earlier and get the VANOS gearbox back on.
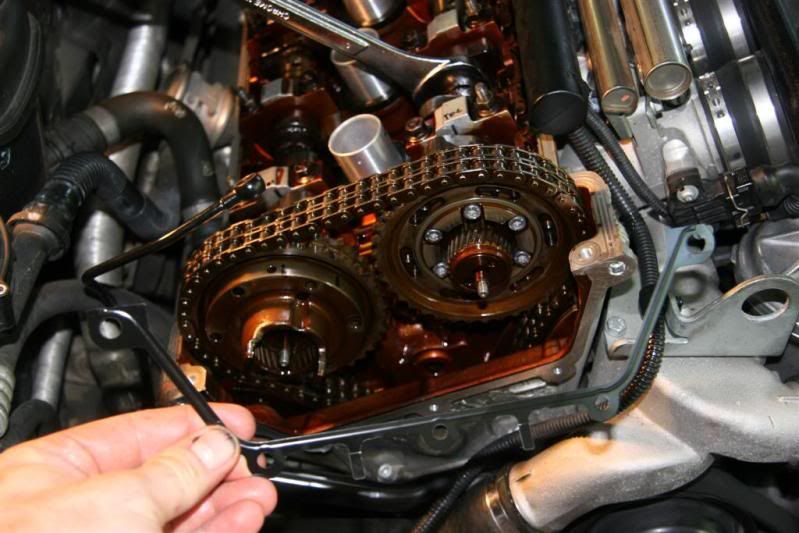
19. (optional) Now is also a good time to replace your VANOS solenoid gasket. Just take out the 5 bolts on top of the
VANOS unit. This is easy and these gaskets are known to leak. You might also want to replace the VANOS filter now too.
Just take out the 22m valve on the right side of the VANOS gearbox. There are tons of write-ups on M3F talking about
this.

20. Take a break. You need a lot of patience to get the VANOS unit back on. Had your break? Good, proceed... With the
vanos unit in one hand. and your two wrenches ( 7mm and 10mm) in the other, simultaneously align the Vanos unit and
tighten up the two mating shafts on the intake and exhaust sides. I have no pictures of this, because I only have 2
hands. It will take a few tries to get this done. It spent probably an hour getting this part done. Make sure the
markes you made previously line up. OH - and don't forget to replace the VANOS gasket that goes between the unit and
the engine. It would have been really helpful to have a helper at this point. But I'm a lone warrior, and I got it done
alone.
21. Now your Vanos unit is back on, all your marks are lined up, go ahead and replace the three 5mm hex bolts and two
10mm that hold the VANOS unit to the engine head.

22. Now its time to tighten up the three accessible bolts on your cam gears. It may be useful to put a 24mm wrench on
the camshaft itself, while you tighten the bolts. This will ensure your timing doesn't go off. You don't want your
camshafts to rotate at all here. Thug life , baby.

23. Once the three accessible bolts on the intake and exhaust cams are tightened, you are ready to turn the engine back
to 180 degrees from TDC. Take out the lock that is in the Vibration damper, and turn the engine to 180 degrees from
TDC. Insert the lock again. Tighten the three remaining bolts on the intake and exhaust camshafts. Remember to hold the
camshafts with the 24mm wrench to ensure they don't turn. Once everything is tight, remove the lock from the vibration
damper. Turn the engine by hand about 4 -5 revolutions. Make sure everything looks and sounds good, make sure there is
no resistance in turning the engine. Make sure all your marks still line up. The engine should turn freely and not make
any noises that it didn't make before. If you feel resistance, or if the engine gets to a point, where it won't turn, then your timing is off, and you either need to start over, or call up an expert. I was really careful, and my timing does not seem to be off at all. If everything looks good, you are ready to re-assemble!!
24. Plug in the Vanos solenoid.
25. Re-attach bolts holding the oil supply line to the top of the Vanos unit, and the 10mm bolt that attaches the line to the engine block.
26. Re-attach the triangular end-caps to the ends of the VANOS unit.
27. Re-attach the Fan to the Fan clutch.
28. Re-install the radiator shroud and the fan. Make sure everyhing is plugged back in properly.
29. Re-install left and right radiator shrouds.
30. Re-install Airbox
31. Re-install Valve cover ( new gasket might be a good idea here)
32. New spark plugs might be a good idea since you're in here.
33. Re-connect Battery
33. Re-install anything else that I forgot to mention.
34. Start up your engine! If everything was done properly, it should fire right up and be nice and quiet. Good luck Ya'll!
35. Check your oil. You are bound to have lost some during this process.
Disclaimer/legal:
Do this at your own risk, I assume no liability for the completeness or accuracy of this DIY. By attempting this DIY, you absolve me of any liability and assume all risk yourself. (sorry, Its the lawyer in me, i guess) That being said - I have gathered this information to the best of my ability, but I make no guarantees that this will work for you, etc. Don't attempt this if you don't have a good mechanical knowledge. This
procedure is NOT for the 1st time mechanic.
Credit:
Special thanks to Jorge, a BMW master tech whom I met on here. He told me about this method that doesn't require any of
BMW's pricey and impossible to find special tools. Thanks again dude, you rock.
Background/Story:
So basically the e46 VANOS has THREE main weak points, the bolts tend to back out of the cam gear/spline hub, primarily on the
intake side, the solenoid pack tends to fail, and some people have had their "tabs" break off the exhaust cam gear/spline hub. The 1st situation can lead to a totally awesome catastrophic failure, where the other situations usually don't. At first it seemed that the bolts coming loose problem is more common on later model S54's, however s54's from all years have now been reported to experience this.
The rumor is that a bad batch of bolts made it into production, and eventually these bolts will work themselves loose. Once this happens, the bolts can eventually shear and cause catastrophic destruction of the cam gears/timing chain/valve cover/ and possibly other parts. I had a noticeable rattle coming from under my valve cover. Once I replaced my loose bolts, my rattle went away completely.
Symptoms:
There are sometimes warning signs for loose bolts. If you hear a "marbles in a can" sound coming from under the front area your valve cover, loose bolts could be one of the causes. My car had a nice rattle prior to doing this repair, and after the replacement of the bolts it was very quiet. Sometimes there are no warning signs at all, and the bolts just shear off, and you're pretty much f#$%ed at that point. I was very lucky and caught this early. My suggestion is to periodically check for loose bolts, it can be done during valve adjustments with no extra effort. See post #93 in this thread.
Standard Mechanics tools needed:
-Various Sockets 7,8,10,12,14 mm sockets
-Various crescent/open end wrenches 7,8,10,12,14,24,32 mm
-hex/ Allen wrench 5mm
-Torx sockets T25 and T30, I believe
-phillips and straight screwdrivers
-needlenose pliers
-Sharpies or even better - paint pens
-lots of rags/ cloths
-Safety Glasses
-digital Camera ( very helpful!)
"Special tools" needed:
-flywheel lock - you could use a bolt if you find one the right size, i bought one on ebay for $12
-fan holder- used in conjuction with the 32mm wrench to remove fan - again i bought mine on ebay for $20
Parts needed:
-1 high temp gasket sealer
-1 valve cover gasket ( optional) p/n 11127832034
-1 Vanos Gasket p/n 11367831938
-1 Vanos Solenoid Gasket (optional) p/n 11367831906
-1 Vanos Filter (optional) p/n 11361401971
-12 Bolts to replace defective bolts p/n 07119919965
Final note: This DIY will not cost you much money (under $50 w/ all optional parts), but it is time consuming. I don't
know how long it took from start to finish, as I did mine over several days, while I wrote up this DIY. I would say
that its definitely a weekend project if the M3 is your Daily driver. Having a helper would probably make this go a lot
faster. I am no mechanic, just a regular guy who didn't want a $6000 repair bill. I have some mad skills with a wrech... well, not really. Anyway this DIY is a general guide, it is not going into to detail about every single nut and bolt - I focus mainly on the actual VANOS repair itself. The bottom line - don't do this if you are not comfortable with your tools, your skills, and your knowledge. This process may be different for a SMG car, as this was done on a 2003.5 6MT car.
-----------------------------------------------------------------------------------------------------------------------
-------------------------------------------------------------------------------------
1. Make sure your engine is cool - sitting for 24 hours or more would be ideal. Disconnect the battery. Remove cabin
filter cover, cabin filter, and cabin filter housing. Remove top (black ///M) engine cover. Remove Air filter, and
airbox.
2. remove spark plugs - If you can't do this without step by step instruction, don't go any further with this DIY.
3. remove valve cover - again If you can't do this without instruction, don't go any further with this DIY.
4. remove left and right radiator shrouds - on the driver side one, I cut a slot into mine so I did not have to detach
the radiator hose. If you don't want to cut yours, you must detach the upper radiator hose, you will lose some coolant,
replace the lost coolant later. Take my advice - just cut it and save yourself the headache.
4. remove 14mm top oil bolt on vanos - put a cloth over top of this, as oil will squirt out like it had a big meal from
taco bell. Wear some safetly glasses. Don't lose the copper o-rings. follow this oil line down, there are two 10mm
bolts holding it to the engine block. These might be easier to reach later, once the radiator shroud is off.
5. Remove radiator shroud. There are 4 torx screws holding the shrould on each corner. Remove these, and unplug any
electrical connectors. You also have to remove the fan at the same time. It's really fun. Use the fan holder and 32mm
wrench to loosen the fan ( Counter-clockwise thread). Once the fan and shroud are loose, lift them both out together.
6. Remove the fan from the fan clutch. I put mine in a vice and took out the three 5mm bolts. Once the blades are off,
put the fan clutch back on the engine. You will use this to manually turn the engine with your 32 mm wrench. Now is
also a good time to get familiar with turning your engine by hand. Pay attention to how the engine sounds and what it
feels like to turn it by hand. It should turn quite easily. Also, you will see on your vibration damper, there are two
holes side by side, and then one hole all by itself. THe one all by itself is the one that shows you were TDC (top dead
center) is. More on that later. Practice turning the engine by hand a few times COUNTERCLOCKWISE.
7. Loosen all six hex screws on triangular caps on the end of the vanos. place a towel around and under triangular
caps to catch oil. GENTLY AND SLOWLY pry off the caps. Oil may squirt out violently, depending on how long ago your
engine was running. It may be a good idea to leave some of the bolts in slightly, so the caps cannot come all the way
off. Once the pressure is released from inside, take the caps completely off. If you let the car sit for a few days,
the pressure will dissipate. Wear eye protection. Set the caps aside.
8. using the 32mm wrench on the fan nut, hand turn engine (COUNTERCLOCKWISE) to 180 degrees from TDC. Insert the lock
inot the vibration damper. You will know you are at 180 degrees from TDC, because the valves for cylinder 1 will be
open. At TDC, the valves for CYL1 will be closed.
9. Now that you are 180 degrees from TDC, loosen the 3 accessible 10mm bolts on each intake and exhaust cam gears.
Don't remove them, just loosen them. I also made marks on my cams here to mark 180 deg from TDC to use for future
reference.
10. Remove lock from vibration damper. Hand turn engine back to TDC, insert lock into vibration damper. This is the
most important step of all. Make marks on your cams, cam gears, timing chains, so that you know where to re-align
everything when you re-assemble. I cannot stress this enough. I made marks in several different places so I had many
points of reference. You won't mess up your timing if you mark it before you disassemble. I used a sharpie, but a paint
pen might work also. Also take digital pics if you have a digital camera. This will help you later if you need to
double check everything to make sure nothing moved.
11. Remove the little chain holder thing. there are two 5mm screws and two 10mm bolts. Set that bad boy aside.
12. Now that you are at TDC, everythign marked, you are ready to disassemble. Loosen the remaining six accessible
screws on the cam gears. Get ready for the fun part!!
13. If you haven't already, reach down and unplug that Vanos solenoid plug.
14. Now remove the three 5mm hex screws and the two 10mm nuts holding the Vanos unit on. Carefully start to slide it
towards the front of the car. There will be some resistance. The more you loosen the bolts on the cam gears, the less
resistance there will be. Once it has slid out about 1/2 - 3/4 an inch, you should see where the VANOS solenoids
connect to the internal VANOS helical gears. There is a 7mm nut and a 10mm nut. these are counterclockwise threads.
Take two small wrenches and carefully separate these. Once both the intake and exhaust sides are loose, you should now
be able to take the VANOS unit completely out. Set that aside, and be careful, that is one expensive piece!
15. Now sit back and admire the fine work of BMW engineers. Next you are going to remove the "spline hubs". These are
held on by the 6 bolts that you already loosened. Be careful when removing them, there is a plate and a spring behind
each one, and it likes to fall off when you take these off.
16. Once the spline hubs are off, set them aside. Now you can finally get at those pesky loose bolts. Mine were so
loose that I could literally take them out with my fingers and no tools. Some of mine had actually been "eaten"
halfway through. My egine was a ticking timebomb!! It was only a matter of time until these sheared off and blew the
sh!t out of my engine. Once I saw this, I was really glad I had gone to all this trouble. Anyway, this part is easy.
Just replace the bad bolts one by one. I used a tightening torque of 10 ft-lbs. The old bolts had an allen wrench head, the new bolts had a torx head.
17. Repeat the process for the exhaust side. Strangely, my exhaust bolts were not loose at all. Only the intake side
bolts were loose. Also, I noticed that the "new" bolts I bought from BMW had some sort of blue loc-tite on them. Looks
like BMW recognizes this problem... hmmmmm....
18. Once you're done admiring your shiny new bolts, and you are sure everything is back the way it needs to be, put the
spline hubs back on. Only finger-tight the six bolts. You will need these to be able to freely move a bit so you can
easily re-align the marks you made earlier and get the VANOS gearbox back on.
19. (optional) Now is also a good time to replace your VANOS solenoid gasket. Just take out the 5 bolts on top of the
VANOS unit. This is easy and these gaskets are known to leak. You might also want to replace the VANOS filter now too.
Just take out the 22m valve on the right side of the VANOS gearbox. There are tons of write-ups on M3F talking about
this.
20. Take a break. You need a lot of patience to get the VANOS unit back on. Had your break? Good, proceed... With the
vanos unit in one hand. and your two wrenches ( 7mm and 10mm) in the other, simultaneously align the Vanos unit and
tighten up the two mating shafts on the intake and exhaust sides. I have no pictures of this, because I only have 2
hands. It will take a few tries to get this done. It spent probably an hour getting this part done. Make sure the
markes you made previously line up. OH - and don't forget to replace the VANOS gasket that goes between the unit and
the engine. It would have been really helpful to have a helper at this point. But I'm a lone warrior, and I got it done
alone.
21. Now your Vanos unit is back on, all your marks are lined up, go ahead and replace the three 5mm hex bolts and two
10mm that hold the VANOS unit to the engine head.
22. Now its time to tighten up the three accessible bolts on your cam gears. It may be useful to put a 24mm wrench on
the camshaft itself, while you tighten the bolts. This will ensure your timing doesn't go off. You don't want your
camshafts to rotate at all here. Thug life , baby.
23. Once the three accessible bolts on the intake and exhaust cams are tightened, you are ready to turn the engine back
to 180 degrees from TDC. Take out the lock that is in the Vibration damper, and turn the engine to 180 degrees from
TDC. Insert the lock again. Tighten the three remaining bolts on the intake and exhaust camshafts. Remember to hold the
camshafts with the 24mm wrench to ensure they don't turn. Once everything is tight, remove the lock from the vibration
damper. Turn the engine by hand about 4 -5 revolutions. Make sure everything looks and sounds good, make sure there is
no resistance in turning the engine. Make sure all your marks still line up. The engine should turn freely and not make
any noises that it didn't make before. If you feel resistance, or if the engine gets to a point, where it won't turn, then your timing is off, and you either need to start over, or call up an expert. I was really careful, and my timing does not seem to be off at all. If everything looks good, you are ready to re-assemble!!
24. Plug in the Vanos solenoid.
25. Re-attach bolts holding the oil supply line to the top of the Vanos unit, and the 10mm bolt that attaches the line to the engine block.
26. Re-attach the triangular end-caps to the ends of the VANOS unit.
27. Re-attach the Fan to the Fan clutch.
28. Re-install the radiator shroud and the fan. Make sure everyhing is plugged back in properly.
29. Re-install left and right radiator shrouds.
30. Re-install Airbox
31. Re-install Valve cover ( new gasket might be a good idea here)
32. New spark plugs might be a good idea since you're in here.
33. Re-connect Battery
33. Re-install anything else that I forgot to mention.
34. Start up your engine! If everything was done properly, it should fire right up and be nice and quiet. Good luck Ya'll!
35. Check your oil. You are bound to have lost some during this process.


 artyman: you are being to kind methinks

Comment