Announcement

Collapse
No announcement yet.

rear suspension troubleshooting.

Collapse
X
 
  • Filter
  • Time
  • Show
Clear All
new posts

    rear suspension troubleshooting.

    so i have a slight issue with my rear suspension, i notice the excess movement of the rear passenger side wheel, its not much but its enough to hear that quite clunk when driving over a manhole cover and what not. so ive been trying to get the car up and get leverage on parts and feel for play as my mechanic cannot find what it is and neither can i, im not suspecting trailing arm bushings as they are look great however im concerned about the upper/lower control arms and the attachment locations the the wheel spindle/bearing holder possibly. im not really having any luck coming up with a technique to diagnose the sloppy component.
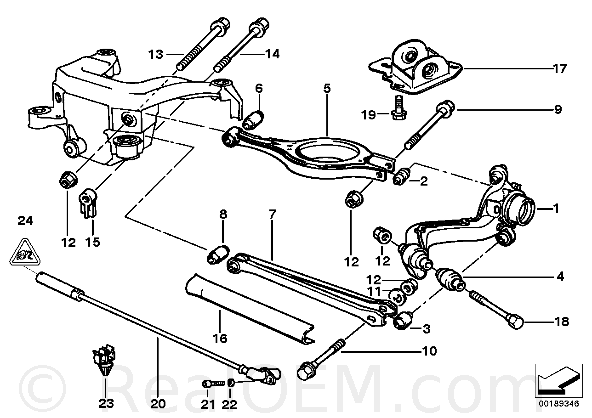


    im about to install ground control adjustable lower control arms and just maybe that could solve the issue but i highly doubt that those components are the culprit. if im not mistaken parts shown in the real oem image #2/3/6/8 are the only mounting surfaces from the differential carrier to the sprung suspension. the other attachment point is the trailing arm bushings and the upper spring seat. but my question is what parts should i be focused on trying to diagnose and how about can i attempt to do so, im not really having much luck giving that the movement is very slight. but i know this can be resolved without a complete rear suspension rebuild.


    the rear suspension of this car is rather complex in comparison to an e28/e30 setup and im stumped without a tear down, witch i was trying to wait until im snowed in this winter to do. the car is in need of a tie rod and i just installed shocks all around and rear shock mounts so its out of alignment. the car is in the air at the moment with the front end apart to replace tie rods/swap strut hats and install adjustable rear control arms, but ive ran into a slight issue with a slightly sloppy component i cannot locate.... im not one to wait until components become apparently trashed to replace them. so any input is very appreciated.


    my diff carrier bushings appear to be intact and being the solid M bushings am i correct to rule out the diff carrier as a possible issue? the slop/sound only appears to be on the rear passenger side and only exerts it self when i drive over bumps and such, so far no amount of force on components has shown me the bad one, however i have not busted out a prybar and started prying on things to try and locate the slop. im afraid of bending things.....

    #2
    Check:

    -RTABs

    -upper and lower outer ball joints

    -upper and lower inner ball joints

    -diff mounts (two front, one rear)


    I'd focus on the outer ball joints.

    Comment


      #3
      Originally posted by shaeff
      Check:

      -RTABs

      -upper and lower outer ball joints

      -upper and lower inner ball joints

      -diff mounts (two front, one rear)


      I'd focus on the outer ball joints.


      im kinda leaning twords outer ball joints, however they have no movement by hand so im thinkning of grabbing them with a set of channel locks and seeing if they wiggle or something tomorrow, ill report back. unless someone has a better troubleshooting technique

      Comment


        #4
        Originally posted by scoobiedoo2029
        im kinda leaning twords outer ball joints, however they have no movement by hand so im thinkning of grabbing them with a set of channel locks and seeing if they wiggle or something tomorrow, ill report back. unless someone has a better troubleshooting technique

        First do not rely on pure visual inspection of your RTABs or most any of these bushings, you cannot possibly see through the RTAB cassette or past the subframe and into the sides of the bushings well enough to see if they are cracked or not. Any cracks and they need to be replaced. The best way to inspect them is to pull the cassette out of the chassis cavity and remove the cassette from the RTAB and have a good look at the rubber after you throughly clean off any grime on the rubber. Stick a bolt though the bushing and move the bolt in a fore and aft direction and look for any fine lines or cracks in the rubber bushing. If one is bad replace both before you get the car aligned again.


        The most likely bushings to fail if indeed a rear suspension bushing or balljoint is the culprit are: RTABs, outer upper balljoints and then lower outer balljoints ('95's use a bushing on the lower trailing pivot that you should upgrade to a balljoint just like the one above to help make them last longer and reduce artificial spring rate), inner lower bushing and inner upper bushing. If one side (left or right) is bad replace the opposite side part too or chances are you will just have to go back and replace that one next once the new part starts to stress the worn opposite side.


        When you pop the RTAB out of the cassette install a set of solid RTAB limiters while you are in there to help increase the life of your RTABs. If your RTABs are 100% fine line or crack free it would be a miracle given the age and typical mileage of these cars. But if the RTAB is good then consider the outer upper balljoint. These are easy to see wear on but you have to remove the spring load from the upper wishbone to reliably check these balljoints. All other bushings need to have a visual inspection there is just no other way to test them. I had to take my E36 M3 completely apart to get good enough access to the bushings after two well known shops said they were fine. Upon complete disassembly I found that virtually every bushing and balljoint in the rear suspension, diff bushings and all of the subframe bushings were shot to differing degrees but ALL required replacement except for one of the inner lower bushings and one of the outer lower bushings. There are a lot of bushings and balljoints back there!


        Did you install RSM reinforcement plates and good RSMs when you replaced the rear dampers? Are you certain that the RSMs are assembled in the correct order and that all of the damper and RSM nuts are torqued down to spec? Double check this as there is very often some noise found to be caused by a loose damper or RSM fastener that gets worse due to the much firmer new dampers. Worth checking out IMO but I was not there during the installation of the dampers. Also check the lower damper bolts and the bushings and bushing sleeves on the damper bottoms. There should be a flanged bushing sleeve with the metal flange on the inside under the head of the lower damper bolt. If there is not you need to turn the damper bottoms around to get the washer or flange under the damper bolt not next to the trailing arm.


        Another possibility are one of the three diff bushings and the subframe bushings. The diff bushings are possible depending on mileage and how much of an animal you are when shifting. The subframe bushings are subject only to age and serious abuse so unless you have some mileage 100K+ on them unlikely unless you are making big power or bang the gears a lot with big tires.


        HTH!

        Comment


          #5
          I wanted to bump this thread because I have to do my upper control arm (item #5 i believe) on my drivers side rear because it was tweaked in an accident. Is there a DIY on doing that? Will i need a spring compressor since the spring perches on the upper control arm?

          Comment


            #6
            Originally posted by M3F1RST
            I wanted to bump this thread because I have to do my upper control arm (item #5 i believe) on my drivers side rear because it was tweaked in an accident. Is there a DIY on doing that? Will i need a spring compressor since the spring perches on the upper control arm?
            Before you lift the car, mark the position of the UCA with respect to the subframe so you can torque it down with the bushing/arm in the correct position when you put it back together.


            Put the rear end up in the air and take the wheel off, release the e-brake (it won't come out with the brake on), and you'll be able to pull the spring right out.


            Take a wheel bolt, thread it into the hub a bit, put a jack stand under it so you have something supporting the RTA when you pull the UCA off.


            Take off the swaybar link. Take the bolts out of the subframe and the RTA and remove the UCA. You'll have a few wires clipped on to it, so watch out for those.


            When you go to bolt it back together, use a jack to bring the arm up to the previously marked position so when you torque that inner bolt down, the bushing is preloaded correctly and won't twist when you drop the car back down.

            Comment


              #7
              I wish i had pics, I'm much better w/visuals :/ So I don't need a spring compressor right? It'll be easy to just take out and pull back in

              Comment


                #8
                No you won't need a spring compression tool.


                Sorry for the crappy resolution but here is something I quickly threw together. Note that in this picture the rear trailing arm is not in place.

                Comment


                  #9
                  Thanks, wish i could zoom in in that, I can't make out all the words lol.

                  Comment


                    #10
                    I m not sure Joe went to school for communications


                    oh...Hi Joe!

                    Comment


                      #11
                      Engineers can't communicate with people that aren't engineers. Haven't you seen office space?


                      Basically all that picture shows is the upper control arm. The top arrow is to the inner control arm bolt and is the location where you will need to make the alignment mark that fiveeightandten mentioned.

                      The middle arrow is where the sway link is at and says that you can remove the nut for that on the under side of the upper control arm and then remove the rest once the upper control arm is off the car.

                      The bottom arrow is for the outter control arm bolt which attaches to the rear trailing arm, pretty basic on that one.


                      A better view but without arrows


                      Sorry, I was being lazy before

                      Comment


                        #12
                        Could you please point out where to make the mark? Thanks.

                        Comment


                          #13
                          The pictures aren't at a good angle really. Its not hard though, you just need to have two marks (one on the subframe and one on the control arm) which are directly opposite each other (basically are a continuous straight line).


                          The exact place you put the marks isn't critical. They are just used as an indicator so that when reinstalling the upper control arm, you have a nice indicator of the original angle before you tighten the inside bolt down so everything is the same as before you removed it.

                          Comment


                            #14
                            Originally posted by M3F1RST
                            I wish i had pics, I'm much better w/visuals :/ So I don't need a spring compressor right? It'll be easy to just take out and pull back in
                            No compressor needed.


                            These pics may help...


                            You want to mark where the UCA meets the subframe, shown here, so you can align it correctly when you tighten it back down. This will make sure the bushing isn't twisted at ride height.


                            This is what the subframe looks like dropped out of the car...Just picture how the angles of the control arms change with suspension travel. This twists the bushings. They're at rest (not twisted) at ride height (note how my UCA's are off the ground. It's the bushings keeping them up there). You want to reproduce that by tightening them down at ride height. Mark the arms so you have a reference. The other way to do it is to just put the rear up on ramps. Marking it is a little easier though, and more accurate, as it takes a bit of rolling for the suspension to settle.


                            Comment


                              #15
                              this thread turned out rather informative. so i need to replace my ball joints in the rear. i have found this DIY that seems very simplistic however i have some question on what parts to use.


                              DIY: http://www.m3forum.net/m3forum/showthread.php?t=255760


                              so autohauz has has rear ball joints listed as part number 33321140345 for $36

                              im assuming to use the upper ball joint for the lower as well, seems from some searching forum users recommend this.


                              link: http://www.autohausaz.com/search/pro...ount%20Bushing


                              however, i see nothing for the inner ball joint of the upper or lower control arm, luckily im about to install adjustable rear control arms and by nature they include new inner lower bushings but my uppers are still original. and id like to do something about uppers if i can and the car is apart.


                              im planning on getting some AKG 80a poly RTAB's to install along with the new rear ball joints, im after the simple installation. and the price is right as OEM bushings and limiters are around the same price. im leaving my subframe/diff bushings alone and hoping for the best after 135k miles.

                              Comment

                              Working...
                              X