

Instead of buying $160 checking tool, we can verify the 90 degree angle with a $10 carpenter square with a pin.
instead of using the special cam setting tool to set the cam +1 or 2 degrees advance, we can just set them at 90 degrees with carpenter square, and set the crank at 2 or 4 degrees BTDC to compensate for chain slack.
-
Ok awesome thanks for all the help! I feel much more confident moving forward here. I’ll post an update once I finish if any issues arise on first start after re-assembly.Leave a comment:
-
I understand nowOriginally posted by AZ-LSB-M3 View Post
So the timing is just a tiny bit retarded which should cause no error. As I said, if you really want to have the bridge pin falls in after rotating the crank 2 turns after timing set, then just set the crank at 0.5mm BTDC then when checking at TDC the pin will fall in.
Leave a comment:
-
After the bolts are tightened to spec and engine is rotated back to TDC. Basically, the wrench is being used to manually adjust the cams, similar to when Beisan states in the instructions to retard the exhaust cam during disassembly to push the VANOS exhaust piston out. To know which way to nudge the cams, the pin is installed into the bridge and the bridge with pin is inserted into the cam. The bridge is lifted on one side and the lifted side is the direction to nudge the cam to get the bridge to sit flat.
It really is not necessary because the cam setting pin won't line up perfectly again after rotating the engine another 720 degrees back to TDC.Last edited by Slideways; 04-22-2025, 02:34 PM.Leave a comment:
-
This is what I’m referring to when I say 1 and 0. The little hook at the end of the hold where you slide the TDC pin into. Here you can see it’s slightly passed the 1. It’s at this crank position where the timing pin slides into both cams with no issue. It’s barely passed the 1 like 0.5mm maybe, maybe even less but enough that the TDC pin doesn’t go in.
Slideways, that’s honestly quite a relief to hear as I’ve done this process well over 10 times trying to get the pins to slide in perfectly! When you say nudge the cams a little, do I do that with everything torqued down to final spec or do I have to loosen the bolts on the hubs again?Leave a comment:
-
Due to the chain might be a little slack on the pulling side, you can cheat this to have better timing by not setting the crank at TDC but instead set it about 4 degrees BTDC at the beginning of the procedure.Leave a comment:
-
The setting bridge has the pins at an 88-89 degree angle, not a true 90. I think the purpose for this was to adjust for chain slack.
I recently obtained a bunch of special tools for the S54, S62, S65, S85 and more from a retired BMW engineer, and he told me in early S54 testing they were actually putting a valve shim under the bridge to play with chain slack and timing. I have a prototype S50/S54 timing tool of which the angle seems to be adjustable.
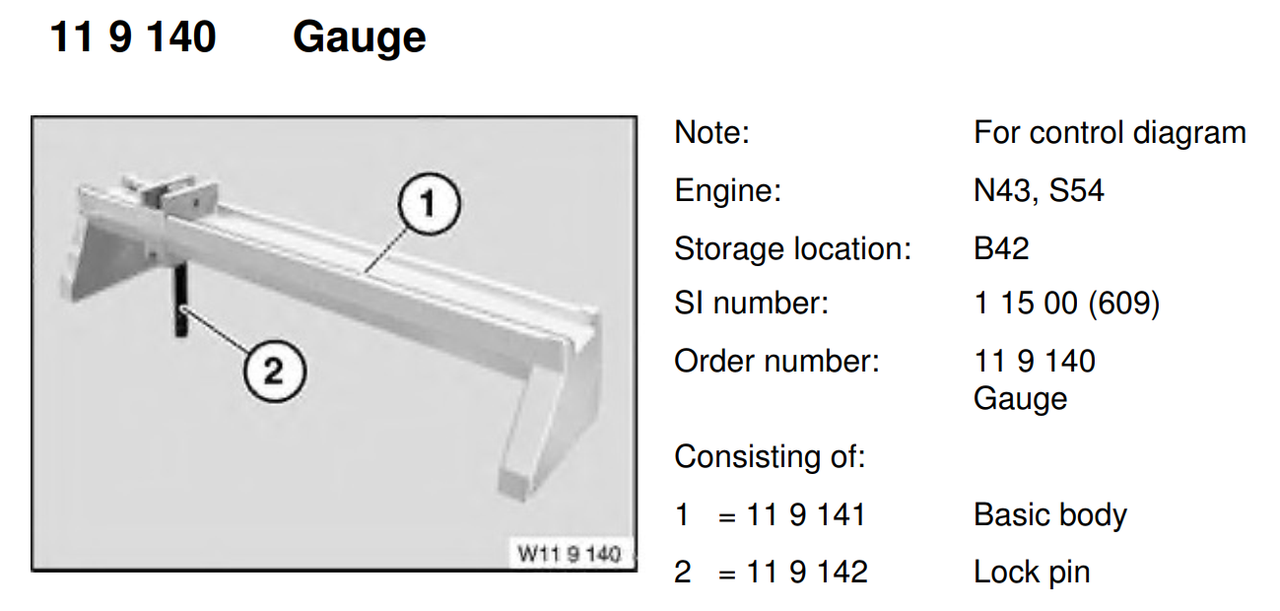
You are meant to set the timing with the tool you have, and after turning the engine over check the timing with special tool 83300493750 which is actually a true 90. In my personal experience if the pin didn’t go in on the setting tool, the checking tool would mostly send up sitting perfectly.Leave a comment:
-
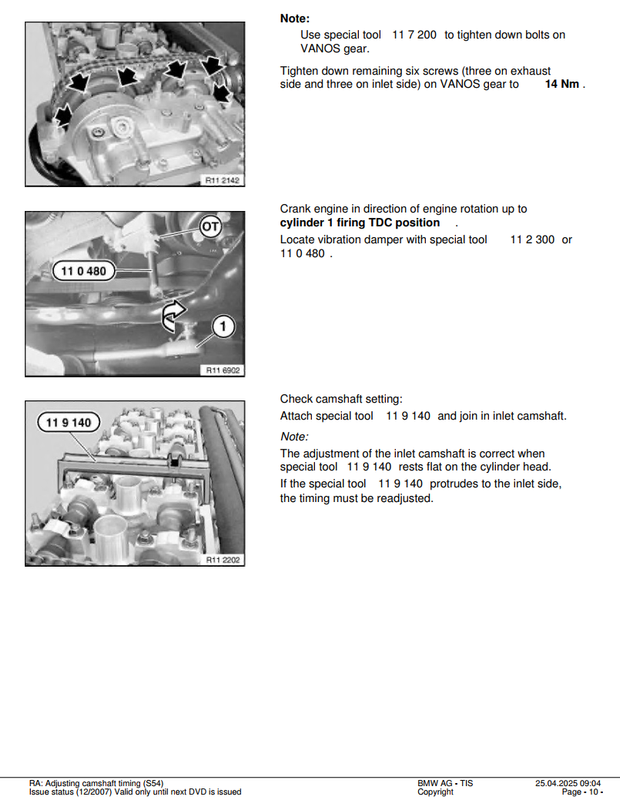
You were good the first time you set the timing. Having done a VANOS removal and installation a few times now, I have never had the pins slide in perfectly after turning the engine. Just like you, they are perfect before rotating the engine but slightly off after. Also, the bridge was lifting a bit on the intake side for the exhaust/intake cam or both. TIS says that the checking bridge, which no one uses, can have no lift on the intake side. Technically, we are using the wrong tool to check cam timing. Almost everyone only buys the cam setting tool and not the checking tool.
To satisfy any OCD, a little nudge of the cam/s with the 24mm wrench will get the pin to slide in perfectly again. This is after rotating the engine back to TDC.
The VANOS will adapt if there is a slight error; typically it shows 1 or 2 degrees off. In other threads, a few people have posted their adaptation values. There were some where it has adapted 4 degrees or more. One person mentioned that their factory engine came like that.
Most recent result was -2.x on the intake side and 1.x on the exhaust side. The bridge was slightly lifted on the intake side for both intake and exhaust cam. It didn't need to be perfect and it was not going to be.Last edited by Slideways; 04-22-2025, 02:12 PM.Leave a comment:
-
I’m sure the tensioner is torque down, but it has a weak spring load so doesn’t help much. TIS should specify to use a solid tensioner tool for this procedure as bmw instructions for non-M vanos timing. You just remove the spring and replace with a socket to convert to a solid tensioner, then hand tighten it to have a tight chain. DONT TORQUE AS THIS CAN BREAK THE GUIDE.Leave a comment:
-
1. "but I’m still getting a bit of lift on the intake side."Originally posted by AZ-LSB-M3 View Post
Not so sure this is about the EX cam timing or the IN cam timing. I can't read your mind.
2. Felt slightly less tension because the sprockets carried no load at this step, as with the hub bolts loosen the sprockets are disconnected from cams.
3. I have no idea what this means; what is position hook, and what are 1 and 0?
4. The piston caps can be removed anytime and this doesn't change the timing. Keep in mind the inside of the cap is not a flat surface but it has a rise circle.
Leave a comment:
-
Hey Sapote, previously I attached the spline shafts to the vanos directly before bolting up to the head and going thru the procedure of pre-tensioning and timing.
Today, I tried the method you mentioned in the other thread where instead of attaching the splines to the vanos, I inserted them into the hubs directly about 5mm or so in, then pre-tensioned and then bolted the vanos up and slowly torqued the two hex bolts until the vanos bolts to the head. This method seems to work a bit better since the timing tool seems to be going in a bit better than before but I’m still getting a bit of lift on the intake side.
I measured the lift using the OEM bmw feeler gauges and the .45mm guage goes underneath but just barely so I think it’s still acceptable. I rotated the engine a few times to confirm and its the same timing every time.
What’s interesting is I think chain slack is my issue. When I had the vanos off and the hubs loosened, I felt slightly less tension on the chain. Once I bolted the vanos up, performed your recommended timing procedure, and rotated the engine a few times, the chain was much tighter.
When I set crank position hook to between the 1 and 0 (just barely after the 1), the timing tool goes in perfectly with no issue.
Can I remove the vanos caps to check if the pistons are all the way back?Leave a comment:
-
OP, after the splined shaft was inserted into the hub, how did you know if the piston was still bottomed on the front cap? So before tightening the vanos to the head, the pistons must be checked to ensure they are bottomed on the caps; if not bottomed then this can cause retarded timing.Leave a comment:
-
Follow TIS, under the section setting the timing, do you have ISTA? i can post it for you?
you are skipping the pretension stage on the hubs before fitting the vanos, that is why you are having trouble, pretension after, pulls the vanos pistons forward
Follow Sapote, He is spot on and got mine perfect = Read this entire thread from start to finishLast edited by BL92; 04-21-2025, 01:10 PM.Leave a comment:



Leave a comment: