-
I just found out that the crankcase drain hose was disconnected again (the small one under the airbox). I think the fitting is worn out and its popping out of place. Not sure that really constitutes a vacuum leak anymore since its before the throttle bodies so TPS based airflow calc doesn't care and MAP won't care either. -
I'm confident in my splices but I'm also splicing off of a whole bundle of already extended MAF wires from the previous owners adapting the e46 harness to the e36 and I can't see what's under the shrink tubing. It's only 3 wires and I have like 15 different colors of tefzel so probably worth just running 3 new wires and not sharing a ground with the IAT.
Also on map sensor scaling: I have the Bosch sensor and martyns tool shows it on the default CSL map scaling. I assume that's correct?Last edited by 3staxontheradio; 02-16-2026, 05:43 PM.Leave a comment:
-
Hey just confirming that you definitely have the MAP sensor gain and offset parameters set correctly for whatever MAP sensor you're using? I'm presuming you've already checked that, but thought I'd mention it.Originally posted by 3staxontheradio View Post
If you're completely confident that that is correct then I'd really start to suspect something in the wiring. I encountered an issue with my first wiring loom (which I was never able to measure or identify) that caused very short duration interruptions in signal. These interruptions weren't visible at 5HZ via TestO and only became apparent when logging at 100Hz with Gauge.S. I know you're very confident with your wiring, but I was too with mine and it proved to be the issue - just thought I'd mention that.Last edited by karter16; 02-16-2026, 05:09 PM.Leave a comment:
-
Originally posted by 3staxontheradio View PostLeave a comment:
-
I'm running it off of the brake booster line. Fitting that in the E36 chassis was actually a little challenging, there is less space behind the airbox than on the E46.
I'll check my LTFT next time they are built up but I don't remember seeing huge values in there, I cleared them out today without looking again. This will be a lot easier to diagnose once I get my gauge.s installed and can data log easily.
In the time I have owned this car (just over a year), I have done most of the proactive maintenance for fueling, spark and sensors:
Injectors serviced
new coil packs
Fuel filter was supposed to be recent when I got the car. It's also worse on the low end than up top and a fuel filter doesn't really make sense for hwat im seeing
crank angle sensor
I haven't replaced the o2 sensors yet. I have one of them on hand and need to order the other one.
I haven't had a car on an alpha-N or TPS based tune before. MAF tunes obviously gets thrown off badly with vacuum leaks, speed density doesn't really care that much. I would guess that alpha-n Is pretty sensitive to vacuum leaks throwing off fueling at the bottom end of the rev range like a MAF tune?Last edited by 3staxontheradio; 02-16-2026, 02:49 PM.Leave a comment:
-
What are your long term fuel trims? A MAP sensor issue is unlikely to cause meaningful LTFT drift on its own - you may have another hardware issue.
Also as a test with the mullet - it should drive pretty well with the MAP unplugged, automatically defaulting to alpha-n. If it gets better after unplugging the MAP sensor, then it’s highly likely you’ve got an issue with MAP. Remind us which MAP sensor you’re running? The Kassel one in the air rail is known to cause issues as it’s pulling just from one cylinder and not the average of all cylinders.Leave a comment:
-
Also does anyone have a good understanding of how MAP is integrated into the CSL tune? I have tuned speed density with a megasquirt on my old miata. I'm guessing the CSL tune isn't running speed density or using MAP as the main load axis but it's using it to apply a correction factor at longer timescale?Leave a comment:
-
I have had the karbonius box on the car for about a week- the sound is great but I'm having some issues I think are related to my map sensor install. I also updated the bootloader with MpowerE36's tool and am currently running Bry5on mullet tune. The car is down on power, especially on the low end, and throttle response is lazy. When I first did the airbox install everything felt great except for some hiccups with the HTE tune that happened to be on the DME before I got it- not faulting the tune, its not for my car and I know nothing about it other than it says its an HTE tune for someones CSL car.The lazy low end power and throttle response happens with both tunes and if I reset adaptations it gets better temporarily. Long term trims are picking up bad data and throwing the car fueling off. Also with both tunes I get some on throttle hiccups and hesitation at medium to high loads and 4000ish RPM. I think this is just a fueling issue in line with whatever is throwing long term trims off.
I wired my MAP sensor by splitting the IAT ground off of the MAF harness (its all properly crimped open barrel splices, not worried about wiring and crimp quality). Martyn has a very helpful MAP sensor testing guide here:

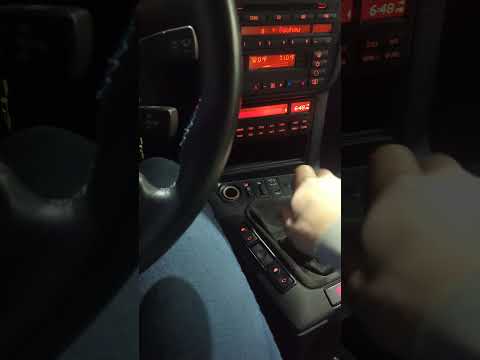
I'm getting slightly different voltages when the car is off and when the car is idling, I think my ground location is causing a signal offset and I'm curious if other people have also grounded both MAP and IAT off of the same wire, its pin 25 on X60003.
Key in position 2 I get 4.02 volts and idling at about 900rpm I get close to 1.3v for and a 360 mbar reading. I live at about 400 feet of elevation so that doesn't really account for the difference in voltage when the car is off at position 2. Atmospheric pressure where I am should be 998.6 mbar which is a much smaller voltage difference.
Also very curious to hear what other people with correctly running CSL cars are getting when they run the testo tool linked from martyns article. FWIW the tool is x86 not x64 and it took me a minute to figure out why I was still getting MSVCP100.dll errors when I have Visual Studio C++ redistributable packages installed (I only had x64 version).Attached FilesLeave a comment:
-
-
I started the install for my karbonius box. I'm waiting on a replacement for the vacuum line that comes off the back of the air rail because I found mine was pretty deteriorated. Also I weighed the OEM box + filter setup I had before vs the karbonius box with the filter installed. 5.782kg for the old setup and 2.474 for karbonius box. I had already transferred all 6 of the couplers would I would guess are around .25kg. Still, not bad for bonus weight loss on the front end.
I decided to wire mine off of the maf wiring and move x60003 pin 1 to pin 18. The wiring notes I made look like this:
I also got my BFI shift knob installed:

Lastly I really need to de-tangle and deal with the extra fuse holders, relays, and excess e46 m3 harness wiring that is being crammed into my ECU cubby:
Leave a comment:
-
My PS pulley has had some wobble in it since I got the car and it seems to be getting worse. I also want to install an underdrive pulley kit so this seems like a great time to do it.
It's a street car but not really a daily. I don't have a work commute and it's used for a mix of school pickups and back roads. Suggestions on an underdrive kit for my use? It doesn't look like the diameters or the underdrive % are listed by the kits I have seen. Rogue and VAC both have kits that look similar, priced similarly but it would be nice to see the diameters to compare them.
Leave a comment:
-
Updates for my car:
I did some bandaid exhaust modifications to fix the leaks and I cut out the damaged cat and for now am running catless. This is not my long term exhaust for the car. There are a few minor pinholes leaking a little bit and I'll probably try to patch them with the exhaust in place soon but its close to leak free now.. I ended up grinding out the birdshit welds as best as I could and then feeding mild steel mig, running a little hotter than normal, into the joints. I'm sure the inside of all these welds is atrocious but I don't think I made that any worse than what it was. I did tig in the new stainless tubes for the cat delete and being pretty new to tig it was an adventure. I guess I didn't clean the inside of the old tubing well enough and at a few points I was trying to manage a lot of contaminates bubbling there were into the puddle, exploding pinholes, and generally making it a pain in the ass. I also opted for solar flux instead of back purging because back purging 4 joints in this whole exhaust felt like and absolute waste of argon.
I also reworked the pivots in my shifter kit. I had previously copied Rogue's approach and used delrin flange bushings inside the clevis joint and those bushings ran on a high precision shoulder bolt that was loctite and then nutted into place. This ended up causing a lot of issues. Mainly delrin is a little soft and in order to eliminate slop/play in the system the clevis needs to fit tightly around the flange of the bushing so it is contained on the outside face. In this design the motion is constrained in two places, the inner diameter of the delrin bushing where it rides on the shoulder bolt, and the outer face of the flange bushing where it slides against the clevis fork. The problem with this is that in order to eliminate slop the clevis has to be tightened to the point where it starts to bind. That binding force wears the delrin and also imparts a small torque onto the shoulder bolt and between vibration and that force I found the clevis was loosening over time.
Rogue works around this by using pins and not fasteners for the bushings to ride on. They also split the DSSR lengthwise so you can add tension to the design as the shoulder bushing wears.
I chose to swap everything over to bronze bushings and intentionally only constrain the joint along the ID/OD of the bushing and shoulder bolt so the clevis fork isn't interacting with the bushing directly. I also drilled out my rogue selector bushing and pressed in a bronze bushing in it's place. There is just barely enough meat to accommodate the larger OD of the bushing I used. I also modified my shifter and made an aluminum reducer to adapt it to the new bushing ID. Overall the feel is now really really good. No more rubber in the system and no more delrin. It all moves freely, very precisely, and without any slop, give, or softness.
The shifter feels fantastic but I'm getting pretty irritated with the behavior of this FX250 clutch material. Its gets really grabby when its heated up but in stop and go or city driving it's difficult to predict when it will decide to grab early. I have lurched the car a few times and every start from a stop feels like it takes a bunch of concentration and like I am playing a clutch behavior lottery. It's a non issue when shifting while driving, just starting from a stop is not pleasant.
Last edited by 3staxontheradio; 01-22-2026, 06:53 AM.Leave a comment:
-
Lots going on over here between work issues and other car stuff but I just bought a cheap 330i dedicated track car. I got this so I don't try to do race car stuff to the E36 and I can keep that a nice streetcar and not let my need to make things lighter, louder, and more feedback, ruin it.
Topaz blue 2002 330i plus the clear coar has some sparkles added which my kids enjoy 🦄
150k miles, 275s on 18x10s with over fenders, 225whp on a dynojet, I think it's around 2800 lb flat with no driver, mix and match suspension right now with konis in the front and dgrs in the rear, os giken diff, willlwood 4 wheel kit running m3 rotors and brake ducting, some mix of aftermarket track oriented bushings I haven't had a chance to dig into yet, a weld in roll bar (a few cheesey details with that I need to address), and safety equipment. My old 330i sedan is also topaz blue so I have a perfect donor vehicle for parts already. The exhaust on this car is interesting. Some form of cheap catless headers into the stock E46 center section and then a small resonator is added before the diff and then it's just two straight pipes at the rear. It's shockingly quiet at low speed and low load doesn't really stand out. When you get on the gas it gets very loud. I'm a little surprised by how quiet it is the rest of the time though. I don't think it's actually any louder than my E36 s54 with stromung muffler that throttle tip in or idle and I can drive it through the neighborhood without irritating everybody pretty well. When you punch the gas it's very rowdy sounding, Even just on a blip for a downshift which is pretty fun. I'm not planning to make this car super nice or really try to make it faster. I want to look at the safety equipment install, fix some minor, and update all the maintenance for track season next year and just keep this as a seat time vehicle. Previous owner was a pediatrician and not a mechanic or fabricator. Plus side is that he had the money to keep it reasonably maintained but there's some stuff that needs work (you can see some diy for hitch install support bracing in there 😬).
The car also came with a splitter he didn't run and I've got a 9lr wing if I ever want to start adding some aero.
My next to-do list on the E36 is to fix the massive exhaust leaks. There are a handful of mig welds that are pretty sloppy with huge holes. I don't think I can possibly get these to be clean, I'm not going to back purge, and I'm sure they weren't back purged the first time when they were MIG welded. I'm just going to grind them down as best I can and then Tig in filler until they're airtight. Just a Band-Aid this until I have time to build the full exhaust for the car.

I still have a few more things I'm waiting on for the CSL box install and then I'll do that too.Last edited by 3staxontheradio; 11-17-2025, 07:24 AM.Leave a comment:
-
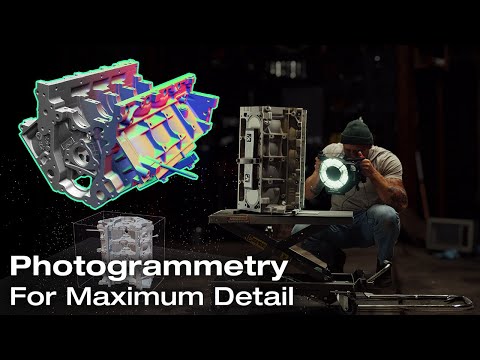
I I use a photogrammetry setup with an older Nikon dslr (d800e) that has changed a little over the years but the main important points are:
Flash lightning so you can handhold at like f/11 and have every image be 100 percent tack sharp
A really good scale reference
Using reality capture to process and having plenty of workstation power and time for processing.
I use a cross polarized ring flash right now (so the light from the flash is polarized and then the lens has a polarizer on it, they are indexed so specular reflections from the ring flash are cut out). Scale is April tags on a scale bar that my processing software picks up automatically.
Photogrammetry is a much much more cumbersome and labor intensive route but you can get extremely high levels of detail that aren't really doable with a dedicated scanner. Really your only limitation for scan quality becomes how close your lens can focus. You could switch to a macro lens and resolve incredible small sub millimeter details if that ever mattered.
Promo video from my business showing an LS block scan:
 Last edited by 3staxontheradio; 11-17-2025, 05:33 AM.
Leave a comment:
-
What are you using to scan? You mentioned earlier that you’d taken a lot of photos?
And it looks like they designed a clip for the battery cable! Nice, would love something simpler than my p-clamp setup.Leave a comment:
Leave a comment: