
Originally posted by attbimmer
View Post
-
Thanks. i sent them a message for an SMG wheel, hopefully they respond. -
Tonight I replaced the oil level sensor that was bad, so that is working properly now and the associated faults are gone. Still waiting for the TPS, so I decided to take a look at the new brakes. The front requires removal of the front hub in order to add a small spacer behind it. 3' breaker bar pretty easily removed the 46mm nut. I was somewhat dreading how hard it may be to get the hub off, but actually it slide almost all the way off by hand. Just needed a few light taps with the side of a hammer to get it off the last part. With the spacer installed and hub reinstalled, the only other modification is to trim the dust shield in the lower front corner to make room for the rotor. After that everything bolts up like usual. I just put the rotor and caliper on loose just to see how they look. I still need to replace the brake line and install pads, but just wanted to see how it looked with the wheel on. Overall I'm pretty happy with the look. Also the install is easily reversible (would just need new dust shields), which I also liked vs some other options out there and uses all factory F80 parts.


Comment
-
Those brakes and wheels are just Lovely!Comment
-
Last night I got the right front done. On that side the front hub did not want to come off as easily. A little persuasion with a mallet got the hub off, but it left the inner race of the bearing on. I didn't have a puller that could fit onto it since it is pretty tight and I wasn't able to pry it forward with a flat head. Before ordering a smaller puller that would fit I decided to put a torch on it for a bit. After that just a little pressure from a flat head and it popped forward and slide almost all the way off by hand. The last bit I had to use a puller and then everything was off.
It was already pretty late at this point, but I got the hub cleaned up, put a bit more grease in the bearing and then happily went to put it back on. Just as it was nice and snug on, I realized I forgot to put the spacer on behind it which was the whole reason for taking it off in the first place. Not a happy moment, but I couldn't bear to just leave it so I went through the same process of removing it again. After that everything went fine and the brake lines are connected in the front now as well.
Tonight I tackled the rear. This was a bit easier since no hub removal to deal with. Just needed to trim the dust shields, add the spacers behind the rotors and then get the calipers and lines installed. The calipers mount with an ecentric steel insert vs the stock ones. In order to fit them you remove the stock and then I slightly filed down the ribs left from the knurled stock inserts so that the new ones could rotate somewhat freely otherwise it would have been very hard to get them exactly lined up.
Overall they are looking great. All that is left now is installing brake pads and then bleeding the brakes. May also need to adjust the parking break.
I also got the new TPS in so I'll get that swapped out by the weekend and hopefully that will take care of the EML fault.


This is how you can tell you know how to maximize the space of a tiny garage. About 1" of space available to squeeze the rear wheel off.

Comment
-
Oooh, I like that F80 setup. I dunno why, it's always bothered me that the go-to budget brake kit on these cars is Porsche stuff. I don't like Porsches and I don't want any of their parts on a BMW, I'd rather keep it all OEM BMW stuff if possible, so this is pretty neat to see. I remember back in E34 land, the F30 Brembos were a common upgrade, since somebody figured out that all it took were some longer bolts + spacers to mount the calipers and using a commonly available rotor off of an E89 Z4 35is (if I'm remembering correctly).Comment
-
I got pads installed and bled the brakes. I certainly like the look. I also replaces the TPS on the throttle actuator, but for whatever reason I can't get the adapations to reset and relearn for them. Tried reset adapations from my launch, from inpa and the recent ds2 app. Doesn't seem to make any difference and it is still showing the old values for the 0 position voltage and correction factor percentage. The new sensor reads a slightly different voltage at the 0 position from the old sensor (4.22v vs 4.1v) so since the adaptation values are still from the old sensor it is now showing that the TPS is reading consistently a few percent lower values then the requested and at the throttles. Not sure what others are doing when they replace a TPS. Something must be off or more is needed then just clearing adapations.

Comment
-
Got the throttles sorted out. There was a small mismatch between some of the throttles on the long shaft the arms all connect to. That was preventing the number 1 throttle from opening all the way. That helped some. Then it ended up being the TPS on the throttles that was also off a little and when replacing it with a new one everything is well in sync. I drove about 20 miles with it last night and all good and no more faults.Comment
-
-
Alright, had a nice easy next project. Installing an Xtrons android head unit. I choose the one with the overall layout that matched the old o.nav unit. Because of the nav you need to run a harness from the left rear up to the front. Overall everything is so easy to access on this car. You pull up the door sill trim, dead pedal, foot well under steering trim, rear seat base, left side seat back and pull back the trunk trim. Removing the head unit is also quick and just requires pulling aluminum trim from the right and center, a couple screws, the center air vents and then retract 2 clips that are on the bottom right and left of the head unit with the provided keys that came with the new unit.
The only part that was slightly difficult to run was to fit the harness connector from the driver foot well up to where the head unit os because the connector is so large. For this I just ended up making not of the wiring and depinning the wires from the connector. Then it was super easy to route it through.
Overall I'm very happy with this unit. Wireless Android Auto works as is, as do the steering wheel buttons (which you can also remap if you want). I also now have a visual indicator for the rear parking sensors. Only drawback is the physical buttons could be slightly higher quality and button fonts would be a bit better. Those are pretty minor though and especially at this price point it is great. Also everything is easily reversible right back to factory.
I took about 10lbs of old electronics out of the car, which is nice. Also found a complete original iPod adapter that I remember having on my last E46 back in 2004.


Comment
-
A couple quite poor cell phone pics from the other night.


Good progress overall. Still have a list of at least half a dozen of so items still to go, but at least now it is drivable as well.Comment
-
Damn it looks good, just a bit lower and it'll sit really nice on those Dinans. What cable did you buy for the Xtrons? I am still confused to this day which cable to get as myc ar is a euro spec dvd nav car with TV function/module as well.Originally posted by attbimmer View PostComment
-
If you want to pull out some more old electronics from that nav bracket in the back, the BM53 tuner module and the box on top can probably go.
0-60motorsports the XTRONS cable is EXL005 which can be found on eBay for less than on their site. When you install an aftermarket headunit like the XTRONS, you are no longer using many of the factory modules like the TV tuner, BM53 etc. Basically, the only thing that extension cable is doing is sending power, ground, iBus coms and speakers wires from the trunk to the headunit.
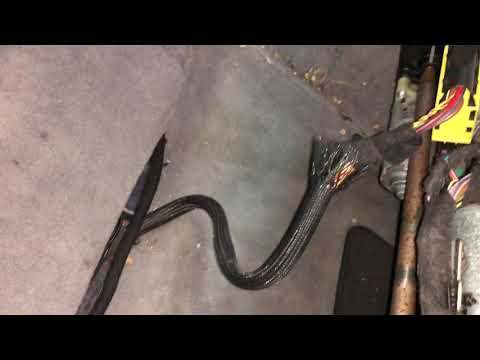
And I'm not sure if OP saw this video in another post for the routing of the extension cable. The one improvement to this method is running the cable through the factory foam grommet under the rear bolster rather than around it. No depinning required as the XTRONS connector will fit under the center console dash and through the foam grommet.
Comment
-
That’s awesome thank you!Originally posted by Slideways View Post
Sent from my iPhone using TapatalkComment
-
Man, Carbon Black looks so good even when it's imperfect. A paint correction will have that car looking mint!Originally posted by attbimmer View PostComment
-
I had to remove some added wiring that was already going under the foot well so I ran this one there as well. In this case depinning this connector was quite easy so was a bit simpler then taking apart the center console. That is a good alternative though.Originally posted by Slideways View Post
The giant foam grommet going into the trunk was quite nice.Comment

Comment