Announcement

Collapse
No announcement yet.

E86 Front Triangulation Braces Retrofit

Collapse
X
 
  • Filter
  • Time
  • Show
Clear All
new posts

  • heinzboehmer
    replied
    Originally posted by Sajk View Post
    I have not followed the entire journey but is the plan to market these?
    Nope, not really interested in making money off of this. Doesn't feel aligned with the spirit of this community.

    It's all open source, though, so anyone can recreate/tweak/improve for their own car. Info and links in the first post.

    Leave a comment:


  • Sajk
    replied
    I have not followed the entire journey but is the plan to market these?

    Leave a comment:


  • bigjae46
    replied
    Originally posted by heinzboehmer View Post

    Awesome! No spin around the paddock to get some driving impressions?
    Not yet. I keep the car at the track and had too many other things to get done. I'm old and it's hot outside so progress has been slow.
    Last edited by bigjae46; Yesterday, 03:49 PM.

    Leave a comment:


  • heinzboehmer
    replied
    Originally posted by bigjae46 View Post
    Finally done with the carbon fiber version!

    The strut tower brackets were a challenge. The issue is the 3rd mounting point. I can't find a moldable threaded insert that is shallow enough to clear the left side (wiring harness). I bonded a bolt and then ground down the bolt head.

    The mold didn't go so well. I made the first half then I remove the base plate for the 2nd half. Like an idiot I removed the base plate and the part. So I had Heinzboehmer print another part. And then I made the mold into a wonky shape trying to be cheap and reduce the amount of urethane casting resin. Then I decided to be a cheap ass and try something cheaper which eh...worked.

    The final part has some voids what are a bit of a concern. The cheap urethane won't allow for as much clamping pressure. I plan to shake down the car on labor day so we'll see if it falls apart!

    Either way, I'll have to "invest" another $500 in casting urethane to redo this 😓

    Click image for larger version Name:	IMG_6368.jpg Views:	0 Size:	82.5 KB ID:	365372 Click image for larger version Name:	IMG_6369.jpg Views:	0 Size:	88.6 KB ID:	365373 Click image for larger version Name:	IMG_6370.jpg Views:	0 Size:	74.3 KB ID:	365374 Click image for larger version Name:	IMG_6371.jpg Views:	0 Size:	111.7 KB ID:	365375
    Awesome! No spin around the paddock to get some driving impressions?

    Leave a comment:


  • siamkazi
    replied
    Originally posted by bigjae46 View Post
    Finally done with the carbon fiber version!

    The strut tower brackets were a challenge. The issue is the 3rd mounting point. I can't find a moldable threaded insert that is shallow enough to clear the left side (wiring harness). I bonded a bolt and then ground down the bolt head.

    The mold didn't go so well. I made the first half then I remove the base plate for the 2nd half. Like an idiot I removed the base plate and the part. So I had Heinzboehmer print another part. And then I made the mold into a wonky shape trying to be cheap and reduce the amount of urethane casting resin. Then I decided to be a cheap ass and try something cheaper which eh...worked.

    The final part has some voids what are a bit of a concern. The cheap urethane won't allow for as much clamping pressure. I plan to shake down the car on labor day so we'll see if it falls apart!

    Either way, I'll have to "invest" another $500 in casting urethane to redo this 😓

    Click image for larger version Name:	IMG_6368.jpg Views:	0 Size:	82.5 KB ID:	365372 Click image for larger version Name:	IMG_6369.jpg Views:	0 Size:	88.6 KB ID:	365373 Click image for larger version Name:	IMG_6370.jpg Views:	0 Size:	74.3 KB ID:	365374 Click image for larger version Name:	IMG_6371.jpg Views:	0 Size:	111.7 KB ID:	365375
    This is so cool!

    Leave a comment:


  • bigjae46
    replied
    Finally done with the carbon fiber version!

    The strut tower brackets were a challenge. The issue is the 3rd mounting point. I can't find a moldable threaded insert that is shallow enough to clear the left side (wiring harness). I bonded a bolt and then ground down the bolt head.

    The mold didn't go so well. I made the first half then I remove the base plate for the 2nd half. Like an idiot I removed the base plate and the part. So I had Heinzboehmer print another part. And then I made the mold into a wonky shape trying to be cheap and reduce the amount of urethane casting resin. Then I decided to be a cheap ass and try something cheaper which eh...worked.

    The final part has some voids what are a bit of a concern. The cheap urethane won't allow for as much clamping pressure. I plan to shake down the car on labor day so we'll see if it falls apart!

    Either way, I'll have to "invest" another $500 in casting urethane to redo this 😓

    Click image for larger version  Name:	IMG_6368.jpg Views:	0 Size:	82.5 KB ID:	365372 Click image for larger version  Name:	IMG_6369.jpg Views:	0 Size:	88.6 KB ID:	365373 Click image for larger version  Name:	IMG_6370.jpg Views:	0 Size:	74.3 KB ID:	365374 Click image for larger version  Name:	IMG_6371.jpg Views:	0 Size:	111.7 KB ID:	365375
    Last edited by bigjae46; 08-29-2026, 05:05 PM.

    Leave a comment:


  • heinzboehmer
    replied
    Added the weight of the stock cabin air filter housing to the documentation (thanks OldRanger for weighing yours!).

    Here's a screenshot of the data:

    Click image for larger version

Name:	Screenshot 2026-06-09 at 11.35.55 AM.png
Views:	115
Size:	204.9 KB
ID:	358017

    Looks like with the 3D printed strut tower brackets, this mod results in a net 909g (2lbs) weight reduction over the stock parts.

    I haven't done the math, but just by eyeballing, it looks like the car's center of gravity will drop by a little bit (most of the weight savings come from the replacement HVAC plastics) and likely not move very much front to back (E86 braces are out front and windshield mount is out back)

    Leave a comment:


  • karter16
    replied
    Originally posted by George Hill View Post
    Yep those are the ones

    Leave a comment:


  • karter16
    replied
    Originally posted by bigjae46 View Post

    Why not just insert the helicoil and cut a threaded rod. On my carbon part, I molded threaded inserts and then used an M8 class 8.8 threaded rod cut to length. Loctite on the end that goes into the bracket.
    With the caveat that I'm not really the appropriate sort of engineer and didn't FEA it, this was my original plan, but I got a little sketched out about the thread depth available given the size of the part (bearing in mind in my case the part is aluminium) and thought that Heinz's approach of having an insert that couldn't pull through seemed better to me.

    Leave a comment:


  • George Hill
    replied
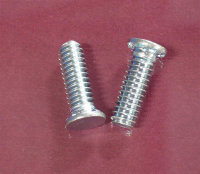
    Are these the studs in question? M10x1.5x20 and M10x1.5x30 from MRO?


    Leave a comment:


  • bigjae46
    replied
    Originally posted by Bry5on View Post
    I mean thread a bolt in in place of a stud, not a bolt to replace a nut. I think adding the flats is no better than adding a hex pattern personally. Either way it’s a printed part job. Seems easier to add threads there and eliminate all semblance of a press fit. Just bolt a bolt in instead of pressing a stud..
    Why not just insert the helicoil and cut a threaded rod. On my carbon part, I molded threaded inserts and then used an M8 class 8.8 threaded rod cut to length. Loctite on the end that goes into the bracket.

    Leave a comment:


  • karter16
    replied
    Well just heard back and the fab house (ApexBatch) are happy with the design, and the quote seems reasonable to me so think I'll probably give this approach a go, if for nothing else but to prove it out as an option for those who find it harder to source the specialist hardware.

    Click image for larger version

Name:	Screenshot 2026-06-08 at 1.22.50 PM.png
Views:	104
Size:	102.6 KB
ID:	357778

    Leave a comment:


  • heinzboehmer
    replied
    A little 3D printed retainer would help with keeping the fastener from moving too much when you start the nuts, but yes still floating.

    Leave a comment:


  • karter16
    replied
    Awesome thanks! Yep I made sure the wall thicknesses were going to be okay. Thanks for that tip, I probably knew that once upon a time but had completely forgotten and hadn't considered it at all!

    Haha I do appreciate that the thread approach is better, my thinking with this approach is part me being stubborn but also part it saves me needing any M10 helicoil hardware.

    Leave a comment:


  • Bry5on
    replied
    Just check your wall thicknesses to make sure there’s nothing too thin and you’re good. That should work.

    Pro tip: Note that you should always pick a corner radius slightly larger than the diameter of the tool you’ll be using so the end mill can make the corner without chattering.

    edit: just remember that with a design like that, the fastener is still technically floating and won’t be rigid when you start running the nuts down and/or it can fall out when this part is removed. Last attempt to get you to switch to threads
    Last edited by Bry5on; 06-06-2026, 06:59 AM.

    Leave a comment:

Working...
X