Drove the car around today. Amusingly, the junkyard radio sounds significantly better than what I sent out to upgrade, regardless of the worse aesthetic condition and broken display driver. Both were manufactured in 2004, so I don't think it actually matters which one gets the upgrade.
It'll be nice to have a decent reference point to compare the upgraded unit against, though. Pretty much anything is gonna sound better than the buzzy/static-y unit that was in there before (as proven by the junkyard radio).
Edit: I just realized I changed two variable at once, duh. I guess the only thing I can say for sure is that the system sounds better as a whole. Can't really attribute to the junkyard radio, as the HK amp could have also been playing a role.
-
Quick bit of maintenance.
Harman Kardon amp in the trunk was acting up. When I parked the car in the sun, the amp would overheat and no sound would come from the speakers. So, I took it apart to clean it and replace the thermal paste:
That's what the unit looked like straight from the car. I was honestly very surprised at how clean it was. I was expecting it to be filled with dust, but nope.
23 year old thermal paste was definitely not doing its job anymore though:
Cleaned the old stuff off, replaced with new and done. Hopefully this fixes my issue.
Also, I have to say that I really like how this thing is designed. The housing is extruded aluminum, so the board slides in from either side. The long silver strip then clamps the amps to the housing and acts as more area for heat to dissipate. The part I thought was most clever is that the board isn't directly fastened to the housing. Instead, it's held in place by the front daughter board (with the harness connector), the heat sink clamp and these rubber bands that friction fit into the housing:
Good stuff, gonna have to steal that rubber band idea for some future design of my own.
The one downside of this design is that assembly is a bit fuzzy, as you can smear the thermal paste everywhere if you're not careful. But overall, thumbs up from me.
Also, keeping with the audio theme, just sent my CD53 out to Baris - Carphonics for amp upgrades. Excited to get the upgraded unit back and installed. I didn't want to be left with no music, so I ran over to the junkyard and grabbed another CD53, which ended up being in way worse shape than my own. Swapped faceplates before sending mine out, as I was definitely not going to be able to stand the shitty junkyard one.
But of course, nothing ever goes smoothly, and it turns out that the display backlight driver is broken on the junkyard HW. At first, I thought I had messed up the ribbon cable/faceplate when swapping, but I swapped back (and forth) and the issue stayed with the junkyard HW. So now I can't really see what the display says unless in fairly direct sunlight. Oh well, at least the audio seems to work fine. One more reason to be excited about getting my own unit back!Leave a comment:
-
OH I know, I did this a long time ago. Walked away without a scratch surprisingly. The engine moved back far enough the starter broke off the block. I think the strut tower would have to be past the firewall to be an issue and I don't think that is likely a survivable crash, but maybe? IDK. Either way, I appreciate that it is a concern for you.
 \
\
Leave a comment:
-
Ha, you're almost certainly right and it's very likely that I'm being overly cautious about an improbable scenario. However, I really hate the idea of having something I designed injure someone, so playing it as safe as possible.Originally posted by George Hill View Post
I'm particularly scared of a front overlap crash. Note how much the strut towers can move in one of those scenarios, especially compared to how little (relatively) the passenger compartment deforms:
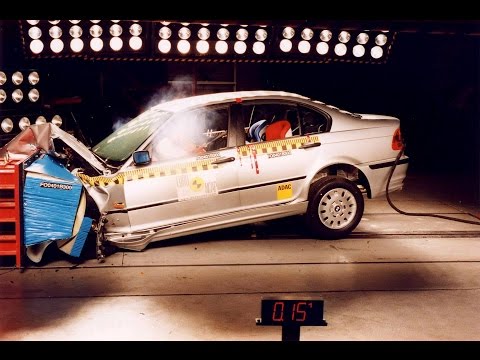
(yes, I spent way too long looking at crashed E46s at the start of this project)
Leave a comment:
-
If the bar moves that far to impale your chest I think you are dead either way lolOriginally posted by heinzboehmer View Post
But I appreciate your concern.
Leave a comment:
-
While I wasn't aware of that specific kit, I did consider similar approaches. This project would have been way simpler had I just made my own braces or adapted aftermarket ones, but I really want to keep the crash safety aspect of the OE E86 braces. I don't trust that aftermarket pieces were put through rigorous crash testing and definitely don't have the skills/resources to do that with a design of my own. E86 uses the same suspension design as E46, so that gives me confidence that the forces seen by these braces will be similar on both chassis.Originally posted by YoitsTmac View Post
Chassis rigidity is cool and all, but hitting a wall head on and ending up with a brace going through my chest (or worse, a passenger's chest) would really, really suck.
Also, custom strut bar end brackets are coming! I need to machine the stock cast aluminum pieces first before starting on the design, but I'm still waiting on the certification class to get access to the machine shop at work. Those pieces are gonna be designed for laser cutting + bending, so manufacturing should be very quick.Leave a comment:
-
This thread is epic. I can't wait to seee the progress on this bar modification - I would totally follow in your footsteps. Even just the firewall mount opens a lot of doors. A quiet thought of mine is you could probably repurpose the hardware on this kit to get carbon fiber mountings. I don't know the dimensions of that piece, but if you did a custom top mount, you'd have a lof of flexibility. you can likely replace the ends with whatever you wanted and just use the carbon tubes. Just a thought. Subbed!Leave a comment:
-
Just opened the box
I am trying to get the mold done before the end of the month. I’m going to mold in threaded inserts - a first for me. I’m excited to get this done!Leave a comment:
-
Yep, they are. The bars themselves are totally flat, but the mounting point is angled to tuck the bars up as much as possible. There wouldn't be enough clearance for tools and the moment trying to rip the mount out would be greater if it wasn't angled. Makes the machining more expensive, but no good way around that, unfortunately.Originally posted by maupineda View PostLeave a comment:
-
Heinz, are the studs and nesting surface at an angle? Never noticed the bars ends were slanted. Looking good!Leave a comment:
-
Last piece of the validation puzzle arrived:
Time to run through an entire mock install, just to make sure there isn't some small detail I overlooked.
Started by printing exactly what is going to be sent out to be machined and installing the timeserts:
Car then got disassembled and piece installed:
I also printed out a cutaway of the piece to check (for the last time) that the profile of my design matches the chassis:
Everything seems to check out!
I forgot to take pics, but I also validated that there's enough tool clearance for the cap head screws that hold the brace attachment point to the main windshield piece. Regular hex bits are a little long, but stubby ones fit just fine!
Was a bit nerve-racking, but this thing has officially been sent out to be machined! ETA is about 30 days, which gives me enough time to finish up the strut tower brackets.
Also worth mentioning that I did a couple of small maintenance items while the car was taken apart:- Replaced the main throttle actuator pull rod just for preventative maintenance reasons.
- Found a leak coming from the timing chain tensioner, so swapped that crush washer and retorqued. Was as enjoyable of a job as it always it. Let's see how long it takes before it starts leaking again.
Leave a comment:
-
Oh that's good to know! I wasn't aware that 7075 was prone to cracking when welded.Originally posted by Bry5on View PostLeave a comment:
-
Important to note that if you’re going the weld route, absolutely do not use 7075, as it is prone to cracking in the heat affected zone! 6061 for welded, 7075 or 6061 for machined. Agree that the small premium for large piece of mind (strength) is worth it here. You could also machine this from various steels and thin the walls to mitigate some of the mass hit. But the machined design should be mega stiff so there’s not much benefit to the stiffer steel material.Originally posted by heinzboehmer View PostLeave a comment:
Leave a comment: