Really looking forward to seeing the final product!
-
-
Gravity 😂. I literally rolled it down the slight hill outside my garage and got it up on the dolly one shot.Originally posted by usdmej View PostComment
-
Paint progress! Went into the booth this morning.
Last edited by robgill; 11-20-2023, 01:26 PM.Comment
-
Oh Wow that was fast. looking nice.Comment
-
Hell yeah this is going to be epic! If you do a saddle brown or cinnamon esque coloring of the interior this will be incredible. Can't wait to see the progress
Sent from my iPhone using Tapatalk2003 E46 M3 TiAg/Cinnamon 6MT
2005 E46 330i ZHP Imola/Sand
| Karbonius | Schrick | Supertech | Volk | Recaro | FCM | SuperSprint | Turner | Hyperco | GC | PFC | VAC | OMP | Radium Engineering | MPRacing |
Instagram:@thegenius46m
NorCal DME Programming and Coding ExpertComment
-
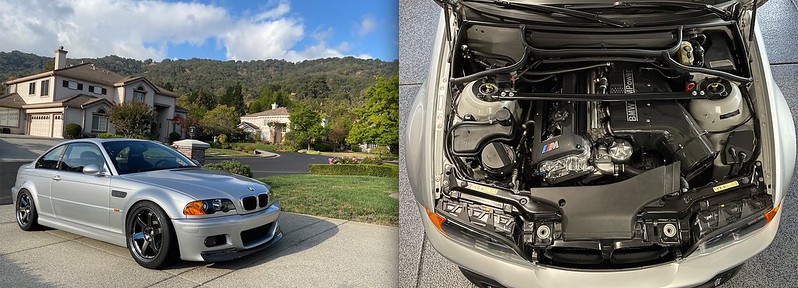
With the M3 at the body shop, I've been focusing on the drivetrain. Plan is a full refresh of the motor with upgraded cam and exhaust. Will also be doing a conversion to manual 6 speed. First big project we stripping down and cleaning up the block. Like most S54s the intake side was a little crusty where water can sit. Exhaust side was pretty clean.
My favorite tools for cleanup are a needle scaler from Harbor Fright and a scotch pad on a die grinder. The scaler is awesome for knocking off rust and loose paint.
Once cleaned up I hit the block with some primer / rust converter from Eastwood.
Then used Por-15 for top coat. Good for another 100k+!
All the accessories also got a good cleanup. I'm going to fully rebuild the throttle bodies and get most of the aluminum vapor blasting. Water pump, starter, PS pump etc will be replaced with new OE.
For vapor blasting I used Brooklyn Vapor Blasting in Red Hook. The result on these parts is awesome. Comes out looking new with a nice satin finish. Vapor blasting is still a little gritty so everything thing needs a through cleaning.
With all of the parts back I started reassembly with a new front and rear crankshaft seals.
Then cleaned oil filter housing and some accessories mounts back on. Plus new chain guide bolts/washers, Constant Pressure Valve and crank sensor.
Last edited by robgill; 11-18-2023, 08:08 AM.Comment
-
Next I started on the bottom end. Standard rod bearing replacement and new gaskets/orings for everything. Definitely the first time tor had been opened up. Looked pretty good for 80k miles.
No surprises with the rod bearings. I went with ACL bearings from FCP which I have used on both Rosso and my track car.
Back on the top end I've decided to go with a bigger set of cams. Love the 280/272 setup on Rosso so decided to stick with that. Fortunate to pick up a new set from SamGrant951 here on the forum. This is the newer Cat Cam set with an oil bridge and their modified rails and followers. Got the VANOS off and the exhaust hub tabs, chain guide and cam bolt all looked good.
Old cams removed and head cleaned up:
A little tedious inserting the new rails/followers but with some patience got it all back together with the additional oil bridge that brings oil over to the intake side. The custom rockers have more direct oil spray on the cam lobes.
New cams installed! Also new Beisan upper chain guide (RIP Raj)
To finish off the top end I rebuilt the VANOS (freshly vapor blasted) with new Beisan seals, pump disc and cam/hub bolts.
Finished it off by retiming the motor and doing a full valve adjustment. One thing nice about these aftermarket cams is both exhaust and intake lash spec is the same, .25mm. Sealed it up and finished it off cleaned up oil lines, water lines and new valve cover gaskets, cam sensors, and Rogue Engineering VANOS line. Also new water pump and orings set from @wolfn8tr.
Comment
-
Nice update! How did you clean the oil cooler?Comment
-
I had the outside vapor blasted and kept the inside sealed. Still debating if I should upgrade it…Originally posted by 0-60motorsports View PostComment
-
I was thinking of doing dry ice but the people who do it said they wouldn't. I'll just have to use some soap and water as I don't have vapor blasting here. Thanks.Originally posted by robgill View Post
No point upgrading it if you are not doing hard track days.Comment
-
Fast start at the paint shop has slowed down a bit 😆. Still needs final cut and polish so hoping to have the car back before end of year! In the meantime I've been knocking out random jobs and cleaning trim. Sooo much cleaning...
All of the underbody plastics are in pretty good shape so gave them a good scrub with por 15 degreaser. That got most of the road grime off! I'm still working on some of the rear panels with that nasty BMW waxy spray.... That stuff is a nightmare; anyone find a product that works on that??
For the fully cleaned parts I then hit them with Meguiar's M5716SP Marine/RV Vinyl & Rubber Cleaner which leaves a nice satin luster.
Also gave the glass a good cleaning and applied some RainX Anti Fog on the interior.
Also installed one of my black friday purchases
Comment
-
For the nasty BMW waxy spray, I used CRC Brakleen red can brake cleaner and a window scrapper for years. You can also try to use a heat gun, it should help too.Send me a pm for Gt4 Composites carbon fiber CSL parts
2007 BMW E86 Z4M Coupe Interlagos Blue/Black
2024 Toyota Land Cruiser BlackComment
-
I forsee an Evolve airbox being fitted to this motor
A British made box for BRG would be apropos DD: /// 2011.5 Jerez/bamboo E90 M3 · DCT · Slicktop · Instagram
/// 2004 Silvergrey M3 · Coupe · 6spd · Slicktop · zero options
More info: https://nam3forum.com/forums/forum/m...os-supersprintComment
-
Thanks for the help on that, I now have 2 Evolve boxes! The box on my track car is getting refurbsihed by Evolve and Im considering tinting that one to have a kevlar look similar to this:Originally posted by Tbonem3 View Post
Love the way that looks with the green!! In the meantime the newer box is swapped onto the track car. I'll make a final call on which one goes on BRG after I see how the tinting turns out.Comment
-
Been a little slow over the holidays with a lot of travel and a cold garage, but slow progress is being made! Stopped by Marios yesterday and they have the orginal front and rear glass installed and have started the final wet sanding and polishing. Fingers crossed I'll have it back by end of the month.
Comment

Comment