
Part 1: Removing the old vanos
Vanos noise can ruin the appeal of your M3, and shops will charge an arm and a leg to install a new unit. This is a guide for replacing your broken vanos. I hope that this DIY will help you out.
I will go into detail about the tools and parts needed, along with a step-by-step guide of how to take your engine apart. Unlike most DIY guides for this, I will start with the engine fully assembled. Then Show you the critical steps that some DIY guides do not. Then Reinstall everything for you too see.
Sources I have read about on this subject:
Bentley Manual
Pelican Parts DIY guide (I will be using several pictures from them to specify parts, which I did not take pictures of)
*Note* I take no responsibility if anything goes wrong with the installation due to misreading the directions, or simply a lack of knowledge about engines.
*Note* There is a testing method for the Vanos that requires the use of an air compressor. This test will show you how much advancing the vanos is able to do, it should be between 8mm-12mm for stock engines. I did not list this in the DIY as most people do not have access to an air compressor. You can do this test at a later time if you wish.
Step 1: Preparation
First, you need to get yourself the right tools:
Camshaft blocks (lock the camshafts in place)

Fan wrench’s (god these make getting the fan off sooooooooo easy!)

Sprocket wrench (placed on the exhaust sprocket to turn it easily)

Flywheel locking tool (keeps the flywheel in place while you work)

Then comes the new parts!
Valve cover gasket set:

Head-vanos gasket
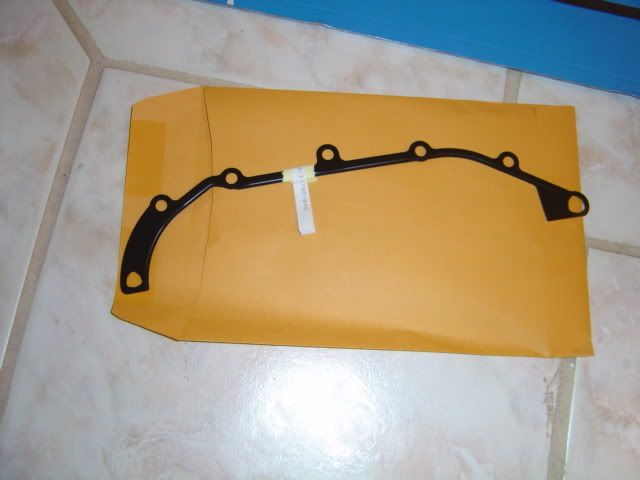
You will also need some anti-seize and some silicon gasket sealer
Along with...BIG SURPRISE!!! ...a tool kit lol
You can buy almost all of these tools and parts off of: http://www.pelicanparts.com/BMW/cata...36_catalog.htm
Step 2: Begin working on the engine
You will want to start be removing the black plastic radiator cover on the front of your M. It is attached using four screws and two expanding rivets. While doing this also remove the alternator-cooling duct.

Now remove both covers from the engine and fuel rail. On both of the covers, there will be two plugs that can pop out using a flat head screwdriver. Under which there will be two 10mm bolts (for the fuel rail cover) and two 10mm nuts (for the engine cover). Remove both covers and place them to the side. To take these off you will need to remove the oil cap, put the cap back on after the covers have been removed.


Next, you should remove all the ignition coils from the engine.
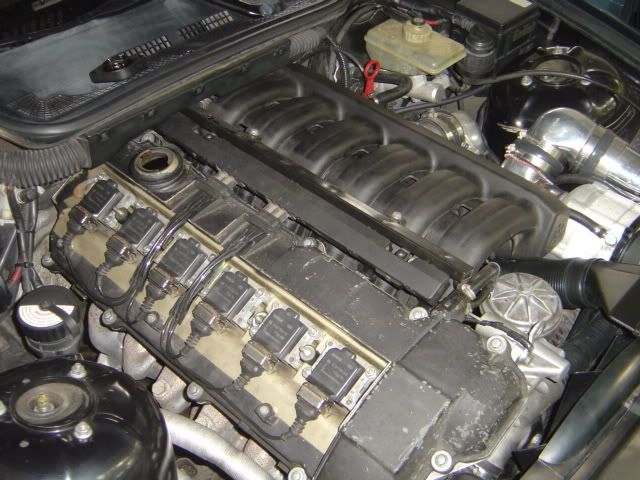
Two 10mm nuts will hold down each coil pack. It is all right to reuse these so remove them all and place them in a safe place for later. Use a flat head screwdriver to unclip the coil packs, before you unbolt them.


On two of the coils there will be a grounding cable, leave them attached to the bolts below for now. One of the bands will be on the farthest stud, and one will be in the middle. I am missing the one in the middle lol, but look towards the back of the coils and you can see one of the brown cords.
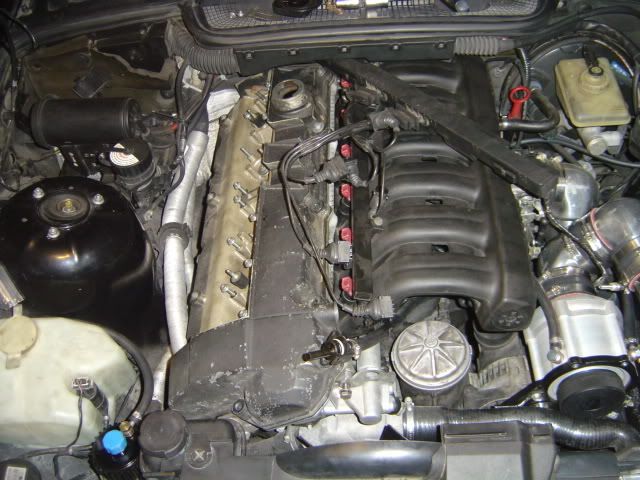
After you have removed the coils its time to relocate the ignition wiring. Unplug the wiring harness from the injectors by pulling the wiring box up with some force. You will hear each injector unplug, make sure to hold this secure while removing. Do not forget to remove the grounding cable that goes from the wiring to the bolt at the top of the vanos. After you remove this cable, place the bolt back in the hole but leave it loose. You will remove this later. When fully unplugged move the wires so they are over the intake manifold and out of the way. Like this:
Now you want to remove the fan, you can do this one of two ways. The first, which is the easiest; you use the specialty fan removal tools and take the fan off. If you do not have these tools, there is no need to worry. The second way is to take a long flat head screwdriver and wedge it between the four bolts that connect the fan to the engine. Then use monkey wrench to unscrew the fan. REMEMBER!!! The fan has counterclockwise threads…turn the wrench clockwise to loosen!
After the fan is removed, you can now relocate the fan shroud and expansion tank. On the bottom of the expansion tank there is a sensor, you need to unplug it. Then carefully pull the fan shroud up, you will have to mess with it a bit to get it past the coolant hoses. You may also have to unplug the overflow hose from the radiator. This will leak a bit but can be plugged easily. When you have the entire thing free, rotate it so that it rests on the intake manifold out of the way.

Now it is time to remove the valve cover. Start by unplugging the vacuum hose on the driver’s side of the engine:

There are six 10mm bolts that go along the outside of the valve cover, and four bolts on the center where the coil packs were. Unscrew all of the evenly and place aside until we reinstall the valve cover.

Two of the bolts on the center of the valve cover will have the grounding cables we talked about before. Keep the grounding cables with their bolts and remove them. They will look like this:

The two bolts that are farthest back will take the most time to get off, try using the smallest 10mm ratchet you have to reach back there. Removing the oil cap will help a lot as well. Do not be surprised if you loose a few bits…I have lost many doing this exact thing. They will usually fall out when you begin to drive the car again.
After the removal, you should see something like this:

Now is a good time to inspect your valve cover for any signs of trouble. Milky oil is a clear sign of head gasket failure. Be sure to look at the section above the vanos and secondary timing chain tensioner for signs of the timing chain hitting the cover. If all is good, move along. If not, it may be time to do a head gasket replacement!
A good picture of coolant in oil:

There will be a plastic cover over the intake camshaft, it simply pulls off. You may need to apply force to the sides to get it to pop off. Place this to the side until its time to reinstall it.

Now it is time to put the car at Top Dead Center (TDC). Start by loosening your spark plugs, you do not need to remove them, but loosening them will make turning the engine by hand easier. Using a 22mm deep socket, you can manually crank the engine. When looking directly at the engine from the front of the car rotate towards the drivers side of the vehicle (clockwise).

Your goal is to get the first cylinders camshafts pointing towards each other and have your camshaft locking tool slide into place easily. There will also be an arrow on the exhaust sprocket that needs to be pointed perpendicular to how the head gasket sits. However, before you start trying to get to TDC, it is time to call a friend in to help. On the driver side of the engine bay, right behind the throttle body and next to the oil dipstick. There will be an open section where you can look down and see the transmission. In the transmission, you should see a blue plug sticking out. Reach down and pull out that plug, then have your friend reach back down with the flywheel-locking tool and place it into the hole and apply pressure.


Now it is your turn to start turning the engine to TDC. Use that 22mm wrench to turn the engine slowly. It will be tough, but get the first cylinder camshaft lobes close to pointing at each other. With your friend still pushing the flywheel-locking tool in place, slowly turn the engine until the tool slides into place. It will only go in a little bit, but you can tell when it does. While you are turning the crank look at the exhaust sprocket and make sure the arrow is pointing upwards. Once the flywheel tool is in do not rotate the engine anymore. There are three studs at the back of the head, remove them, and place them to the side. The three studs are circled in red below:

Take your camshaft-locking tool and place it at the back of the head. If it does not slide on easily, you can rotate your crank a little more each way. If it is off severely…you have major timing problems and I am surprised your engine runs lol.

Also, make sure to check the crankshaft pulley that it is at TDC as well. The sprocket part has markings at the top that look like this:

Disconnect the oil line from the vanos; this will be the big black hose connecting to the driver’s side of the vanos. There will be a little oil that drips out after you remove it, I just took a rag and wrapped it around the end of the hose. There will be two washers that come off with the bolt, do not loose them!


Before you remove the vanos use some sort of wire, I used a metal shirt hanger, to lock your secondary timing chain tensioner in the down position. Push down on the tensioner so that it cannot go down anymore. Then insert the wire into a hole on the back of the tensioner that is above where the chain is.

Now this picture is after I removed the chain and vanos…but it gives you a good picture of where the wire goes:

Finally!!! Taking off the vanos. There are six 10mm nuts and one 13mm bolt connecting the vanos to the engine.
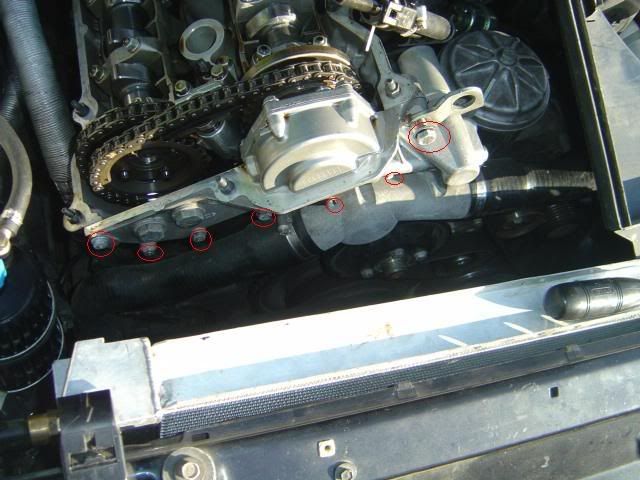
Remove the six nuts, the crank position wire runs in front of two of the bolts. A black plastic cover that is held in with C-clips will cover it. Remove this cover, do not be afraid to break the C-clips they are cheap. With that out of the way continue to remove the nuts. When you get to the 13mm bolt at the top of the vanos, remove it and place it with the nuts you just took off. There will be a metal lift ring attached under the bolt.


Loosen the second bolt holding this on; this is located on the underside of the vanos. Just follow the lift ring down and you cannot miss it! Swivel the ring to the driver’s side so that it is out of the way for the vanos removal.


Now you need to unplug the vanos solenoid. The solenoid is located on the driver’s side of the vanos next to the oil filter housing. It is what I have circled here:
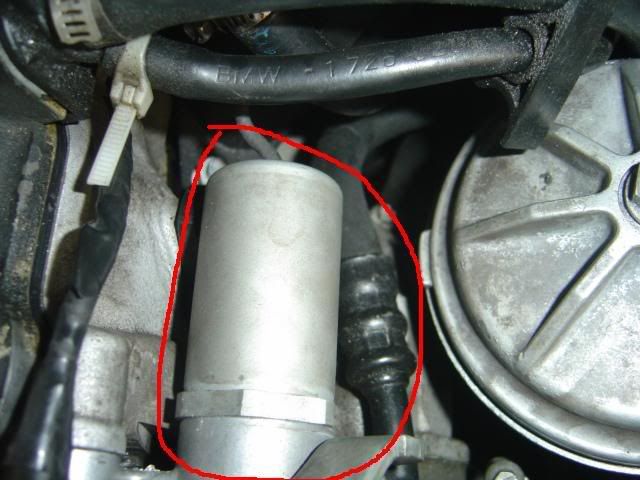
This has a small black wire coming out of the back of it. Follow the wire under the intake manifold and unplug it. Try to remember where it goes, it is not too hard to find again. If you are not replacing the vanos and are, using this guide to get to the actual engine you can simply unscrew the solenoid using a monkey wrench.
Next remove the two access plugs at the front of the vanos and set them to the side


Now using an E10 Torx socket... loosen, but do not remove, the four bolts holding the secondary timing chain exhaust sprocket on the exhaust cam shaft. They only need to be loosened a little bit, maybe 1 turn. You will need to use a short bit extension and go through the two holes you just opened up in the vanos to get to the bottom two bolts.

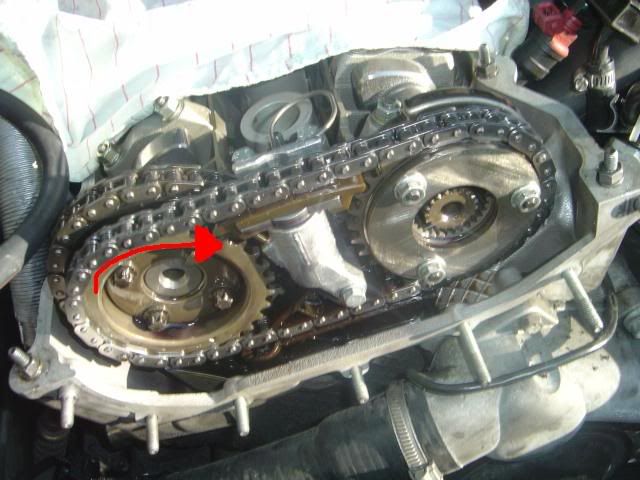
Before pulling the vanos off, rotate the exhaust sprocket as far as I can towards the drivers side of the car. This will put you on the right foot when installing your new unit. Use the Sprocket wrench to turn it.

After the sprocket is all the way over towards the driver’s side of the car, it is time to pull the vanos off. Pulling evenly on both corners of the vanos, slowly separate it from the head.
Using a flat head screwdriver will make this easier but be sure to space it out evenly. Pulling the vanos off you will notice that the gear plunger on the vanos is being pulled out. This is perfectly fine and is a good sign that you almost have the thing out. The exhaust sprocket may also rotate back towards the passenger side of the vehicle, which is fine.
Instructions continue in Post #2
Vanos noise can ruin the appeal of your M3, and shops will charge an arm and a leg to install a new unit. This is a guide for replacing your broken vanos. I hope that this DIY will help you out.
I will go into detail about the tools and parts needed, along with a step-by-step guide of how to take your engine apart. Unlike most DIY guides for this, I will start with the engine fully assembled. Then Show you the critical steps that some DIY guides do not. Then Reinstall everything for you too see.
Sources I have read about on this subject:
Bentley Manual
Pelican Parts DIY guide (I will be using several pictures from them to specify parts, which I did not take pictures of)
*Note* I take no responsibility if anything goes wrong with the installation due to misreading the directions, or simply a lack of knowledge about engines.
*Note* There is a testing method for the Vanos that requires the use of an air compressor. This test will show you how much advancing the vanos is able to do, it should be between 8mm-12mm for stock engines. I did not list this in the DIY as most people do not have access to an air compressor. You can do this test at a later time if you wish.
Step 1: Preparation
First, you need to get yourself the right tools:
Camshaft blocks (lock the camshafts in place)
Fan wrench’s (god these make getting the fan off sooooooooo easy!)
Sprocket wrench (placed on the exhaust sprocket to turn it easily)
Flywheel locking tool (keeps the flywheel in place while you work)
Then comes the new parts!
Valve cover gasket set:
Head-vanos gasket
You will also need some anti-seize and some silicon gasket sealer
Along with...BIG SURPRISE!!! ...a tool kit lol
You can buy almost all of these tools and parts off of: http://www.pelicanparts.com/BMW/cata...36_catalog.htm
Step 2: Begin working on the engine
You will want to start be removing the black plastic radiator cover on the front of your M. It is attached using four screws and two expanding rivets. While doing this also remove the alternator-cooling duct.
Now remove both covers from the engine and fuel rail. On both of the covers, there will be two plugs that can pop out using a flat head screwdriver. Under which there will be two 10mm bolts (for the fuel rail cover) and two 10mm nuts (for the engine cover). Remove both covers and place them to the side. To take these off you will need to remove the oil cap, put the cap back on after the covers have been removed.
Next, you should remove all the ignition coils from the engine.
Two 10mm nuts will hold down each coil pack. It is all right to reuse these so remove them all and place them in a safe place for later. Use a flat head screwdriver to unclip the coil packs, before you unbolt them.
On two of the coils there will be a grounding cable, leave them attached to the bolts below for now. One of the bands will be on the farthest stud, and one will be in the middle. I am missing the one in the middle lol, but look towards the back of the coils and you can see one of the brown cords.
After you have removed the coils its time to relocate the ignition wiring. Unplug the wiring harness from the injectors by pulling the wiring box up with some force. You will hear each injector unplug, make sure to hold this secure while removing. Do not forget to remove the grounding cable that goes from the wiring to the bolt at the top of the vanos. After you remove this cable, place the bolt back in the hole but leave it loose. You will remove this later. When fully unplugged move the wires so they are over the intake manifold and out of the way. Like this:
Now you want to remove the fan, you can do this one of two ways. The first, which is the easiest; you use the specialty fan removal tools and take the fan off. If you do not have these tools, there is no need to worry. The second way is to take a long flat head screwdriver and wedge it between the four bolts that connect the fan to the engine. Then use monkey wrench to unscrew the fan. REMEMBER!!! The fan has counterclockwise threads…turn the wrench clockwise to loosen!
After the fan is removed, you can now relocate the fan shroud and expansion tank. On the bottom of the expansion tank there is a sensor, you need to unplug it. Then carefully pull the fan shroud up, you will have to mess with it a bit to get it past the coolant hoses. You may also have to unplug the overflow hose from the radiator. This will leak a bit but can be plugged easily. When you have the entire thing free, rotate it so that it rests on the intake manifold out of the way.
Now it is time to remove the valve cover. Start by unplugging the vacuum hose on the driver’s side of the engine:
There are six 10mm bolts that go along the outside of the valve cover, and four bolts on the center where the coil packs were. Unscrew all of the evenly and place aside until we reinstall the valve cover.
Two of the bolts on the center of the valve cover will have the grounding cables we talked about before. Keep the grounding cables with their bolts and remove them. They will look like this:
The two bolts that are farthest back will take the most time to get off, try using the smallest 10mm ratchet you have to reach back there. Removing the oil cap will help a lot as well. Do not be surprised if you loose a few bits…I have lost many doing this exact thing. They will usually fall out when you begin to drive the car again.
After the removal, you should see something like this:
Now is a good time to inspect your valve cover for any signs of trouble. Milky oil is a clear sign of head gasket failure. Be sure to look at the section above the vanos and secondary timing chain tensioner for signs of the timing chain hitting the cover. If all is good, move along. If not, it may be time to do a head gasket replacement!
A good picture of coolant in oil:
There will be a plastic cover over the intake camshaft, it simply pulls off. You may need to apply force to the sides to get it to pop off. Place this to the side until its time to reinstall it.
Now it is time to put the car at Top Dead Center (TDC). Start by loosening your spark plugs, you do not need to remove them, but loosening them will make turning the engine by hand easier. Using a 22mm deep socket, you can manually crank the engine. When looking directly at the engine from the front of the car rotate towards the drivers side of the vehicle (clockwise).
Your goal is to get the first cylinders camshafts pointing towards each other and have your camshaft locking tool slide into place easily. There will also be an arrow on the exhaust sprocket that needs to be pointed perpendicular to how the head gasket sits. However, before you start trying to get to TDC, it is time to call a friend in to help. On the driver side of the engine bay, right behind the throttle body and next to the oil dipstick. There will be an open section where you can look down and see the transmission. In the transmission, you should see a blue plug sticking out. Reach down and pull out that plug, then have your friend reach back down with the flywheel-locking tool and place it into the hole and apply pressure.
Now it is your turn to start turning the engine to TDC. Use that 22mm wrench to turn the engine slowly. It will be tough, but get the first cylinder camshaft lobes close to pointing at each other. With your friend still pushing the flywheel-locking tool in place, slowly turn the engine until the tool slides into place. It will only go in a little bit, but you can tell when it does. While you are turning the crank look at the exhaust sprocket and make sure the arrow is pointing upwards. Once the flywheel tool is in do not rotate the engine anymore. There are three studs at the back of the head, remove them, and place them to the side. The three studs are circled in red below:
Take your camshaft-locking tool and place it at the back of the head. If it does not slide on easily, you can rotate your crank a little more each way. If it is off severely…you have major timing problems and I am surprised your engine runs lol.
Also, make sure to check the crankshaft pulley that it is at TDC as well. The sprocket part has markings at the top that look like this:
Disconnect the oil line from the vanos; this will be the big black hose connecting to the driver’s side of the vanos. There will be a little oil that drips out after you remove it, I just took a rag and wrapped it around the end of the hose. There will be two washers that come off with the bolt, do not loose them!
Before you remove the vanos use some sort of wire, I used a metal shirt hanger, to lock your secondary timing chain tensioner in the down position. Push down on the tensioner so that it cannot go down anymore. Then insert the wire into a hole on the back of the tensioner that is above where the chain is.
Now this picture is after I removed the chain and vanos…but it gives you a good picture of where the wire goes:
Finally!!! Taking off the vanos. There are six 10mm nuts and one 13mm bolt connecting the vanos to the engine.
Remove the six nuts, the crank position wire runs in front of two of the bolts. A black plastic cover that is held in with C-clips will cover it. Remove this cover, do not be afraid to break the C-clips they are cheap. With that out of the way continue to remove the nuts. When you get to the 13mm bolt at the top of the vanos, remove it and place it with the nuts you just took off. There will be a metal lift ring attached under the bolt.
Loosen the second bolt holding this on; this is located on the underside of the vanos. Just follow the lift ring down and you cannot miss it! Swivel the ring to the driver’s side so that it is out of the way for the vanos removal.
Now you need to unplug the vanos solenoid. The solenoid is located on the driver’s side of the vanos next to the oil filter housing. It is what I have circled here:
This has a small black wire coming out of the back of it. Follow the wire under the intake manifold and unplug it. Try to remember where it goes, it is not too hard to find again. If you are not replacing the vanos and are, using this guide to get to the actual engine you can simply unscrew the solenoid using a monkey wrench.
Next remove the two access plugs at the front of the vanos and set them to the side
Now using an E10 Torx socket... loosen, but do not remove, the four bolts holding the secondary timing chain exhaust sprocket on the exhaust cam shaft. They only need to be loosened a little bit, maybe 1 turn. You will need to use a short bit extension and go through the two holes you just opened up in the vanos to get to the bottom two bolts.
Before pulling the vanos off, rotate the exhaust sprocket as far as I can towards the drivers side of the car. This will put you on the right foot when installing your new unit. Use the Sprocket wrench to turn it.
After the sprocket is all the way over towards the driver’s side of the car, it is time to pull the vanos off. Pulling evenly on both corners of the vanos, slowly separate it from the head.
Using a flat head screwdriver will make this easier but be sure to space it out evenly. Pulling the vanos off you will notice that the gear plunger on the vanos is being pulled out. This is perfectly fine and is a good sign that you almost have the thing out. The exhaust sprocket may also rotate back towards the passenger side of the vehicle, which is fine.
Instructions continue in Post #2




Comment