Introduction
This is a write up for installing an illuminated 6 speed shift knob from a F10 M5 (BMW Part Number 25112284205) or a F80 M3 / F82 M4 (BMW Part Number 25112284705) into your E46 (or E92) M3. Over time, the factory shift knob begins to fail and the clear plastic at the top may begin to bubble. In some cases, you may just want to switch over to a ZHP style knob. In my case, my factory knob was bubbling and I preferred the ZHP style shift knob. Originally I used a ZHP knob, which doesn't illuminate. Over time I kept thinking about having the illuminated shift pattern and M logo at night, but still retain my alcantara shift boot. Unfortunately the only options that I have found to purchase an illuminated shift knob without a boot is from LeatherZ.com. Currently the illuminated knob with the 6 speed and M logo display is $357 (wow). I am someone who prefers to use OEM parts when I can, so I sourced a used F80 M3 shift knob off of eBay for about $120. You can also use a shift knob from an F10 M5 or F82 M4, buying new or used per your budget and liking.
Tools and items required
F10 M5/F80 M3/F82 M4 factory shift knob
X-acto knife
Small flat head screw driver (I used a 2.4mm wide head one)
Wire cutters
Wire insulation jacket remover
Heat shrink tubing
Lighter or other heat source
Soldering iron
Solder
How to
Here is a factory shift knob from a F80 M3.

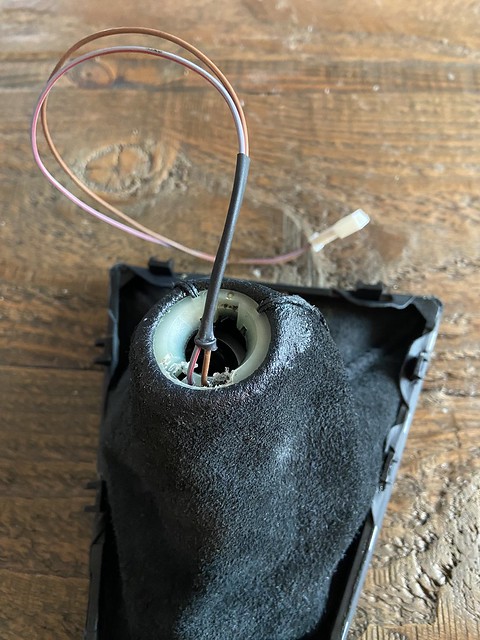
Inside of the boot, you can see where the shift knob attaches to the boot. There are 3 plastic pins that hold it into place. One on either side of the wires you can see the two main pins are located. I personally didn't want to keep these two pins so I used my small screw driver and x-acto knife to pick the heads off of the plastic pins.


Using your x-acto knife, carefully cut away the existing heat shrink tubing around the wires, this will allow you to pull more wiring through the plastic ring.


My original plan was to de-pin the connector and slide the pins through the plastic rings. Unfortunately the pins were too large for the holes in the ring. However, should you need or want to de-pin the connector, the instructions will be at the end of the write up.

With the pins unable to slide through the plastic ring, you must cut both wires, or remove the pins and put new pins on after removing the wires from the ring. I chose to cut both wires and solder. I made my cut at about the mid point to insure I had plenty of wire in either direction to work with.
Using your x-acto knife, carefully remove the two plastic pins on either side of the wires. Work slowly to make sure you don't nick the wires too bad.

I nicked the wires a little bit so I used some heat shrink tubing to cover up the wire insulation. I then used a bit larger of a size to replicate the factory tubing that held the two wires together.


Your shift boot may be different than mine. I used BMW Part Number 25117919219. When you compare the two boots, you can see that the alcantara shift boot doesn't have holes for the wires to pass through other than the main hole for the shifter. To prevent the wires from rubbing or being pinched on the shifter, I made a small incision with the x-acto knife on the "inside" of the top of the shift boot. I don't have a great photo of where I made the incision but I will do my best to explain where on the shift boot I mentioned above. I made my incision in the extra alcantara material that is normally folded inside of the boot and hidden, Here the wires still have a layer of alcantara between them and the shifter and the incision is inside the very top crown of the boot so the wires should remain hidden.

If you are feeding your wires through the boot, do so now. Then solder the wires back together and use heat shrink tubing the cover the solder location.

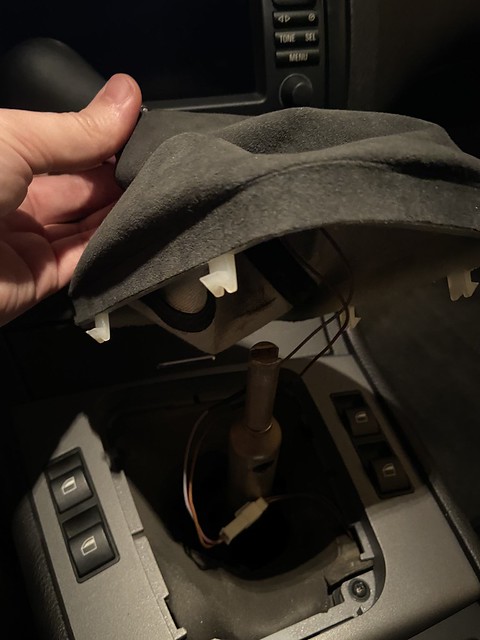
Plug your shifter into your car and turn on the key to the first position. Ensure your headlights are on and verify the shift knob illuminates.

Install the shift boot and shift knob fully and enjoy that OEM+ goodiness.

Instructions for de-pinning
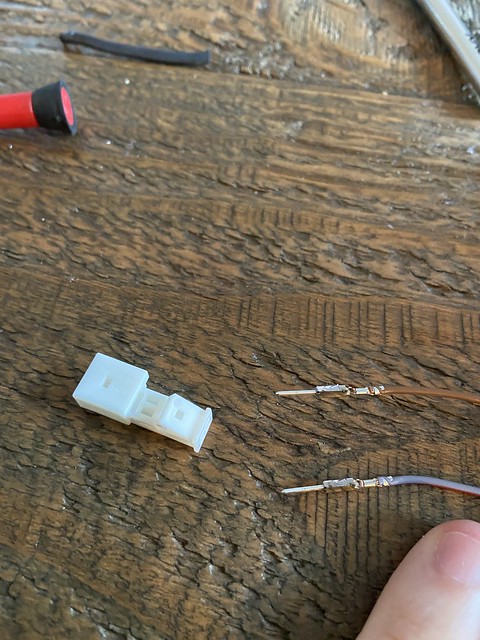
Use your x-acto knife to pop open this safety. This makes sure that the pins don't back out on accident.

With the safety open, use your small flat head, pick, or other tool to depress the pin and pull the wire part of the way out. The pin will get caught again just under the safety so you will need to do this step twice per pin.

When putting the pins back in, be sure to leave the safety in the open position.
This is a write up for installing an illuminated 6 speed shift knob from a F10 M5 (BMW Part Number 25112284205) or a F80 M3 / F82 M4 (BMW Part Number 25112284705) into your E46 (or E92) M3. Over time, the factory shift knob begins to fail and the clear plastic at the top may begin to bubble. In some cases, you may just want to switch over to a ZHP style knob. In my case, my factory knob was bubbling and I preferred the ZHP style shift knob. Originally I used a ZHP knob, which doesn't illuminate. Over time I kept thinking about having the illuminated shift pattern and M logo at night, but still retain my alcantara shift boot. Unfortunately the only options that I have found to purchase an illuminated shift knob without a boot is from LeatherZ.com. Currently the illuminated knob with the 6 speed and M logo display is $357 (wow). I am someone who prefers to use OEM parts when I can, so I sourced a used F80 M3 shift knob off of eBay for about $120. You can also use a shift knob from an F10 M5 or F82 M4, buying new or used per your budget and liking.
Tools and items required
F10 M5/F80 M3/F82 M4 factory shift knob
X-acto knife
Small flat head screw driver (I used a 2.4mm wide head one)
Wire cutters
Wire insulation jacket remover
Heat shrink tubing
Lighter or other heat source
Soldering iron
Solder
How to
Here is a factory shift knob from a F80 M3.

Inside of the boot, you can see where the shift knob attaches to the boot. There are 3 plastic pins that hold it into place. One on either side of the wires you can see the two main pins are located. I personally didn't want to keep these two pins so I used my small screw driver and x-acto knife to pick the heads off of the plastic pins.


Using your x-acto knife, carefully cut away the existing heat shrink tubing around the wires, this will allow you to pull more wiring through the plastic ring.


My original plan was to de-pin the connector and slide the pins through the plastic rings. Unfortunately the pins were too large for the holes in the ring. However, should you need or want to de-pin the connector, the instructions will be at the end of the write up.

With the pins unable to slide through the plastic ring, you must cut both wires, or remove the pins and put new pins on after removing the wires from the ring. I chose to cut both wires and solder. I made my cut at about the mid point to insure I had plenty of wire in either direction to work with.
Using your x-acto knife, carefully remove the two plastic pins on either side of the wires. Work slowly to make sure you don't nick the wires too bad.

I nicked the wires a little bit so I used some heat shrink tubing to cover up the wire insulation. I then used a bit larger of a size to replicate the factory tubing that held the two wires together.


Your shift boot may be different than mine. I used BMW Part Number 25117919219. When you compare the two boots, you can see that the alcantara shift boot doesn't have holes for the wires to pass through other than the main hole for the shifter. To prevent the wires from rubbing or being pinched on the shifter, I made a small incision with the x-acto knife on the "inside" of the top of the shift boot. I don't have a great photo of where I made the incision but I will do my best to explain where on the shift boot I mentioned above. I made my incision in the extra alcantara material that is normally folded inside of the boot and hidden, Here the wires still have a layer of alcantara between them and the shifter and the incision is inside the very top crown of the boot so the wires should remain hidden.

If you are feeding your wires through the boot, do so now. Then solder the wires back together and use heat shrink tubing the cover the solder location.

Plug your shifter into your car and turn on the key to the first position. Ensure your headlights are on and verify the shift knob illuminates.

Install the shift boot and shift knob fully and enjoy that OEM+ goodiness.

Instructions for de-pinning
Use your x-acto knife to pop open this safety. This makes sure that the pins don't back out on accident.

With the safety open, use your small flat head, pick, or other tool to depress the pin and pull the wire part of the way out. The pin will get caught again just under the safety so you will need to do this step twice per pin.

When putting the pins back in, be sure to leave the safety in the open position.


Comment