Interior looks beautiful. I'm so jealous!
-
-
Looks fantastic! Somewhat upset, I missed the set. But hey, glad it's on my car's twin, haha.Comment
-
What did you do with your original steering wheel?Comment
-
It’s on the car, just wrapped in new leather.Comment
-
Wow -I didn’t realize it had been so long since my last formal post. I gave a short teaser but time to do some catching up.
First bigger item for me wasn’t actually a purchase for myself. After the Tail of the Dragon trip, my best friend with a built STI (seen in some of the photos above) decided he wanted to move into the BMW platform. He wanted a black or white e92 6MT ZCP with under 60k miles. Luckily, I was able to find one with 66k miles only 2 hours away from us that he decided to jump on. So far he loves it, and it is fun for me to have my best friend in an M3. He didn’t take too long to jump into modding it, but I will leave that story for him to tell if he chooses.

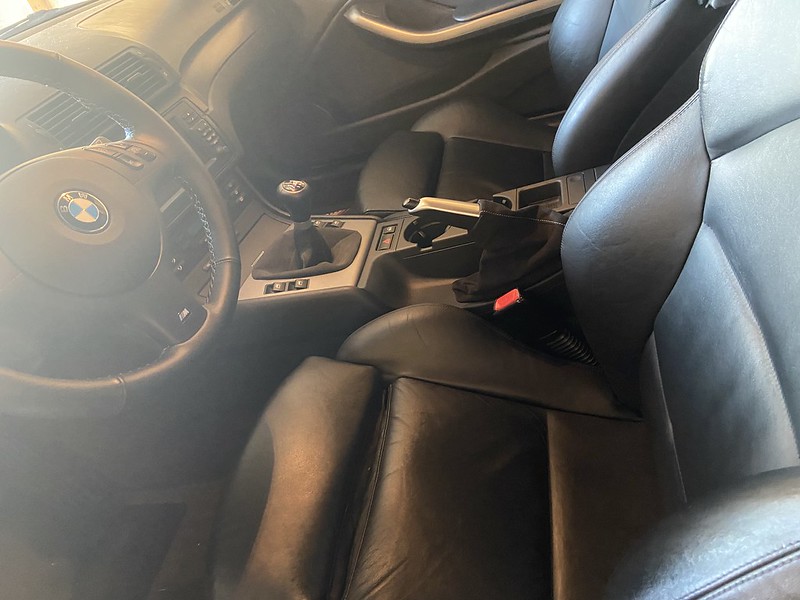
Back to my M3. Shortly after the Tail of the Dragon trip I decided to upgrade to an M-Performance emergency brake handle and alcantara boot. I heard a rumor that this part may soon be NLA. I’m not sure how true it is, but I jumped on it. I like the way it brings a little more attention to and brightens up the very dark center console area. The alcantara shift boot also ties into my alcantara shift boot which was a plus as well. I don’t have the best photos from this install, but hopefully you can get the idea.

The biggest news for the M3 I have is now below. When I saw BMWahba mention he had an M-Texture interior, I took a closer look at what it actually looks like. Needless to say I fell in love with the look and thought it would compliment my Imola Red exterior. Then I found out LSBALEX has the interior and his photos made me lust after it even more. Sure enough, AdamLZ on YouTube bought an LSB M3 with the interior and I really felt like I was missing out. I told myself if I ever saw a set come up for sale, I would buy it. I knew they were rare, just didn’t really know how many were ordered from the BMW factory.
MPartsWorldwide bought a crashed car that had an original M-Texture interior and listed the entire interior for sale late in the night on September 17th. I felt the asking price was really fair and shipping to Ohio was very reasonable via freight to a business. Lucky for me, my friend I spoke about above owns a Lumber business. Where I lost a bit of faith was when I was asked to pay via Paypal Friends and Family. Never before have I had someone refuse I pay goods and services, especially when I offered to cover fees. I spoke with Liam and a few others who have bought similarly priced items and they helped me establish some confidence in the purchase. I knew if I waited overnight that the seats would be sold, so I decided to go with it and made my purchase. My initial thoughts were that the interior was dirty, but in decent shape for 110k miles on them. The donor car was t-boned on the passenger side door, so an airbag did deploy through the door card. Below is a photo of the pallet prior to shipment, happy to say it looked pretty well wrapped.

It arrived literally the next day in pretty similar condition.

Thanks to the help of Titaniu//M and my best friend, swapping into the interior only took a couple of hours.


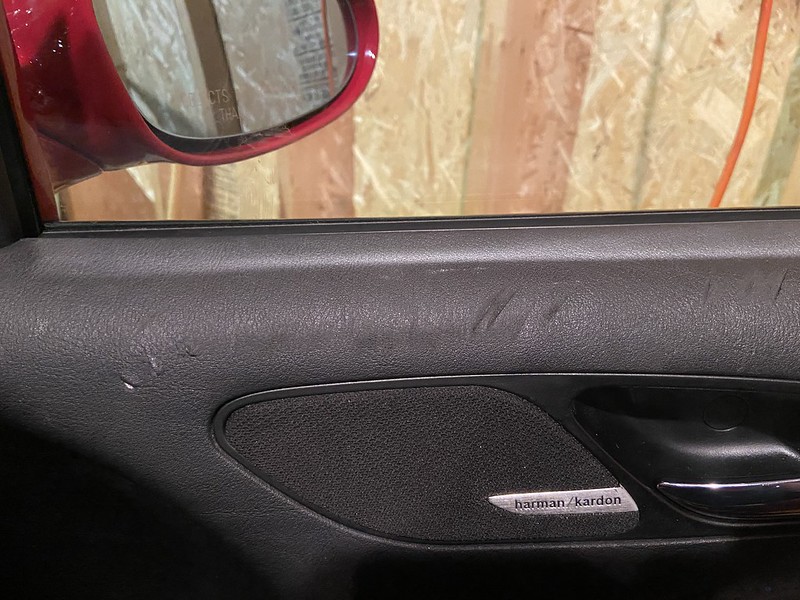
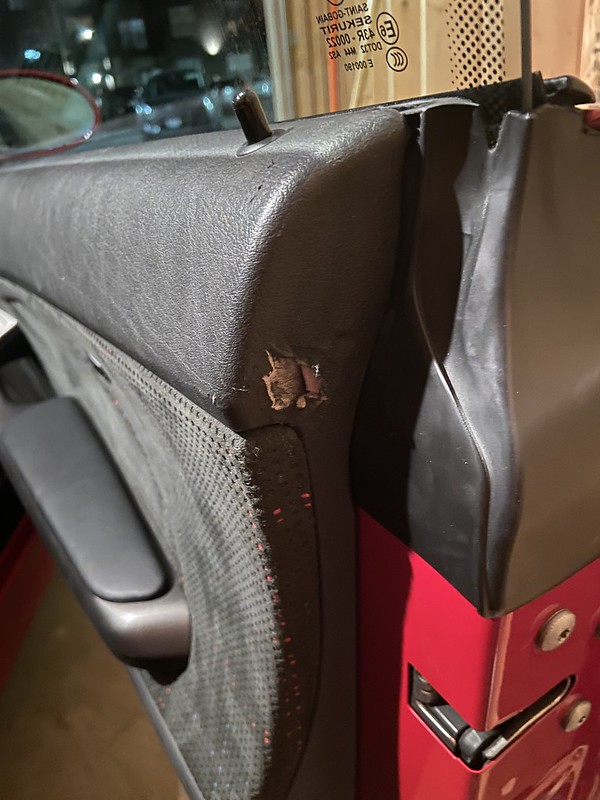
Unfortunately it got too dark to take any good photos of the front seats prior to cleaning. The back seats looked like they never saw any use, which is great. The front seats have obviously seen some use but that's ok. I did have some issues with the passenger door card. I can’t really tell if it was from the accident or from shipping but there were scratched the top of the vinyl near where the window was which I attribute to the broken window in the accident. The weird one was a tear on the vinyl in the door jam. You can also see the fabric on the airbag cover is loose. When the airbag deployed, the soft plastic/styrofoam backing shattered and broke the bond with the glue.

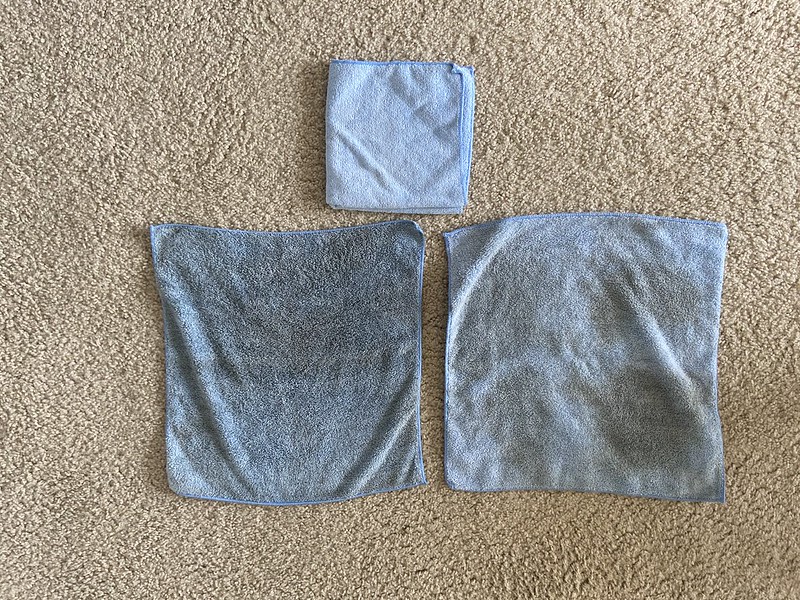
I immediately went to vacuuming all of the interior to remove some of the bigger pieces of dirt and some final pieces of broken glass from the accident. Next, I used leatherique on all of the leather components and Sonax alcantara cleaners on all of the inserts. The leatherique did its job but the leather didn’t seem to be terribly dirty. The Sonax on the other hand was very helpful. I went through an entire bottle of Sonax alcantara cleaner, luckily it was enough to clean everything including the front and rear door panels. Below are photos of the towels displaying the dirt removed from the alcantara on the front seats alone (clean towel for reference).

My next steps were to help restore some of the bolstering which has had a bit of cracking. I had some leftover dye that I used to help darken the cracking. Below is an example for before and after photos, sorry they’re not the best. The dye job was subtle though.


With the interior clean, I wanted to shift my focus back to the passenger door panel. I felt like with this interior, restoration wasn’t just needed, but required. You can’t exactly just jump on eBay or Facebook and find an M-Texture interior being parted out. ASCFabrics does sell a good reproduction of the fabric but it is $225/yard which is pretty expensive. I wanted to preserve the original fabric to a) save on cost and b) match the age of the rest of the interior. I knew repairing the shell on the airbag cover wasn’t a possibility due to its shattered state. The scratched and torn vinyl could be repaired but it wouldn’t be perfect and would still be visibility repaired since the texture wouldn’t match 100%. Finding a donor door panel with non-damaged vinyl and an intact airbag cover shell was the best option. After reaching out to BMWRestoredSeats on Instagram I was told that there is a slight difference between the leather and cloth door cards. Leather door cards have a thicker foam than cloth, so the shell is shaped a little differently. After some searching on eBay, I found a laser cloth door card for sale that was the perfect candidate.

While I feel like I could have probably DIYed this repair by swapping over the inserts, I felt the cost if I had an error was too high so I took it to some professionals in town. I used Tritex Corporation in Columbus and they did a great job. We used the vinyl structure from the donor card, swapped over the large M-texture insert without reupholstering, and then removed the M-texture fabric from the shattered shell and placed it on the donor shell with some new foam. I also transferred over the factory “M-texture” sticker located on the back of the door panel. Tritex knocked it out of the park on this. I don’t have the best photos of the repair, but it looks great.


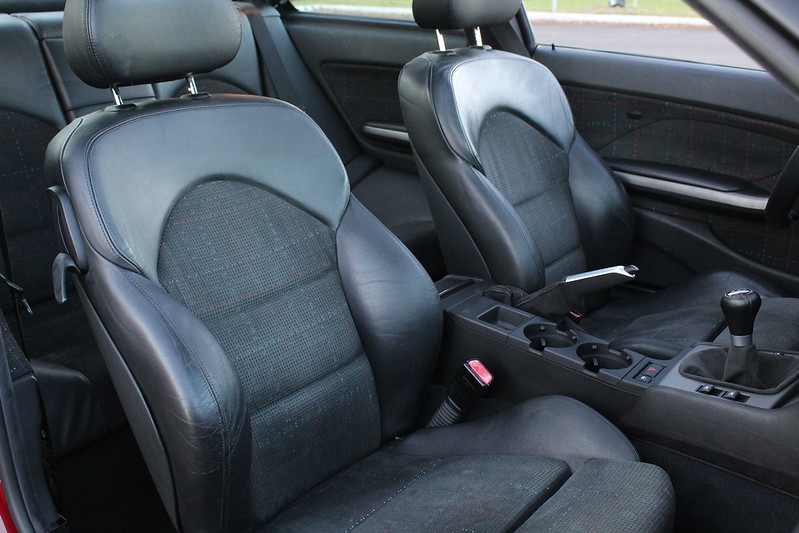
Finally, here is the finished product. Some of the photos are still missing the passenger door card since I took them while the repair was still being worked on. All I can say is that I am in love and these are easily my favorite part of the car right now (outside of the driving experience).


Also - for those curious, here are the factory production numbers of M-texture for North America courtesy of Duck360198 :
US 6MT: 129
US SMG: 76
CAN 6MT: 67
CAN SMG: 22
TOTAL: 294Last edited by Inizes; 10-20-2020, 06:23 AM.Comment
-
Looks wonderful man. congrats!!!! It is such a good interior.
Current:
1997 BMW M3 - Boston Green/Modena
2003 BMW M3 · Coupe · 6MT - Alpine White/M-Texture AlcantaraComment
-
Interior looks great! super jealousComment
-
Comment
-
Man that looks great. Big improvement just with the dye rub. Your ass is going to be much happier with the improved breathability next summer 👍Comment
-
My fiancé’s legs won’t stick to the hot leather anymore either!Originally posted by ZHPizza View PostComment
-
Awesome build and restoration journal. I’ve been doing the same maintenance stuff throughout this past year and you just motivated me to put together a journal as well. Keep up the fine modding!
Comment
-
Thank you! I added up how much I spent on parts this year... oops hahah. It’s all worth it though, the car is so much better than when I found it and it really deserved it in my opinion. While I may not see $1 for every $1 I put in, I think that with values appreciating for well documented cars, it has to be pretty close.Originally posted by DropTopKingM3 View PostComment
-
It’s cool at the end of the day. You’re building it for your own enjoyment. Plus it gave you a lot to do during covid.Comment
-
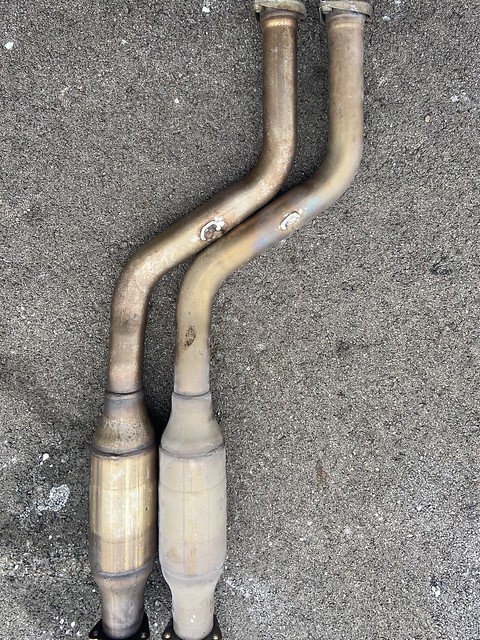
I told myself I was going to be done working on the car for 2020, but for some reason I made an excuse that exhaust would be acceptable and the last thing. This time I really am going to stick to it though. I was scrolling through eBay and stumbled across a set of OEM Euro Headers for sale in Spain, the price was about $520 shipped to my door. This felt like a pretty good deal, but I wasn’t set on whether or not I should use these or go with Megans. Ultimately I decided OEM Euro seemed to fit the theme of my build a bit better since I have been lightly using the term “OEM+.”

They arrived pretty much as I expected. I thought they were a bit dirty so I cleaned them up in the sink to remove some of the surface dirt to make the installation process a little cleaner. I also removed one of the old compressible donut gaskets to fully prepare it for installation.
Black Friday made for some pretty solid deals from ECS Tuning on Supersprint Exhaust products. I had my eyes set on a SS Resonated X-pipe. Free shipping and the cheaper Black Friday pricing made this a better deal than Status Gruppe’s resonated X-pipe. Plus, shipping from 2 hours away in Ohio vs across the country from LA lowered the chances of shipping issues or damage.
Now that I had the headers and a section 2, it only made sense for me to find the final of the piece I was looking for, right? I knew from some videos I had seen from Instagram and YouTube that I wanted to try the Rogue Engineering El Diablo section 3. Unfortunately, they seem to be very difficult to get your hands on one. I woke up one morning and scrolled through Facebook. One of the first posts I saw was a post only a few minutes old for an M3 being parted out at TySpeed in New Jersey. That car had an El Diablo on it so I messaged to inquire and I was told the price was $600, with another $100 for shipping. I’ve seen these sell for a closer to $900-1000 so I thought it was a no brainer to buy it. Even if I used it and didn’t like it, I could easily get back out of it. Once it arrived, I noticed there was a bit of a minor issue that I had not been told about. However, the seller wasn’t aware of it either. On the driver side exhaust tips, there were a couple of cracks that had formed.


I swung by Go Fast Engineering in Powell, OH to quickly get the cracks welded up. Ryan was a huge help for fitting me in quickly. I forgot to grab after photos, but the cracks were drilled at either end to prevent spreading and then filled the crack in.
I have taken the section 2 off previously, so that wasn’t too bad of a job to take off. I thought it would be better to take this off first to help make taking off the muffler easier. I have heard that the stock section 3 was heavy, but wow 60 lbs feels heavier when you are trying to drop it by yourself and your floor jack isn’t tall enough to help support you. I think the weirdest part is how the weight is distributed and the awkward shape. I don’t think the muffler has ever been off the car, so I got pretty dirty.


I mounted up the section 2 and section 3. I didn’t bolt section 2 to section 1 right away so that I could remove section 1 while installing the headers.


I had read through the header install DIY in the forum and watched a few videos, but I was still nervous for some reason. More-so than the VANOS job I had performed earlier this year. I started my removal of the SAP and disconnected the coolant hose to the expansion tank. I was able to keep the smaller somewhat hard line from the expansion tank attached and rested the tank on the air intake plenum. I did clean up every part that I removed from the car, so I have lots of clean heat shields that nobody will ever see… but I know haha.


The only issue I had with the header install DIY was it didn’t specify what size corks to use to plug the two coolant holes. I bought an array from Lowe’s and here were the two sizes that I used.

My header installation went nearly flawless. My only issue is I had one stud come out of the block, so I needed to go purchase one from the nearest BMW dealership. $6 later I was back in business. I was lucky and had 2 friends come out and help me with this job. I think the ideal number of people for this job is two total. One person on top getting to most of the header nuts with a flex head socket, and one person under the car guiding the socket to the nuts the person on top can’t see. If I remember correctly, there were only 2 or 3 nuts I had to get from the bottom.
Putting everything back together was pretty easy. The first start up was louder than I expected and smelled due to some of the spilled coolant burning off. The first drive felt like pure bliss, I could have driven my car all night. The next morning I gave it another shot and started to realize that while the exhaust sounds great above 3,000 rpm, my current setup has a flaw. Between 2,500-3000 rpm, there is an awful drone/resonance that I will need to work on removing, especially since this is basically cruising speed on the highway. I have a fix in the works, so my next update will hopefully be that solution. Below is a video I put together of the current set up.
https://youtu.be/Xp6v7rPU8wsLast edited by Inizes; 12-23-2020, 06:20 AM.Comment
-
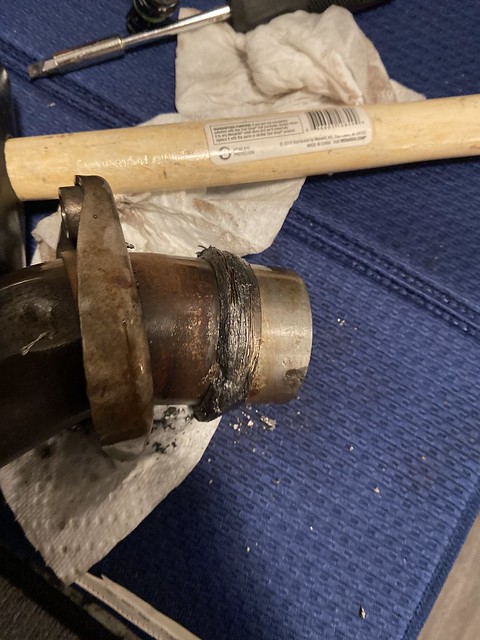
I alluded to it in my last update, but I wasn’t 100% satisfied with my first attempt of an exhaust setup. I was left with a loud resonance between 2,500-3,000 rpm, which is right about highway cruising speed. I couldn’t have avoided this rpm band and I definitely wasn’t going to live with it. Based on some videos I had seen online, I decided my first attempt at a fix would be dual OEM section 1 resonators. Most people would just source one additional section 1 and cut up their original. I want to keep as many original parts as I can with the car (that aren’t worn out) so I sourced 2 new section 1s to cut up. The first one was a Facebook Marketplace find in Cincinnati for $50. Finding the second one local turned out to be a harder task than I originally thought. I made some calls to some junk yards around the state based on what was listed on car-part.com. All of these leads turned out to be dead ends. I next turned to eBay and found almost every listing wanting about $150, I was surprised. I knew there was no way these were selling fast enough for every listing to be comfortable getting their asking price, so I went after the “Make an Offer” listings and began my bidding. Surly enough one of the listings that was originally $170 accepted my $50 offer and even had free shipping. So, for a grand total of $100 I had two section 1s to cut up.

The grinding of the welds was pretty easy. I made the mistake of not using ear protection when grinding apart the first one. Definitely use ear plugs, your hearing will thank you.

Trying to fit the dual resonator setup in the car was a bit more difficult than I was expecting. They definitely do fit, but there is a little bit of contact near the “S” bend. I found the passenger side piece to be the tightest squeeze, but I also put it in second to that may have been the cause. I would try it in the opposite order (passenger side first, then driver) and see if it has similar results the next time I drop the exhaust.

So now my setup is the following:
OEM Euro Headers (Catless)
Dual OEM resonator Section 1
Supersprint Resonated X-pipe Section 2
Rogue Engineering El Diablo Section 3
Here is the accompanying short video of the current exhaust setup: https://youtu.be/bTm5cbSX_uw
I found that this removed all of that nasty drone I was having from 2500-3000 rpm. I didn’t notice too much of a difference other than that.
I also decided to make a comparison video of the low end where the drone was as well as the top of the power band. That video is here: https://youtu.be/grfy8kFwtwk
To me, the top of the power band sounds the same, so I feel as though my goal was accomplished.
With the help of ECUWorx, I also tuned out the post cat O2 sensors and the EGT sensor out. This removed the CEL light off the dash which would drive me nuts. For now, I decided to leave in the "cat heating sequence" so that I would still have a true cold start. For the giggles, I added in the shift light programming and also removed the 155mph speed limiter. Will I ever go that fast? No. But its fun to do I guess.
I also tackled another very minor project recently. While I was vacuuming the driver side footwell, I noticed there was a tear in the clutch pedal pad. Knowing that these pedal pads arent very expensive, I figured they could both be replaced.


Old in on the top, new in on the bottom. Not a huge difference but the tear is gone and the car is slowly getting back to factory fresh.
 Last edited by Inizes; 01-14-2021, 05:36 AM.
Comment

Comment