Announcement

Collapse
No announcement yet.

Tyler's 2011.5 Jerez Black E90 Slicktop Daily

Collapse
X
 
  • Filter
  • Time
  • Show
Clear All
new posts

    Tyler's 2011.5 Jerez Black E90 Slicktop Daily

    While I loved having 2 E46 M3s, again daily-ing an E46 M3, I felt that I had reached an impasse of sorts with the 2002 steelgrey 6spd daily. I had put a lot of sweat equity into it, but it was at the point where much more investment would be needed, and it wasn't quite meeting my needs as an older enthusiast and a father/husband. It was also always an issue, for me, of steel vs. silvergrey and the silvergrey was winning every comparison to the point where I was just constantly disappointed in the pre-lci car.

    The market has also been on fire, as you all know, so I figured now was a fine time to sell. I also was starting to think it was a now or never situation with buying the only other BMW that I have real interest in, the e9x or e60 with f1 derived n/a v8 or v10 as their values are rapidly rising, but more laws/restrictions coming in.

    Initially, I wanted to go big with the v10. My friend bought one around this time as well, but it has been problem after problem. I already own an E46 M3, so I'm no stranger to high running costs and "fixes," but this was going to be my daily car and a car I'd hopefully keep for years, so I shied away from the older and troublesome E60.

    The only other car that would have a chance at making me as happy as an E46 does was the e9x with S65. I wanted 4 doors, dct, lower mileage this time around. My normal criteria of low options was still in play as I'm not a fan of much, even for a daily, but after 4 BMWs in black, silvergrey, tiag & steelgrey, I was ready for some color this time. Unfortunately, the e60/e9x generation's color pallet was very German, less colorful than e36/46 IMO. So me and my friends (who doesn't like looking at cars for sale ) started looking at listings, and it didn't take long to find something special.

    My friend sent me a link to a craigslist ad, in a city only about 1.5hrs away. The ad was not that well done, which probably helped me, but the price was great, given this climate, for the mileage and year.


    Click image for larger version  Name:	CraigslistAd (3).jpg Views:	0 Size:	244.6 KB ID:	160629

    It took me a while, but I zoomed in and asked my friend, "wait a min, is this a fucking slicktop????"

    My 2004 is a slicktop, my 2012 128i 6spd was a slicktop, gotta keep it going.

    2011 with 48k for $36k? Car is unmolested, original owner! Engine bay looks like owner took car of the car:


    Click image for larger version  Name:	CraigslistAd (2).jpg Views:	0 Size:	239.1 KB ID:	160627

    The interior was not what I was looking for tbh, perhaps that also played into the ease with which I obtained the car. I was open to leather that wasn't black, but I'm no fan of the wood trim. Easy fix, though.

    Click image for larger version  Name:	CraigslistAd (1).jpg Views:	0 Size:	195.7 KB ID:	160628

    Car seemed immaculate and well priced, almost too good to be true being only one owner, 48k, slicktop, not white/black/silver/grey. I had to go check it out. Ran a carfax, which only served to increase my excitement:

    Click image for larger version  Name:	Carfax1.jpg Views:	0 Size:	95.2 KB ID:	160630
    Click image for larger version  Name:	carfax2.jpg Views:	0 Size:	127.9 KB ID:	160631

    Confirmed original owner, socal original, bought and serviced at the same Southbay dealership, it even got the 1200 mile oil change, not to mention a slew of maintenance/inspections.

    So I drove down with my buddy, and test drove the car. It still had pilot sport tires from 2013 lol. Female owned, always garaged, and it showed. A stack of original receipts that matched the carfax was provided as well. 2 keys, you know, the kind of purchase you want. Bought it for $35,400 after tax/title, and drove it home!


    Click image for larger version  Name:	20220215_205907.jpg Views:	0 Size:	59.2 KB ID:	160632

    That VIP sticker means it got a hand wash/wax every time it visited the dealership!

    Click image for larger version  Name:	20220215_210232.jpg Views:	0 Size:	76.1 KB ID:	160634

    Still not liking the wood lol

    Click image for larger version  Name:	20220215_205939.jpg Views:	0 Size:	47.3 KB ID:	160633

    The bamboo novillo leather is really growing on me. I love the supple feel of this leather. The e9x seats are incredible. These have full heat/lumbar (like 4 lumbar adj lol).

    I think I'm only going to swap out the trim. The bamboo really suits the jerez nicely. Very classy. No, not as cool as mtex on LSB, but sophisticated and luxurious, especially at this mileage/condition.

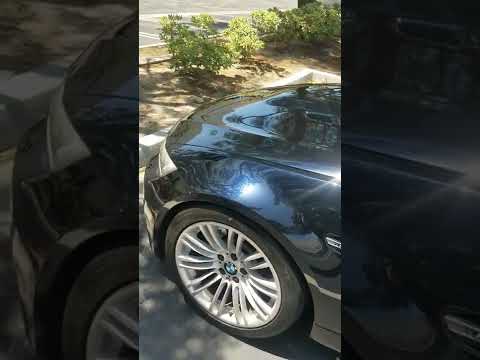
    I know it's Jerez BLACK, but this color is amazing. Very similar to Carbon black, a favorite of mine, this paint is a little darker and more purple than CB in most lighting. Then, at times, it appears very blue, like this:


    Click image for larger version  Name:	image_33456.jpg Views:	7 Size:	112.0 KB ID:	160635

    Here's the vin decoder information on options:

    Click image for larger version  Name:	Vindecode (1).jpg Views:	0 Size:	86.1 KB ID:	160636 Click image for larger version  Name:	Vindecode (2).jpg Views:	0 Size:	70.1 KB ID:	160637 Click image for larger version  Name:	Vindecode (3).jpg Views:	0 Size:	77.2 KB ID:	160638 Click image for larger version  Name:	Vindecode (4).jpg Views:	0 Size:	66.7 KB ID:	160639


    Seems like I not only lucked out on it being an original owner/slicktop, but it's an 2011.5, which is pretty important. I knew it had to be an LCI, either e60 or e90, but the 2011.5 also has more upgrades like the combox for ipod/usb. This is very, very important to me as I want to play high quality .WAV files for music (30 gigs or so, on a thumbdrive, no less). This Hifi (m3 base) stereo, with the combox, is perfect because it's the easiest and cheapest to upgrade. And because my CIC will put out 5 volt low level signal AND will play .wav files, I only have to upgrade the amplifier! Ya, and probably speakers too, knowing me.

    More to come...
    Last edited by Tbonem3; 03-25-2022, 06:06 PM.
    DD: /// 2011.5 Jerez/bamboo E90 M3 · DCT · Slicktop · Instagram
    /// 2004 Silvergrey M3 · Coupe · 6spd · Slicktop · zero options
    More info: https://nam3forum.com/forums/forum/m...os-supersprint

    #2
    Congrats on a great pick up! I'm somewhat jealous of this great find at a very reasonable bargain.

    Comment


      #3
      Thank you!

      Some more pictures after bringing it home.

      It certainly looks like the car was waxed, nice beads!


      Click image for larger version  Name:	20220215_211153.jpg Views:	0 Size:	148.2 KB ID:	161405
      Click image for larger version  Name:	wash27.jpg Views:	0 Size:	222.0 KB ID:	161406

      So this car was the first month of production where they introduced the "reflex silver" color for the 18s (2011.5). I really really like them. They look great on E46 too. Looks like they even waxed the wheels:

      Click image for larger version  Name:	20220215_211319.jpg Views:	0 Size:	102.3 KB ID:	161407

      Given the PO was female, there's a fair amount of rash, but, in line with her "no expenses spared" style of ownership, the rash was sanded and touched up professionally!

      I'm loving this paint! I'll do a full correction in April/May.


      Click image for larger version  Name:	e90wash3202205.jpg Views:	0 Size:	90.5 KB ID:	161408

      Yep, it's a slicktop:

      Click image for larger version  Name:	Slicktop1.jpg Views:	0 Size:	62.5 KB ID:	161409

      Can't get over how clean this engine bay is. The valve covers don't even have any oil weepage yet.

      Click image for larger version  Name:	JerezDay124.jpg Views:	0 Size:	164.8 KB ID:	161410
      Click image for larger version  Name:	20220215_210420.jpg Views:	0 Size:	118.5 KB ID:	161411

      So I read that E92 & E93 got plastic front fenders, but not E90. Well, maybe this is another LCI or a 2011.5 change, but this car definitely has plastic fenders. As a paint guy, it kills me a little, but I'll take the weightloss.

      Click image for larger version  Name:	20220215_210450.jpg Views:	0 Size:	125.5 KB ID:	161412

      The Jet Black and Jerez black cars show swirls so easily. Given the mileage and garage storage, the amount of swirls is actually quite low. They'll be gone soon tho.

      Click image for larger version  Name:	20220215_210338.jpg Views:	0 Size:	106.8 KB ID:	161413

      For some reason, PO had a chrome ///M plate cover up front, but a black one in the rear. I'm taking the front off anyway, but I think I'll put it in the rear where it'll go nicely with the chrome badge and exh tips, and contrast nicely against the Jerez blk.

      Click image for larger version  Name:	20220215_205830.jpg Views:	0 Size:	132.8 KB ID:	161414

      The plate holder was screwed into the bumper 😭 I'll see how good I can make it look when I correct the paint.

      Click image for larger version  Name:	20220215_210824.jpg Views:	0 Size:	92.0 KB ID:	161415

      The ///M is faded, so replacing...

      Click image for larger version  Name:	031922wash14.jpg Views:	0 Size:	99.9 KB ID:	161416

      Play nice you two! 😁

      Click image for larger version  Name:	20220215_210858.jpg Views:	0 Size:	87.5 KB ID:	161417
      DD: /// 2011.5 Jerez/bamboo E90 M3 · DCT · Slicktop · Instagram
      /// 2004 Silvergrey M3 · Coupe · 6spd · Slicktop · zero options
      More info: https://nam3forum.com/forums/forum/m...os-supersprint

      Comment


        #4
        Beautiful find!

        Comment


          #5
          Congrats on the car Tbone, can't wait to watch the detail master at work. This is gonna be good!!
          Build thread: Topaz Blue to Shark Blue

          Comment


            #6
            Thanks guys!

            Some more progress

            Found some janky wiring on battery and followed it to a lojack. Yay weightloss!

            Click image for larger version  Name:	20220216_103629.jpg Views:	0 Size:	126.1 KB ID:	168549

            Got some bumper reflector covers:

            Click image for larger version  Name:	reflectors1.jpg Views:	0 Size:	146.5 KB ID:	168550

            Product was not finished well

            Click image for larger version  Name:	20220408_132219.jpg Views:	0 Size:	53.0 KB ID:	168548

            I use a blank cc to get under e46 & now e9x reflectors

            Click image for larger version

Name:	reflectors204.jpg
Views:	847
Size:	47.8 KB
ID:	168552

            Before

            Click image for larger version  Name:	reflectors201.jpg Views:	0 Size:	160.7 KB ID:	168551
            Click image for larger version

Name:	reflectors202.jpg
Views:	877
Size:	88.8 KB
ID:	168554

            After:

            Click image for larger version

Name:	reflectors205.jpg
Views:	846
Size:	62.9 KB
ID:	168555
            Click image for larger version

Name:	reflectors208.jpg
Views:	854
Size:	86.5 KB
ID:	168556
            Click image for larger version

Name:	reflectors209.jpg
Views:	872
Size:	161.9 KB
ID:	168553


            Car had a chrome ///M plate cover up front, but a black one in back (I would say it should have been reversed). I don't run a front plate, but it'd be frame-less anyway, but I do want to use the chrome cover on the rear to add contrast to the dark color and match the badge and exh tips.

            Last edited by Tbonem3; 05-19-2022, 02:02 PM.
            DD: /// 2011.5 Jerez/bamboo E90 M3 · DCT · Slicktop · Instagram
            /// 2004 Silvergrey M3 · Coupe · 6spd · Slicktop · zero options
            More info: https://nam3forum.com/forums/forum/m...os-supersprint

            Comment


              #7
              The chrome needed a polish

              Click image for larger version  Name:	licplate02.jpg Views:	0 Size:	136.8 KB ID:	163472

              You guys know me, even did the screw heads (left done, right still original)

              Click image for larger version  Name:	licplate03.jpg Views:	0 Size:	89.4 KB ID:	163474 Click image for larger version  Name:	licplate05.jpg Views:	0 Size:	141.9 KB ID:	163473 Click image for larger version  Name:	licplate07.jpg Views:	0 Size:	148.5 KB ID:	163471

              DD: /// 2011.5 Jerez/bamboo E90 M3 · DCT · Slicktop · Instagram
              /// 2004 Silvergrey M3 · Coupe · 6spd · Slicktop · zero options
              More info: https://nam3forum.com/forums/forum/m...os-supersprint

              Comment


                #8
                Few little things to post before I start with the mods/maintenance

                First, the bamboo leather has really grown on me. I'm glad it's just the seats and doors, not the dash or even lower half of the dash. The wood trim is really killing me, plus there's tons of glare from the sun because the trim is gloss and quite large in size as compared to E46, so I'll be looking to swap it out or wrap it.

                The Blue Jerez paint (in the sun) really pairs nicely with the bamboo, esp for me at this point in life. Fox red would look cool too ofc, and fetch more upon resale, but I like the jerez/bamboo combo a lot.

                Click image for larger version  Name:	20220314_145046.jpg Views:	0 Size:	75.7 KB ID:	168695

                Happened to be driving the E90 when I went to my friend's house who has an E46 in Carbon Black (normally, I'd be in my E46), so I took some pics of them together.

                Jerez is the 2007+ version of carbon black basically, like how tanzanite has superseded jerez in the F series I believe. I really love CB, so it was cool to put the 2 together.

                You can see that Jerez is a touch darker, and a little more purple in it than CB's blue-r tone.

                Click image for larger version  Name:	20220314_145414.jpg Views:	0 Size:	156.5 KB ID:	168697 Click image for larger version  Name:	20220314_145329.jpg Views:	0 Size:	145.2 KB ID:	168696

                More comparisons or should I say "no comparison" lol

                I never took to the E60+ "bangle" styling from BMW, but I have to say 2 things - 1) they look much better in person, esp the M models with the wider bodies & 2) they are very German looking, very muscular, angular and handsome I would say, if I'm being nice.

                However, nothing holds a candle to the E46. I really love this E90, it's a rockstar, but I'm sure glad I still have an E46.

                Click image for larger version  Name:	E46E905.jpg Views:	0 Size:	178.5 KB ID:	168698 Click image for larger version  Name:	e90switch4detail07.jpg Views:	0 Size:	174.6 KB ID:	168699

                I just get to enjoy the best that both have to offer. I also am learning to change how I take pictures (settings, distance, angle, lens choice) since the E90 can look quite a lot better or worse whereas the E46 looks good no matter what you do lol

                Next, I'm going to be changing springs. I've decided on Swift-R as they have the best mix of drop and linear spring rate so that you don't hit the bumpstops, though there are also a couple other tricks, like for the E46, I'll do to recapture travel (shaved guides/e36 bumps).

                I'm posting a couple of photos of the car, stock, for reference. I'll be doing 15mm/12mm spacers as well. No studs for this car, and no new wheel setup for some time, if at all.

                Click image for larger version  Name:	e90stock08.jpg Views:	0 Size:	150.9 KB ID:	168700 Click image for larger version  Name:	e90stock12.jpg Views:	0 Size:	268.9 KB ID:	168701
                DD: /// 2011.5 Jerez/bamboo E90 M3 · DCT · Slicktop · Instagram
                /// 2004 Silvergrey M3 · Coupe · 6spd · Slicktop · zero options
                More info: https://nam3forum.com/forums/forum/m...os-supersprint

                Comment


                  #9
                  As I've mentioned in the E46 journal, my neighbors allow me to park a car in their garage for most of the year while out of state. They're leaving now, so I can move the E46 into their garage which allows me to ramp up the mods/maintenance on the E90.

                  As badly as I want to correct the paint (like my favorite thing to do), it's still not that nice out (early March at this point) and this paint needs the bright sun, so I'll wait a bit and do my 2nd favorite thing, suspension!

                  Click image for larger version  Name:	swiftsprings1512spacers33.jpg Views:	0 Size:	121.5 KB ID:	169075

                  This is not a typical instagram e9x build, no e88s, no ohlins, etc, but I still am doing some subtle mods that should add up to really nice and useful car, all around.

                  The chassis is already quite brilliant, but I wanted to lower the car a touch, increase spring rate, widen the track & add a little neg camber. Did some research, and found that the best lowering springs for the e90 are Swift spec-R. Good drop with good rates unlike most brands where one end is lowered too much and/or one end's spring rate is too low (I'm looking at you, H&R). Just as bad, if not worse than the E46, the E9x almost rides on the bumpstops, but these swift springs were designed to get you as low as possible without engaging the bumps during normal driving. There are other tricks you can do as well, similar to E46, that will recapture travel. Namely, using E36 M3 bumps & shaving down the guide supports (the mounts) a la Dinan.

                  Front end, wheels off. Quite of bit of surface corrosion. This is a low mileage car, so while it's in great condition, there'll be instances like this where maybe the wheel hasn't been off in years.

                  Click image for larger version  Name:	swiftsprings1512spacers02.jpg Views:	0 Size:	80.5 KB ID:	169077
                  Click image for larger version  Name:	swiftsprings1512spacers03.jpg Views:	0 Size:	85.2 KB ID:	169076

                  Even though the e9x chassis is a revelation from the older E36/E46 era, it's still very similar, still a macphe strut up front with swaybar. 2 arms instead of 1, but that's irrelevant to spring/strut swap.

                  3 nuts loosened, now the whole assembly can drop down so I can fit my spring compressors in the tower (it seems tighter in here than E46)

                  Click image for larger version  Name:	swiftsprings1512spacers05.jpg Views:	0 Size:	101.1 KB ID:	169078

                  I put a little jack under the strut/hub so nothing can just fall down, but I need to lower things as much as possible in order to compress the spring:

                  Click image for larger version  Name:	swiftsprings1512spacers08.jpg Views:	0 Size:	49.8 KB ID:	169079

                  I really like these struts. Alloy housings, very stout. Seem like big upgrades on the E46 sachs. With 48k, I'm just doing springs. in this pic, you can see a thick washer that the bump stop will hit. Removing it is one of my tricks to recapture travel, not that it's a lot, but every bit helps, and I'm not cutting the mounts' guide tubes (more nec with H&R springs or Eibach I believe)

                  Click image for larger version  Name:	swiftsprings1512spacers10.jpg Views:	0 Size:	139.9 KB ID:	169082

                  Disassembled, cleaned and treated the rubber pads. I'm not replacing them on purpose, I want as much drop as possible, and they're in good condition anyway. You see new E36 bumps installed.

                  Click image for larger version  Name:	swiftsprings1512spacers12.jpg Views:	0 Size:	84.9 KB ID:	169081

                  Swift vs OE

                  Click image for larger version  Name:	swiftsprings1512spacers13.jpg Views:	0 Size:	86.4 KB ID:	169080

                  Reassembled (note, no 3/16" washer - bump just butts up against top mount)

                  Click image for larger version  Name:	swiftsprings1512spacers14.jpg Views:	0 Size:	127.4 KB ID:	169083

                  You can get a special socket, but it's easy enough to loosen/tighten the nut, and hold the shaft, with hand tools (if no ugga dugga). Also, note removal of strut pins to allow for a little more neg camber.

                  Click image for larger version  Name:	swiftsprings1512spacers15.jpg Views:	0 Size:	138.6 KB ID:	169085

                  This little clam shell spreader bit is fantastic. I never used it on E46 (prob should have), but I read about it and bought when working on my e82. Came in handy for the e90. Makes ingress/egress easier. I still clean the inside of the shell with wd40/red scotch pad to smooth it out and remove corrosion.

                  Click image for larger version  Name:	swiftsprings1512spacers17.jpg Views:	0 Size:	95.0 KB ID:	169086

                  With the mount's pin removed, you can now move the top mount in and out since the strut tower's holes are slotted. You can push or leverage the top of the strut inwards, and just lift the strut brace plate to see if you're all the way inboard.

                  Click image for larger version  Name:	swiftsprings1512spacers18.jpg Views:	0 Size:	51.0 KB ID:	169084

                  All done. I still use a flat head to keep the strut leveraged over towards the engine as I tighten the 3 nuts to make sure I'm inboard as much as possible.

                  Click image for larger version  Name:	swiftsprings1512spacers19.jpg Views:	0 Size:	108.6 KB ID:	169089

                  Cleaned up the hubs and wheels:

                  Click image for larger version  Name:	swiftsprings1512spacers21.jpg Views:	0 Size:	67.4 KB ID:	169087
                  Click image for larger version  Name:	swiftsprings1512spacers22.jpg Views:	0 Size:	107.4 KB ID:	169088

                  I love these KSP spacers! Rock 'em on my E46; got a set in 15mm for the front and 12mm for the rear for E90 now. Funny, the 15/12 combo is perfect for stock wheels on E46 AND E90. No studs for this car, just black, extended lug bolts.

                  Click image for larger version  Name:	swiftsprings1512spacers23.jpg Views:	0 Size:	72.8 KB ID:	169090
                  Click image for larger version  Name:	swiftsprings1512spacers24.jpg Views:	0 Size:	64.1 KB ID:	169091

                  All done with the front. Didn't take a pic, but I didn't replace anything else, just loosened the swaybar endlink from the strut housing. I'll look at replacing some more stuff like bushings/links/thrust arms a while from now since I don't drive the car that much.

                  Just dropping the front end down, the fitment already looks great! Don't expect too much settling from here (I even matched the spring coils to the indentations in the rubber pads lol)

                  Click image for larger version  Name:	swiftsprings1512spacers28.jpg Views:	0 Size:	59.3 KB ID:	169092

                  Rears. Again, an engineering revolution in rear suspension, but it's still a divorced shock spring setup, and not too dissimilar to E46 when it comes to R&R of springs/shocks. Biggest difference is the arms/bearings and much larger (and longer!) hardware.

                  Click image for larger version  Name:	swiftsprings1512spacers30.jpg Views:	0 Size:	72.0 KB ID:	169094


                  I support the rear as well, with a little jack, makes life easier. I also don't want any load on the bolts as I remove them. This is the part that's most different to E46.

                  Click image for larger version  Name:	swiftsprings1512spacers31.jpg Views:	0 Size:	62.2 KB ID:	169093

                  I even had to employ the e-rachet 'cause these bolts are so damn long. Then remove the jack, and you can leverage the arm down. The inner joint is a rubber bushing, so you do need to use some leverage to lower the spring arm and pull spring out.

                  Swift vs OE

                  Click image for larger version  Name:	swiftsprings1512spacers32.jpg Views:	0 Size:	92.8 KB ID:	169095

                  New springs in. Just re-conditioned the rubber pads. For E46, you must load up the hub before tightening the shock bolt as the shock uses a rubber bushing. On this car, I didn't remove the shocks, and couldn't see their joint, so I'll just assume they're still rubber, and load up the rear before tightening the outer arm. It also allows me to watch the spring compress and make sure it sits well. The rotor's neg camber is looking tasty!

                  Click image for larger version

Name:	swiftsprings1512spacers35.jpg
Views:	784
Size:	79.4 KB
ID:	169100

                  12mm KSP spacers and ext bolts

                  Click image for larger version

Name:	swiftsprings1512spacers36.jpg
Views:	807
Size:	104.2 KB
ID:	169101

                  Very little of the car shows wear, but man these (all 4) wheel caps (new style too ☹ ) were beat to shit:

                  Click image for larger version

Name:	swiftsprings1512spacers58.jpg
Views:	811
Size:	77.2 KB
ID:	169102

                  So I replaced them:

                  Click image for larger version

Name:	swiftsprings1512spacers26.jpg
Views:	810
Size:	67.4 KB
ID:	169103
                  Click image for larger version

Name:	swiftsprings1512spacers37.jpg
Views:	807
Size:	74.7 KB
ID:	169104

                  Final result:

                  Click image for larger version

Name:	swiftsprings1512spacers52.jpg
Views:	863
Size:	210.3 KB
ID:	169106 Click image for larger version

Name:	swiftsprings1512spacers50.jpg
Views:	831
Size:	175.0 KB
ID:	169105 Click image for larger version

Name:	20220314_145112.jpg
Views:	828
Size:	137.2 KB
ID:	169107

                  I have never ever seen a pair of lowering springs result in such a perfect drop like this I'm blown away. For E46, Eibach drops the rear perfectly, but not much up front. H&R is opposite, half inch drop rear, but then dumps the front 1.2". Dinan is an even drop, but too conservative imo. Other E9x springs seemed to suffer similar fates. The Swifts were the favorites, and I can see why.

                  The ride - amazing. Not bumpy at all. Just firmer, still very well controlled. Feels factory for sure. Doesn't look it!
                  Last edited by Tbonem3; 05-23-2022, 02:55 PM.
                  DD: /// 2011.5 Jerez/bamboo E90 M3 · DCT · Slicktop · Instagram
                  /// 2004 Silvergrey M3 · Coupe · 6spd · Slicktop · zero options
                  More info: https://nam3forum.com/forums/forum/m...os-supersprint

                  Comment


                    #10
                    After the springs, I got an alignment. Pulling the pins up front, I was able to get -2 camber all around with typical toe settings:

                    Click image for larger version  Name:	20220614_142231.jpg Views:	0 Size:	113.9 KB ID:	183557

                    Then, as I always do with my cars, I installed some audio components. Luckily, this car is an 11.5 so it got some further upgrade, the most important to me, being able to play hi fidelity .WAV files. So, this time, I don't need to upgrade the headunit, just the amp and speakers.

                    The stock amp is so tiny lol. Even just installing an aftermarket amp will do wonders for the base "hifi" system. And what's more, hifi si still analogue and puts out high voltage. So with a Technic harness, you can hook up RCAs to your aftermarket amplifier, though it does need to be able to handle "bridge-tier-load" aka balanced differential signal - that's where the audio signal is both positive and reverse polarity to clean the signal.

                    Click image for larger version  Name:	ampe901.jpg Views:	0 Size:	113.3 KB ID:	183558

                    Most people, thus, run Alpine amps as they can handle that and the newer class D tech is very powerful, but with much smaller footprint and easier on the battery (e9x era is hard on the battery). I have always preferred class A/B, but the higher quality class D has come a long way.

                    Because I care so much about the "color" of the sound, and had bad experiences with older class D, I went with a very musical amp in the ARC audio 850. It provides the warm sound I love, but big time power (2 stereo channels, and a mono for sub running at 2ohm) and small enough form to fit nicely in the driver side corner - but I would need to make my own bracket for it.

                    Click image for larger version  Name:	arc850.52.jpg Views:	0 Size:	146.2 KB ID:	183559

                    So I made some brackets and a shelf for the amp to sit on:

                    Click image for larger version  Name:	20220402_145344.jpg Views:	0 Size:	83.5 KB ID:	183560
                    Click image for larger version  Name:	20220402_150549.jpg Views:	0 Size:	166.3 KB ID:	183561

                    You can see the Technic harness here

                    Click image for larger version  Name:	amptray1.jpg Views:	0 Size:	129.2 KB ID:	183563

                    You can also see some simple (passive) cross overs. I have always preferred the E36/46 2 way (1" tweeter and 5.25 or 6.5" woofer) but the E60+ era is now 3 way with a 4" mid and a 8" midbass under the seats. Well, in order to tune correctly, you need to create a band-pass to filter sound frequencies for the midbass. You can do it with certain headunits or a processor/eq, but I prefer less hardware, and opted for these very simple, but effective 12bd/oct x-overs that low pass at 120hz. I will finish the band-pass with a HPF determined by the adjuster on the amp.

                    Click image for larger version  Name:	amptray2.jpg Views:	0 Size:	58.9 KB ID:	183562

                    Everything fit perfectly where I can then re-install the liner for a factory look:

                    Click image for larger version  Name:	20220405_211335.jpg Views:	0 Size:	137.4 KB ID:	183564 Click image for larger version  Name:	20220405_211318.jpg Views:	0 Size:	195.9 KB ID:	183566 Click image for larger version  Name:	20220405_211358.jpg Views:	0 Size:	132.9 KB ID:	183565

                    Then I have the sub from my E46 that will still do the job I need. Nothing crazy, a 10" DVC4 ohm run in parallel to present 2ohm for the mono channel on the amp and I'll LPF it at like 60hz (only 12db slope - I would normally prefer 24hz/db @ 80hz)

                    Click image for larger version  Name:	ARCsub6.jpg Views:	0 Size:	191.5 KB ID:	183567

                    Unfortunately, I lost all the picture files of the CDT components I installed

                    You can see the 4" midranges behind the grill. I went with the CL4 rather than the HD4s I had in my e82 last year because the CL carbon treated paper cones are a bit stiffer which work better for the guitar sounds I like, plus crisp vocals. The tweeters are the typical oversized 26mm silk (I hate alloy). The 4" are thin enough to fit without any real modification.

                    Click image for larger version  Name:	e90doorretrims27.jpg Views:	0 Size:	73.6 KB ID:	183568

                    Then I took out the mechanically limited 2ohm 8" hifi woofers and installed 4ohm logic 7 woofers that have more power handling (and match the resistance of the mids/tweeters):

                    Click image for larger version  Name:	L7woofers3.jpg Views:	0 Size:	152.3 KB ID:	183569 Click image for larger version  Name:	L7woofers7.jpg Views:	0 Size:	211.0 KB ID:	183570

                    You can see the older style ferrous magnet versus the fancy neodynium (right). These are very much just mid-bass speakers, only reproducing around 120-240hz, tapering off down around 50hz (24db down) so no real authority in the bass zone - you need a 10"+ sub.
                    Last edited by Tbonem3; 01-31-2023, 09:15 AM.
                    DD: /// 2011.5 Jerez/bamboo E90 M3 · DCT · Slicktop · Instagram
                    /// 2004 Silvergrey M3 · Coupe · 6spd · Slicktop · zero options
                    More info: https://nam3forum.com/forums/forum/m...os-supersprint

                    Comment


                      #11
                      Wow the e90 looks good! The speakers Is there a big difference in sound?

                      Comment


                        #12
                        Originally posted by Allnightlong View Post
                        Wow the e90 looks good! The speakers Is there a big difference in sound?
                        Thanks! Ya, a massive difference, mostly because they've got access to way more power, but adding a subwoofer gives much more richness to the sound, full spectrum now (well, down to about 30hz anyway) And with the sub, you can ask the underseat woofers to reproduce fewer frequencies which clears it up (they really can't move that much air).

                        And the mids and highs are much clearer and sharper, but the factory speakers aren't the worst part about the hifi system, it's the amp.
                        DD: /// 2011.5 Jerez/bamboo E90 M3 · DCT · Slicktop · Instagram
                        /// 2004 Silvergrey M3 · Coupe · 6spd · Slicktop · zero options
                        More info: https://nam3forum.com/forums/forum/m...os-supersprint

                        Comment


                          #13
                          Trying to catch up on the updates...

                          My favorite DIY - Paint work!

                          I don't quite have as much time on my hands as I did in 2020/2021, so I'm correcting the paint in stages. Here, I'm starting with the roof and the trunk lid/back & rear bumper.

                          Car was taken care of, so the paint isn't too swirled or scratched, nor is it very rough. I still used the clay bar, but it really didn't pick much up.

                          Click image for larger version

Name:	e90paint13.jpg
Views:	719
Size:	93.4 KB
ID:	183783 Click image for larger version

Name:	e90paint14.jpg
Views:	734
Size:	43.9 KB
ID:	183782

                          New ///M emblem on the back:

                          Click image for larger version

Name:	e90paintwork07.jpg
Views:	707
Size:	67.2 KB
ID:	183784

                          Man this orange peel is egregious. Oh well, still very pleased to have a car with all original paint again, and in such good condition

                          Click image for larger version

Name:	e90paint07.jpg
Views:	702
Size:	57.4 KB
ID:	183785

                          For now, I'm just doing a single step - Blue LC hydrotech pad that has good cut and good finish, but on a DA, it's not that powerful. There's no reason to dig too deep anyway - this car has no oxidation, no real etchings, barely any RIDS etc. I have plenty of sealants I can use to lock the paint until I do a final polish with a softer pad. I use bead maker, carnauba paste, Turtle Wax sio2 sealNshine, Mother's CMX (tio2/sio2).

                          Then, once I'm done with the whole care, at a later date, I'll do a final polish/sealant AIO to finish it out. From there, I should be able to just do annual or bi-annual cleaner wax or polish/sealant 1 steps to keep it glossy. I know ceramic is the move, but I don't wanna get driven crazy by hi-spots, and I enjoy polishing/waxing the cars. We're talking fine polishing, so there's no concern of running through the clear.

                          Click image for larger version

Name:	e90paint19.jpg
Views:	706
Size:	143.7 KB
ID:	183786 Click image for larger version

Name:	e90paintwork20.jpg
Views:	703
Size:	154.4 KB
ID:	183788 Click image for larger version

Name:	e90polishwashrear07.jpg
Views:	702
Size:	163.9 KB
ID:	183787
                          DD: /// 2011.5 Jerez/bamboo E90 M3 · DCT · Slicktop · Instagram
                          /// 2004 Silvergrey M3 · Coupe · 6spd · Slicktop · zero options
                          More info: https://nam3forum.com/forums/forum/m...os-supersprint

                          Comment


                            #14
                            More paintwork. Tackled the front fenders and hood. Hood had the most imperfections (obv), though still not bad at all.

                            Clay bar didn't pick up anything really:

                            Click image for larger version  Name:	e90hoodcut01.jpg Views:	0 Size:	83.3 KB ID:	187487

                            Fenders are plastic, so it takes more time to build enough heat to get any real cut since plastic vibrates more than metal. Luckily the car is in great shape, so not much cut was needed.

                            Click image for larger version  Name:	e90hoodcut05.jpg Views:	0 Size:	80.5 KB ID:	187486

                            We good

                            Click image for larger version  Name:	e90hoodcut07.jpg Views:	0 Size:	53.9 KB ID:	187485
                            Click image for larger version  Name:	e90hoodfinish21.jpg Views:	0 Size:	117.0 KB ID:	187491

                            There were 2 bad chips, so I filled them in (found a cheap bottle of Volvo midnight blue metallic that matched well to Jerez).

                            Click image for larger version  Name:	e90hoodcut16.jpg Views:	0 Size:	27.2 KB ID:	187488

                            Click image for larger version  Name:	e90hoodcut15.jpg Views:	0 Size:	42.2 KB ID:	187489

                            Then later, after doing the fenders, I did the hood with chips filled in.

                            Blue hydrotech euro foam with Griots correcting cream

                            Click image for larger version  Name:	e90hoodcut12.jpg Views:	0 Size:	107.6 KB ID:	187490

                            In this photo, are the 2 chips from above that you would have seen that are now, for intents and purposes, "invisible."

                            Click image for larger version  Name:	e90hoodfinish09.jpg Views:	0 Size:	31.0 KB ID:	187493

                            Close up of the worst one:

                            Click image for larger version  Name:	e90hoodfinish08.jpg Views:	0 Size:	31.1 KB ID:	187492

                            This was just a 1 step. Didn't need to dig too deep, and didn't do a final polish since I'll do the whole car at a later time. I did, of course seal the paint after this step. I just used some SiO2 "ceramic" spray wax for now.

                            Click image for larger version  Name:	e90hoodfinish13.jpg Views:	0 Size:	113.9 KB ID:	187494

                            I'll do the headlights and front bumper next. Need some wetsanding first on the headlights, so it'll take a little while on its own.

                            Click image for larger version  Name:	e90hoodcut24.jpg Views:	0 Size:	149.7 KB ID:	187495


                            Last edited by Tbonem3; 10-06-2022, 03:42 PM.
                            DD: /// 2011.5 Jerez/bamboo E90 M3 · DCT · Slicktop · Instagram
                            /// 2004 Silvergrey M3 · Coupe · 6spd · Slicktop · zero options
                            More info: https://nam3forum.com/forums/forum/m...os-supersprint

                            Comment


                              #15
                              Great work ! Car looks super clean. And yes the orange peel is terrible on mine too. I wouldn't dare wet sand my clear. Such a shame for a 70k car.
                              2005 Phoenix Yellow M3 Coupe 6spd
                              2013 Interlagos Blue M3 Coupe 6spd ZCP, CF roof
                              2007 Imola Red Z4M Coupe

                              Comment

                              Working...
                              X