There is an issue with the E46s where the rubbers tend to crack over time. This appears both below the rear side windows and in the corner of the side finisher trim. BMW does not sell only the rubber for the side finisher trim, but you can buy each side piece as one whole part (trim and rubber). Part # 51717003935 (left side) and 51717003936 (right side). These currently cost about $550 each.

There has been another solution created using aftermarket rubber along with the OEM trim currently on your car. There are a few different options. Personally I used a roll of 3M 08650 EPDM Hollow Rubber Weatherstrip - 7/8" Thick x 3/4" Wide x 8'. I purchased this off of eBay for about $40 at https://www.ebay.com/p/1511205846
3M does not make this any more, so anything you find is new-old stock. There are some other cheaper options as well that can be picked up from the local hardware or automotive parts store. The most important thing is the size.
To start, pull off the top of door/window seal where it connects from the base of the A-pillar to the B-pillar. This is accomplished by simply pulling straight downward. It is on a little tight, which is normal, but it should come off relatively easily. Peel a little back to get a good grip and just pull it off. Be careful near the base of the A-pillar, there are some wires which run through the seal. You will also need to remove the rear side window seal. To do this, the rear window should be released from the actuator. This will allow the rear window to open wider and freely, allowing more access to remove the seal and the side finisher piece screws. This is accomplished by first opening the rear window then taking a flat head screwdriver, plastic pry tool, or your fingers and lightly prying the black cone shaped cover away from the window. It should come off easily. Then just pull the ball joint from the actuator arm towards the open side of the housing to unhook it. Slide in a towel or a roll of paper towels to wedge the window open.
Now you can start unscrewing the 16 Phillips head screws that are placed around the underside of the finisher. They start at the base of the A-pillar and finish at the rear window seal. The last 4 screws near the rear window seal are different from the rest, be sure to keep these aside for re-installation. The side finisher piece may have some 3M double sided tape near the B-pillar, so be careful when prying off the trim.

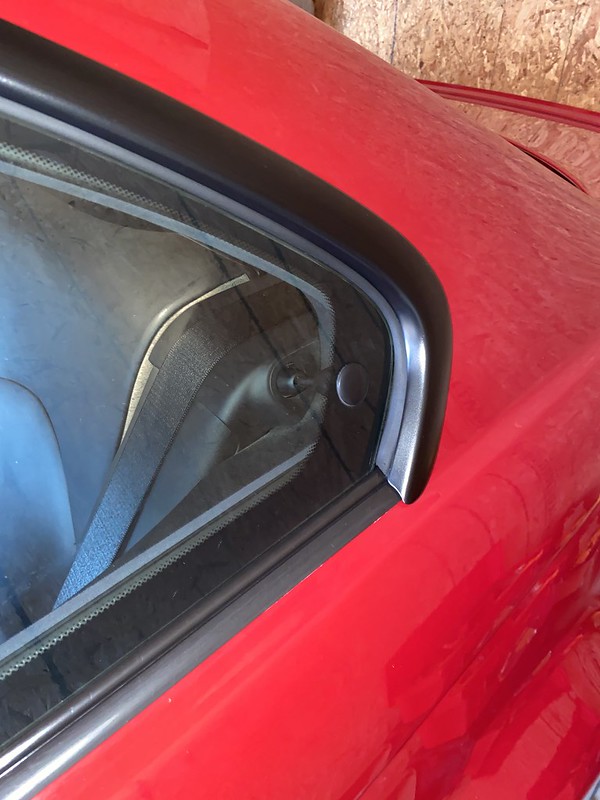
With the trim off the car, make note or mark where the rubber seal ends near the B-pillar location on the finisher trim. This is important for the new rubber to go back to the same spot for proper installation and fitment. Remove the old rubber trim and any leftover adhesive. Clean the surface well to prep for the new rubber and adhesive. Starting at the back of the finisher piece, wedge the "T" side of the rubber in between the finisher trim and the lip so that the "O" shape of the rubber faces the inside of the radius. The rubber may kink in the tight radius. Some people have had success removing this with some extra tension or some heat. I, like many other people have found success using vacuum hose from the hardware store and sliding it inside of the rubber "O" for some added rigidity to push out the kink. When you are satisfied with the radius and placement of the new seal, remove trim at the B-pillar location and remove the adhesive backing to stick to the finisher trim. The rear of the rubber will need to be trimmed at an angle to fit correctly, see the video or picture below for reference.

The finisher piece has holes in it to allow for the screws to secure it to the car. The rubber will need to be trimmed around these holes to allow for the screws to fit. Be liberal with your trimming, if the rubber interferes with the rubber, it will be a pain to re-install the finisher trim.
Once the trim is back into place, give a good push on the new one to get it in securely. Once mounted, I pushed the whole piece towards the back of the car to help line up the holes. Once you put all screws back in place, just get those window seals back in. Push them in (might need to give them a little hit to encourage them to sit in there tightly).
While you are in the area, it is a good idea to replace the horizontal trim below the rear side window between the B and C-pillars. These Part #s are 51368194741 (left side) and 51368194742 (right side). Each side is held on mostly by two strips of double sided tape as well as a rubber pin in the door jam. Remove the pin and pry the old rubber off.


There will be leftover adhesive and it is very tedious to remove. Some members have had success with rubber eraser wheels that you use with a drill. Whatever method you choose, the more adhesive you remove, the better the fitment of the new piece will be.
Install the new piece. Be sure to line up the rubber pin hole in the door jam and try to follow the original orientation to the bets of your ability. After removing the tape backing from the adhesive, press down firmly.
You can then hook up the rear window actuator again and slide the cone cover back into place.
Videos to reference: (neither are mine)
There has been another solution created using aftermarket rubber along with the OEM trim currently on your car. There are a few different options. Personally I used a roll of 3M 08650 EPDM Hollow Rubber Weatherstrip - 7/8" Thick x 3/4" Wide x 8'. I purchased this off of eBay for about $40 at https://www.ebay.com/p/1511205846
3M does not make this any more, so anything you find is new-old stock. There are some other cheaper options as well that can be picked up from the local hardware or automotive parts store. The most important thing is the size.
Originally posted by COVID-19
View Post
Originally posted by netcsk
View Post
To start, pull off the top of door/window seal where it connects from the base of the A-pillar to the B-pillar. This is accomplished by simply pulling straight downward. It is on a little tight, which is normal, but it should come off relatively easily. Peel a little back to get a good grip and just pull it off. Be careful near the base of the A-pillar, there are some wires which run through the seal. You will also need to remove the rear side window seal. To do this, the rear window should be released from the actuator. This will allow the rear window to open wider and freely, allowing more access to remove the seal and the side finisher piece screws. This is accomplished by first opening the rear window then taking a flat head screwdriver, plastic pry tool, or your fingers and lightly prying the black cone shaped cover away from the window. It should come off easily. Then just pull the ball joint from the actuator arm towards the open side of the housing to unhook it. Slide in a towel or a roll of paper towels to wedge the window open.
Now you can start unscrewing the 16 Phillips head screws that are placed around the underside of the finisher. They start at the base of the A-pillar and finish at the rear window seal. The last 4 screws near the rear window seal are different from the rest, be sure to keep these aside for re-installation. The side finisher piece may have some 3M double sided tape near the B-pillar, so be careful when prying off the trim.
With the trim off the car, make note or mark where the rubber seal ends near the B-pillar location on the finisher trim. This is important for the new rubber to go back to the same spot for proper installation and fitment. Remove the old rubber trim and any leftover adhesive. Clean the surface well to prep for the new rubber and adhesive. Starting at the back of the finisher piece, wedge the "T" side of the rubber in between the finisher trim and the lip so that the "O" shape of the rubber faces the inside of the radius. The rubber may kink in the tight radius. Some people have had success removing this with some extra tension or some heat. I, like many other people have found success using vacuum hose from the hardware store and sliding it inside of the rubber "O" for some added rigidity to push out the kink. When you are satisfied with the radius and placement of the new seal, remove trim at the B-pillar location and remove the adhesive backing to stick to the finisher trim. The rear of the rubber will need to be trimmed at an angle to fit correctly, see the video or picture below for reference.
The finisher piece has holes in it to allow for the screws to secure it to the car. The rubber will need to be trimmed around these holes to allow for the screws to fit. Be liberal with your trimming, if the rubber interferes with the rubber, it will be a pain to re-install the finisher trim.
Once the trim is back into place, give a good push on the new one to get it in securely. Once mounted, I pushed the whole piece towards the back of the car to help line up the holes. Once you put all screws back in place, just get those window seals back in. Push them in (might need to give them a little hit to encourage them to sit in there tightly).
While you are in the area, it is a good idea to replace the horizontal trim below the rear side window between the B and C-pillars. These Part #s are 51368194741 (left side) and 51368194742 (right side). Each side is held on mostly by two strips of double sided tape as well as a rubber pin in the door jam. Remove the pin and pry the old rubber off.
There will be leftover adhesive and it is very tedious to remove. Some members have had success with rubber eraser wheels that you use with a drill. Whatever method you choose, the more adhesive you remove, the better the fitment of the new piece will be.
Install the new piece. Be sure to line up the rubber pin hole in the door jam and try to follow the original orientation to the bets of your ability. After removing the tape backing from the adhesive, press down firmly.
You can then hook up the rear window actuator again and slide the cone cover back into place.
Videos to reference: (neither are mine)


Comment