Preface
Have a couple things to say about this before getting into the actual DIY, so I'll get that out of the way first.
1. This is not an easy or quick job.
Mechanical Work
There are multiple approaches to this swap. I'll list them out below in ascending order of difficulty.
1. Sell your MK20 car and buy an MK60 car.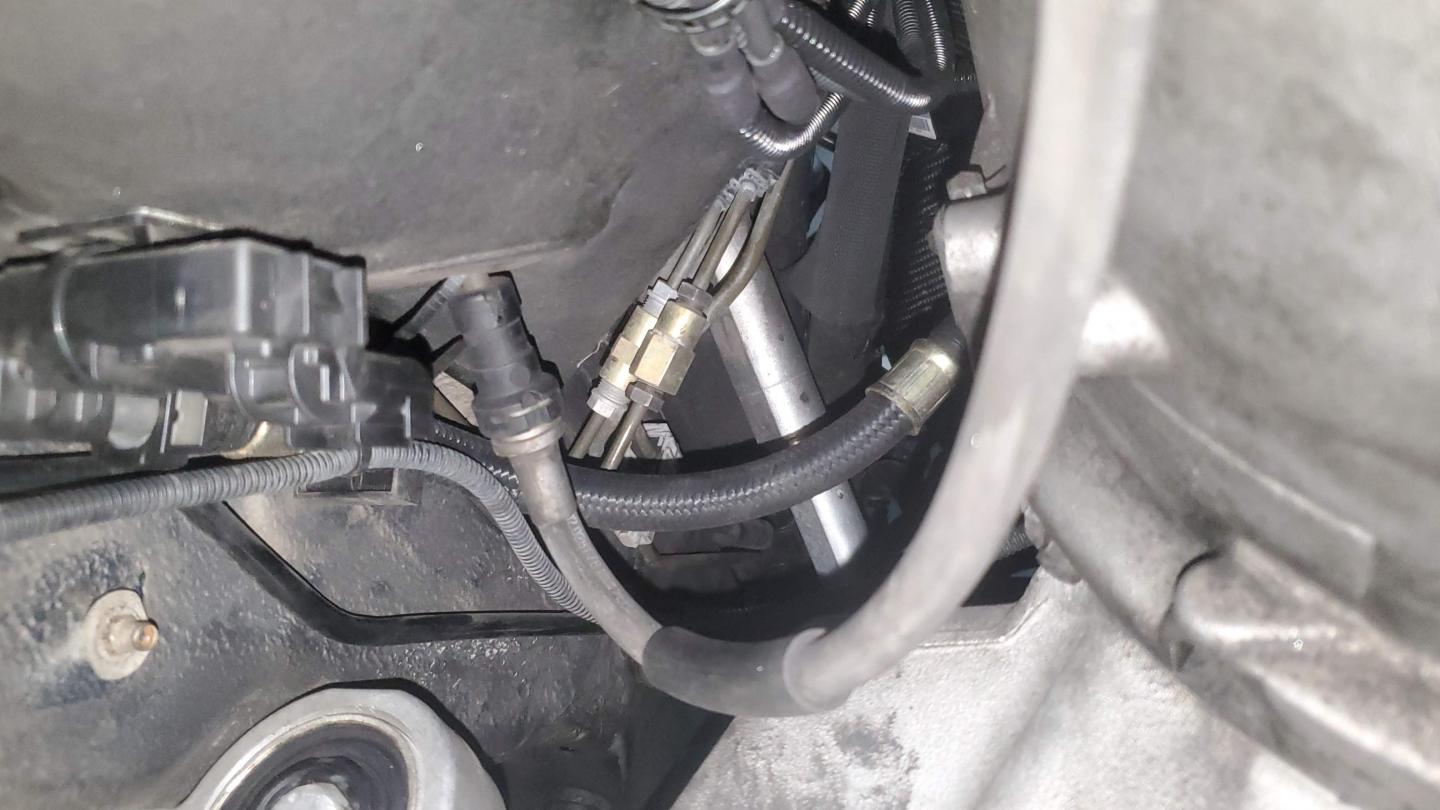
4. Remove ALL brake lines and run new ones.
Steps:
1. Gather parts.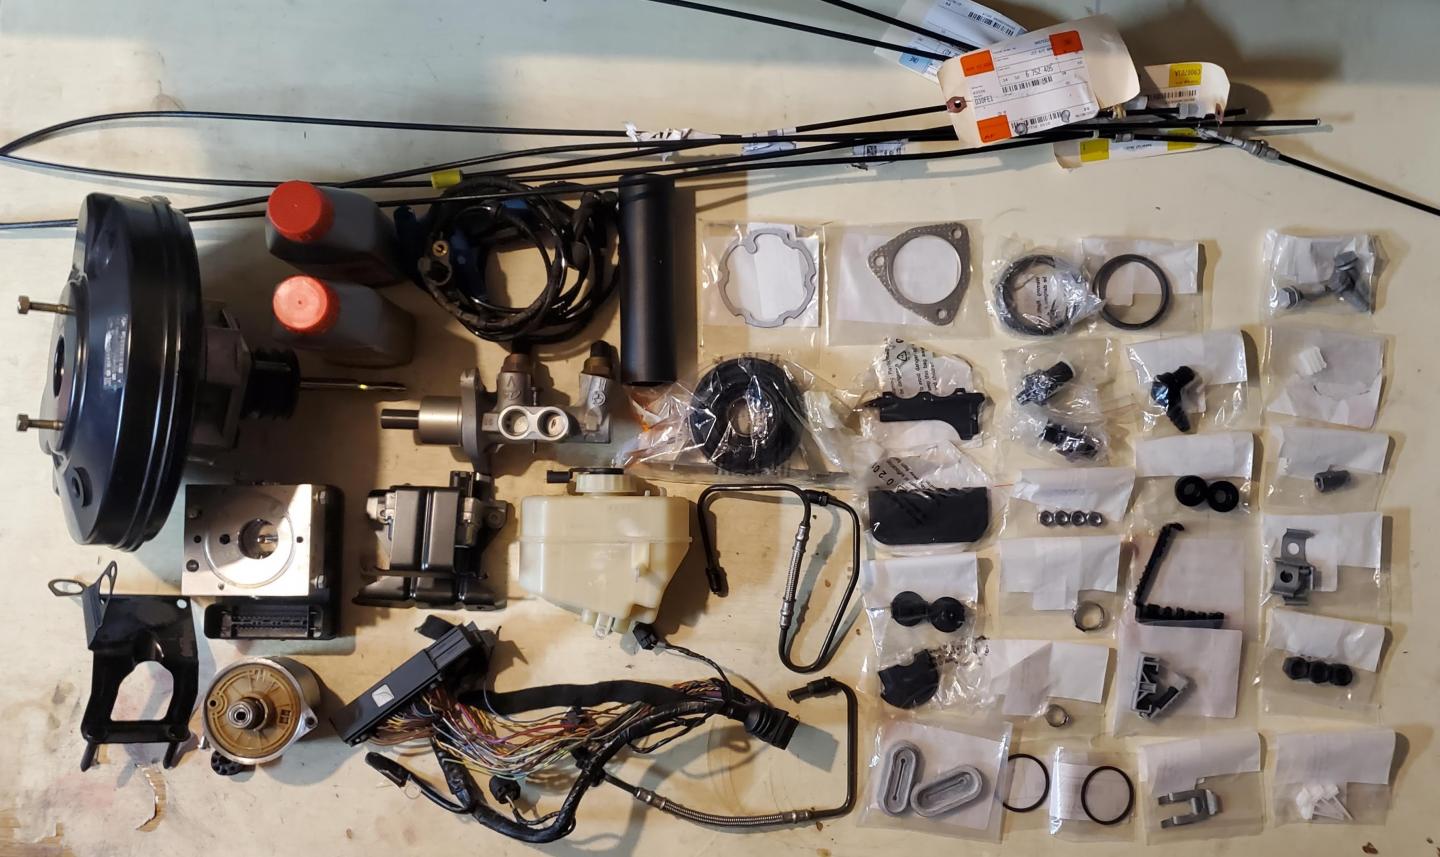
1.5. (If necessary) Refurb your used MK60 bits.
3. Take your engine bay apart.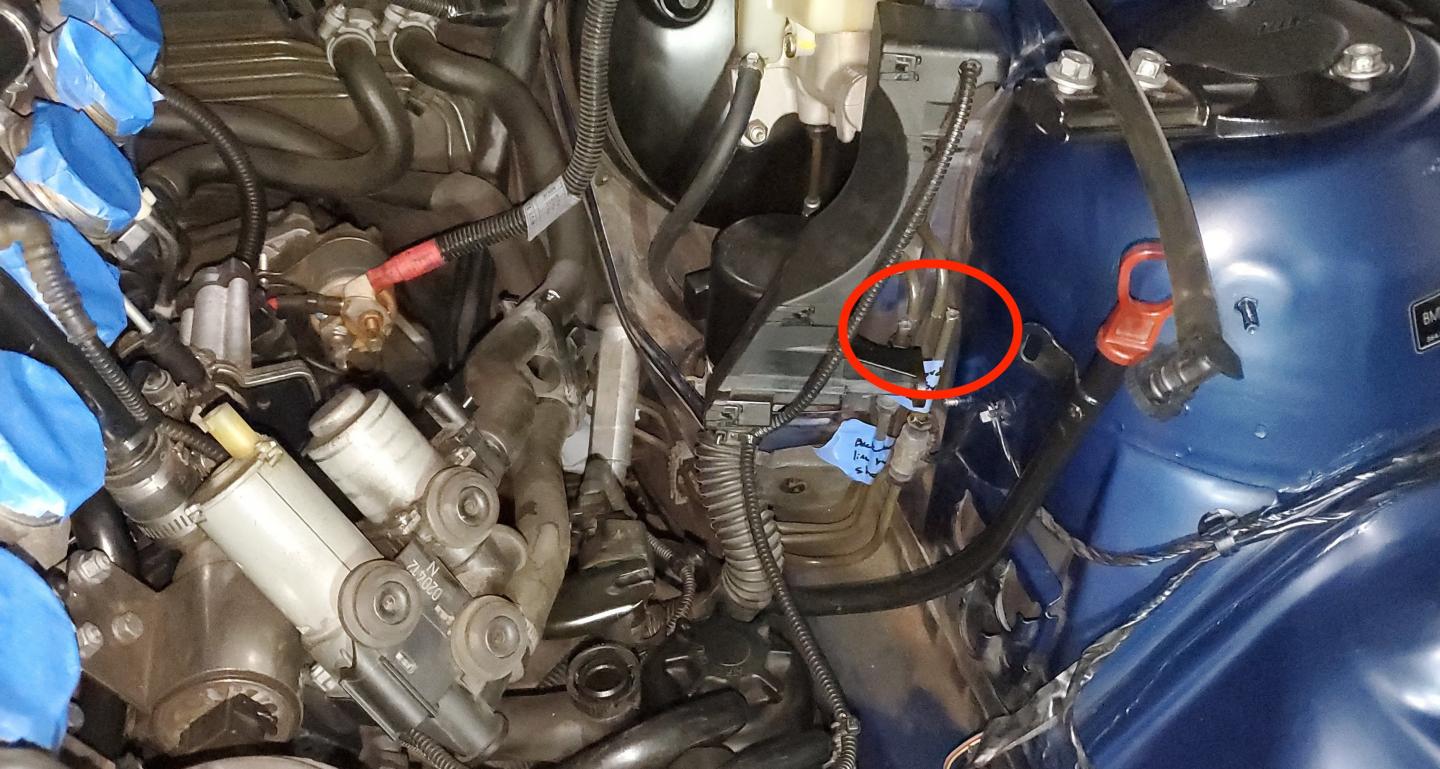
6. Rip out the rest of the MK20 stuff.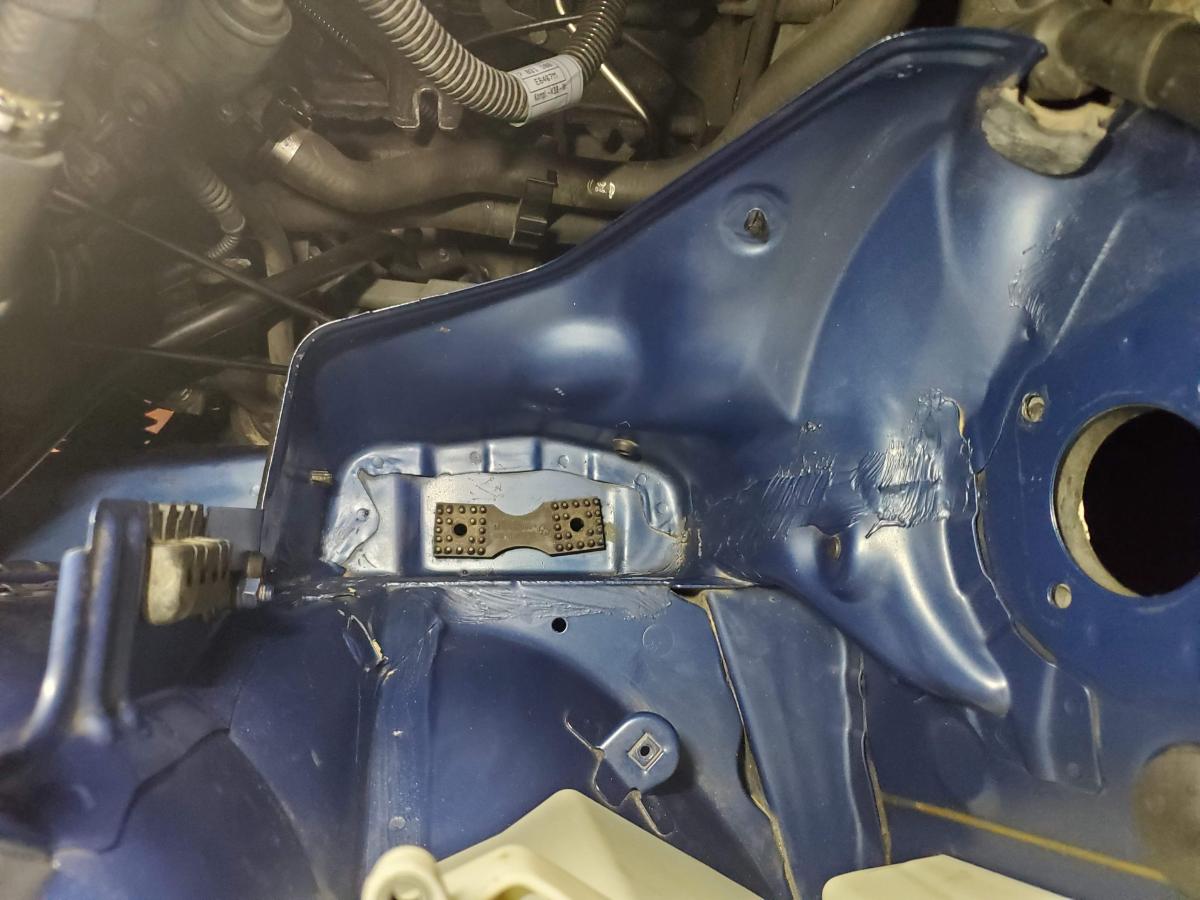
8. Bolt the new MK60 module in temporarily.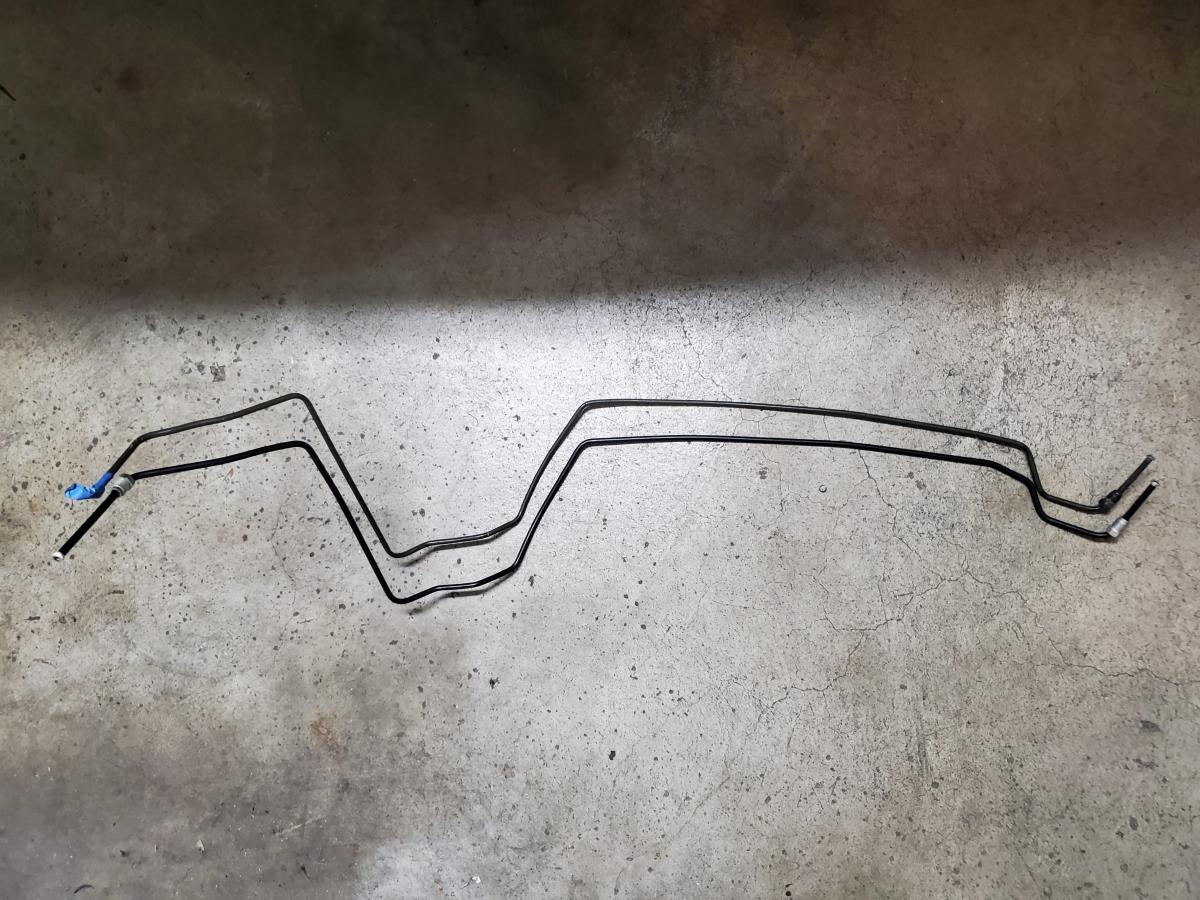
16. Resist the urge to put too much of the engine bay back together.
Have a couple things to say about this before getting into the actual DIY, so I'll get that out of the way first.
1. This is not an easy or quick job.
- I knew it was going to be a lot of work before starting and I was still greatly surprised by how much time I ended up spending. With that in mind, I really do not think this is a worthwhile swap, unless your car is fully sorted otherwise. I decided to do it because it would have probably taken me longer to do everything I've already done to mine on another car, but that might not be the case for everyone.
- The parts required are not exactly cheap, so it's totally possible that selling your MK20 car and getting an MK60 car is the better choice.
- I'll make sure to cover everything necessary, but will also assume that anyone following this has some decent "working on cars" skills.This guide will be split into three parts: mechanical, electrical and coding. I found that was also the order of most difficult to less difficult, so plan accordingly.
- Due to what was covered above, this guide is likely to be very direct and 'referenc-y". I have some posts that are much more conversational in my journal. It's probably worth reading through those too if you plan on attempting this.
Mechanical Work
There are multiple approaches to this swap. I'll list them out below in ascending order of difficulty.
1. Sell your MK20 car and buy an MK60 car.
- This is by far the easiest and most sensible option. Not very rewarding, but will save you a ton of time and effort. Will also only be a bit more expensive than going through with the swap.
- This requires very little brake line work and can probably be done in an afternoon. However, you will not get any reduction in complexity or weight. Additionally, there's talk about BMW placing the MK60 module closer to the brake master cylinder for reasons (response times?), so having it in the "wrong" place might not make it behave optimally. To do this, you would need to add unions and bend short bits of brake lines for the two lines that plug in on the side of the MK60 valve block.
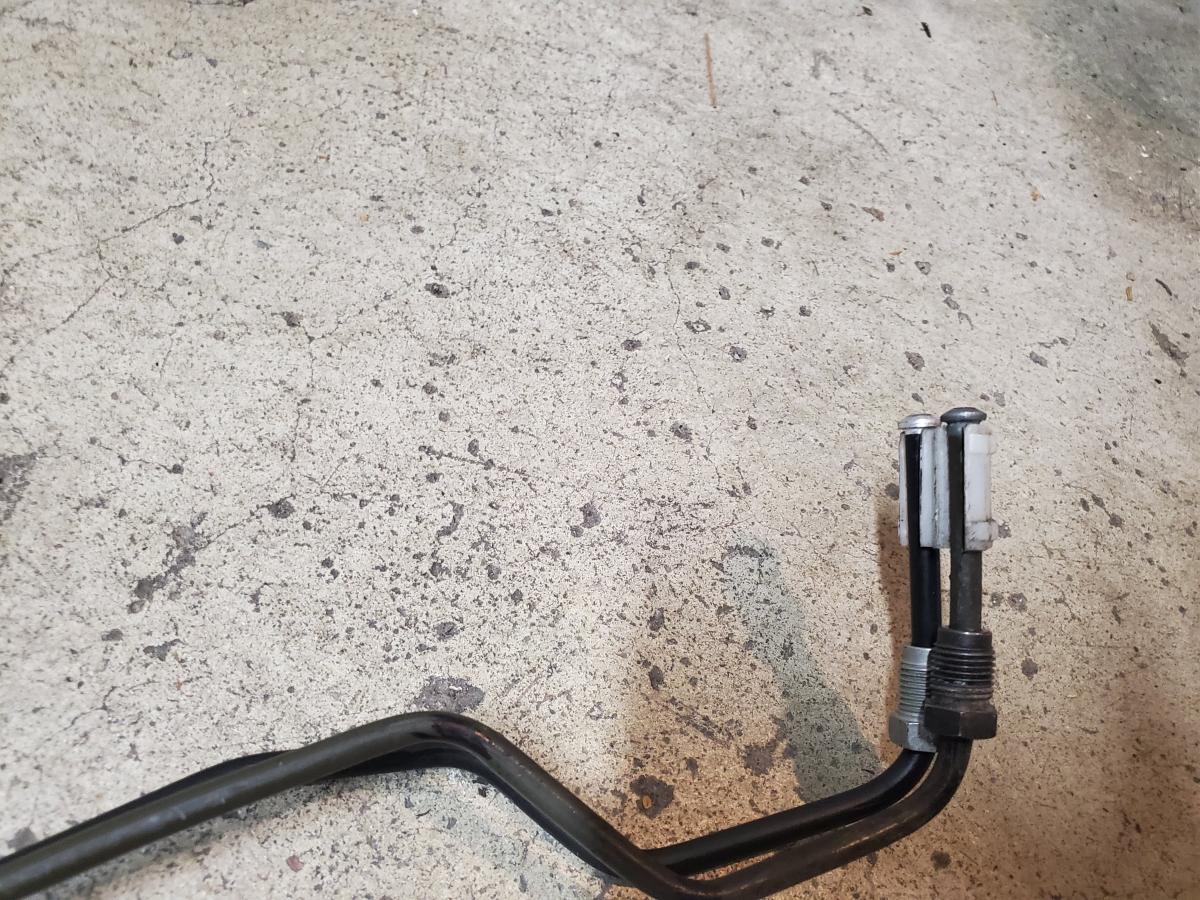
- This option is probably the best compromise of work and "correctness". The MK20 rear brake lines have unions right by the steering column. It's possible to unbolt these and then just run new lines from these unions to the new MK60 location.
- Pic of the factory unions:
4. Remove ALL brake lines and run new ones.
- This is what I decided to do and what I will be covering in this thread. It's the most involved approach, so any of the previously mentioned approaches should become obvious after reading through this.
Steps:
1. Gather parts.
- The most cost effective way to do this is to find a crashed car that someone is parting out and buy everything from them. There are also some sellers that sell "kits" on eBay (and similar), but they tend to be more expensive.
- RealOEM is your friend. Go look at the front brake pipe and rear brake pipe diagrams for MK60 cars and buy everything you need from there. Most useful bits are the brake lines (of course) and the spacers/brackets.
- Don't forget one time use things for everything that need to come out (exhaust gaskets, guibo nuts, driveshaft gasket, etc.
- Pic of everything I bought:
1.5. (If necessary) Refurb your used MK60 bits.
- You will likely get your used parts covered in brake fluid. Brake fluid is the absolute worst and will eat everything it touches. This means that you might need to touch up/fully repaint some of your parts.
- Eagle eyed viewers will notice that the MK60 pump motor in the previous pic is silver. This is not some special edition MK60, but rather the result of me stripping off all the old paint from it because it was severely bubbling. I later refinished this with POR-15.
3. Take your engine bay apart.
- Remove as much as you can so that all the MK20 brake lines are visible. This includes —but is not limited to— the following:
- Strut bar
- Cabin air filter housing
- Cover for blower motor
- Intake
- Engine beauty cover
- Any wire harnesses that run to the DME area
- Everything in the DME area (electronics, plastic brackets, DME fan, etc.)
- Brake pedal
- Underside plastic panels
- Fuel filter cover
- V brace
- Exhaust
- Handbrake cables
- Heat shields
- Driveshaft
- Gas tank (!)
- Note: removing the rear subframe might make your life a little easier, but I found no need to do it
- This is annoying enough that I figured I should spend some time on this.
- You want to run the gas tank as far down as possible. This will make it lighter during removal and less prone to spills.
- If you parked your car directly onto the jack stands, chances are your fuel system will still be pressurized. There's a schrader valve right by the fuel filter that you can use to relieve fuel pressure. Fuel will come out, so be prepared to catch it.
- First thing to do is go into the interior, remove the lower part of the rear seats and open up both access covers. Once that is done, disconnect all fuel lines and electrical connectors that you see. If you didn't relieve the fuel system pressure, you're going to spray fuel everywhere, so be aware.
- Now undo the flexible bit of the fuel filler hose. This is a great opportunity to replace this, as it will probably be crusty from having spent 20 years on the bottom of a car.
- After that, go underneath the car and remove both straps and the one nut holding the fuel tank to the body. Drop it enough so that you can access the rest of the lines and remove them. Obviously take care when lowering the tank, but the lines are flexible enough that you can drop it a good amount.
- To remove the tank, you need to swear a bunch at it and then realize that the fuel filler neck is catching on the passenger upper control arm. Angle the tank in such a way that the filler tube clears the control arm and then pull towards the front of the car.
- Seal up any ports on the tank and fuel lines hanging from the car. I used a combination of rubber gloves, zip ties and masking tape. Gas vapors are highly flammable and you really want to keep their combustion internal to the engine exclusively.
- First empty out all the brake fluid in the lines. I used my pressure bleeder (with nothing in the chamber) to pressurize the system and push out all the brake fluid. It worked great.
- The clutch line does not need to be fully emptied, you can just disconnect it from the reservoir and cap it off.
- Cut/unbolt all the brake lines that you see. These will not be reused (well, unless you're not fully replacing everything), so don't be afraid to be destructive. The only thing you want to keep intact is the line that runs above the subframe. This one is short enough that you can easily use it as a template for the new lines.
- Example of my own destructive disassembly:
6. Rip out the rest of the MK20 stuff.
- Unbolt the module from the drug bin.
- Unbolt the booster and master from the interior of the car. The accumulator is connected to the master, so unbolt that from the chassis as well and don't forget to disconnect any electrical connectors.
- Early cars have an extra tab on the chassis beneath the brake booster that interferes with the MK60 module, so cut that off. Bending it out of the way does not give enough clearance, it must be cut.
- Make sure to treat any exposed metal appropriately.
- Pic (tab was in the lower left):
8. Bolt the new MK60 module in temporarily.
- Fortunately, the one threaded tab used to mount the MK60 module is already present, so all you need to do is reuse the accumulator bolt to bolt it up.
- This is just to make sure there's enough clearance for everything. You will likely end up removing it a bunch of times, so just thread the bolt in by hand.
- Leave the thing there, as it will serve as a reference point for bending the brake lines.
- This is easily the most time consuming part of the whole project.
- If you bought the BMW lines, then they will come pre-flared and cut to length. This is great because you don't need to worry about those things, but it also means you will need to be very precise with your bends or else the finished lined will be too long or too short. I bent my rear lines twice because of basically this.
- If you don't have a good 3/16" bender, get yourself one. I bought the Ridgid 403 bender and it worked great.
- Whenever you bend a line, make sure the threaded bit is at the very end, otherwise you'll have to start from scratch. I used some masking tape to make sure they stayed where I wanted them and did not sneak up on me during bends.
- The line that runs above the subframe is the one line that you technically do not have to remake. It is exactly the same on MK20 and MK60 cars, but I was already remaking everything, so I figured I would do this one too. It's short enough that you can use the old line as a guide:
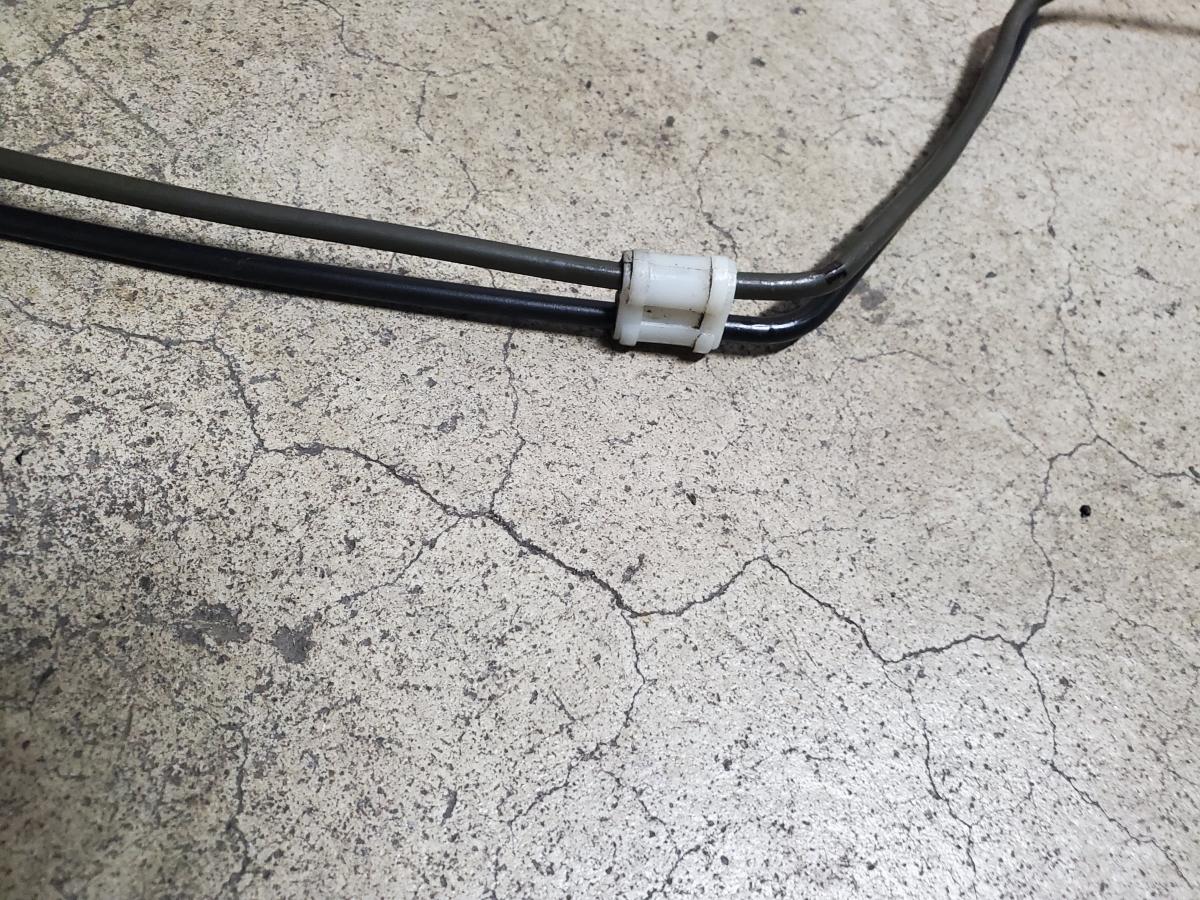
- I found these white spacer clips to be super useful when lining everything up so that the line could be duplicated:
- The rest of the lines are a pain. You will have probably destroyed the original lines out of frustration upon removal, so you will have little to no reference to base yourself off of. I used the many pictures in Casa de Mesa 's journal to guess at what the lines should look like.
- For the rears, start at the MK60 module and work your way back. Do not try to start at the calipers (ask me how I know). If you do, then it will be basically impossible to stuff the bender in for the bends that go to the module.
- I used a clothes hanger to get the bends correct and then duplicated them on the line.
- Note: One of the rear lines (I forget which) has different sized threads on each end. Make sure you get the orientation of it correct, otherwise you'll be redoing a bunch of work. I walked over to the module and made sure the correct end would screw in to be 100% sure it was all good.
- Repeat this process for the front lines. The coat hanger is yourself.
- Don't get discouraged if you have to redo any of this. It's a pain to get something in this part of the project wrong, but the lines are cheap and it's probably better to have to rebend some stuff than to end up in a wall on your test drive.
- These are hard lines, so it they're not bent at the correctly angle it's possible that the lines will want to jump out of some of the holders or will be rubbing against stuff.
- Fortunately, the lines are soft enough that any clearancing can be done with your fingers.
- Make sure to use the clips that you bought earlier! These will make it so that the lines are soldily held to the body and don't rub against stuff.
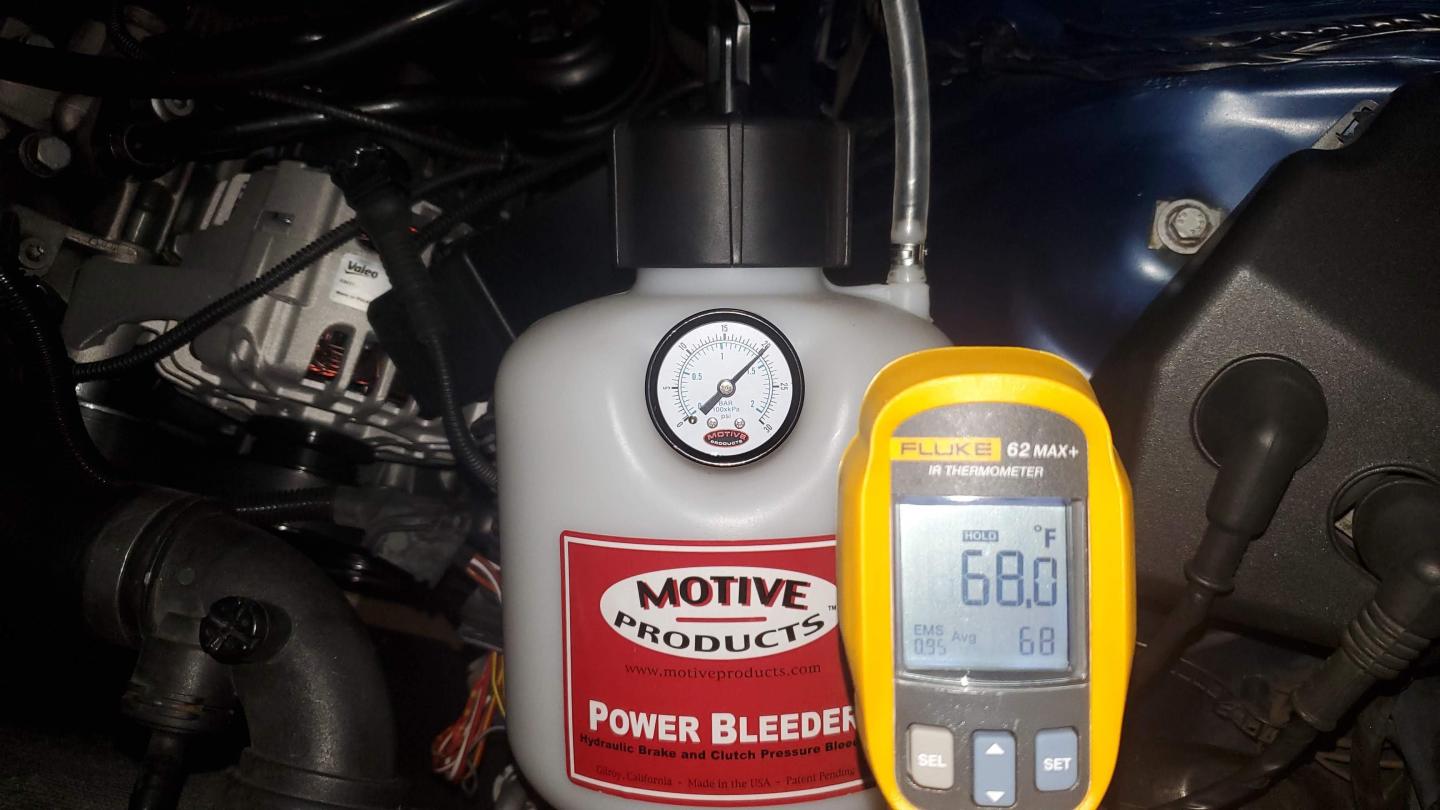
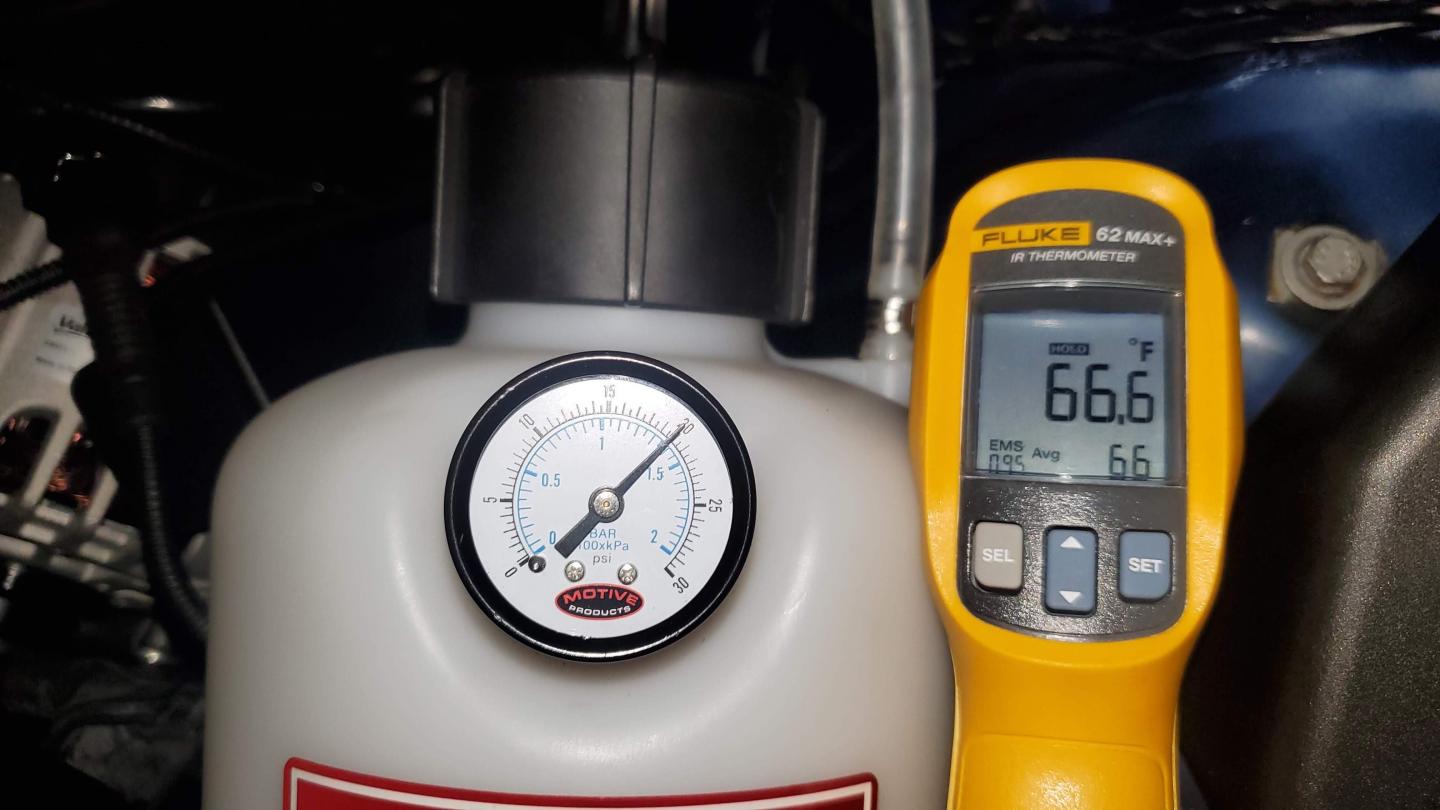
- Hook up a source of compressed air and make sure that there are no obvious leaks. I pressurized my pressure bleeder to 20 psi and left it for a while. If no leaks, you're probably good to go.
- Here's mine initially:
- And after 22 hrs:
- Dropped ~0.4 psi (temp corrected) over 22 hrs. Was happy with that so I continued.
- Should be easy since you removed all the DME stuff.
- This is also probably a good time to reinstall the brake pedal.
- Make sure all junctions are torqued correctly before you start filling things up with brake fluid. Brake fluid sucks and you really don't want it spraying at high pressure everywhere.
- Fill up and bleed everything in the standard order (RR, RL, FR, RL, clutch).
- Wedge some wood between the seat and the brake pedal (tightly) to pressurize the system.
- Come back the next day and check all the junctions. If you see no fluid leaking out, then you're good! If you do, sell the car and buy one that came with an MK60 from the factory.
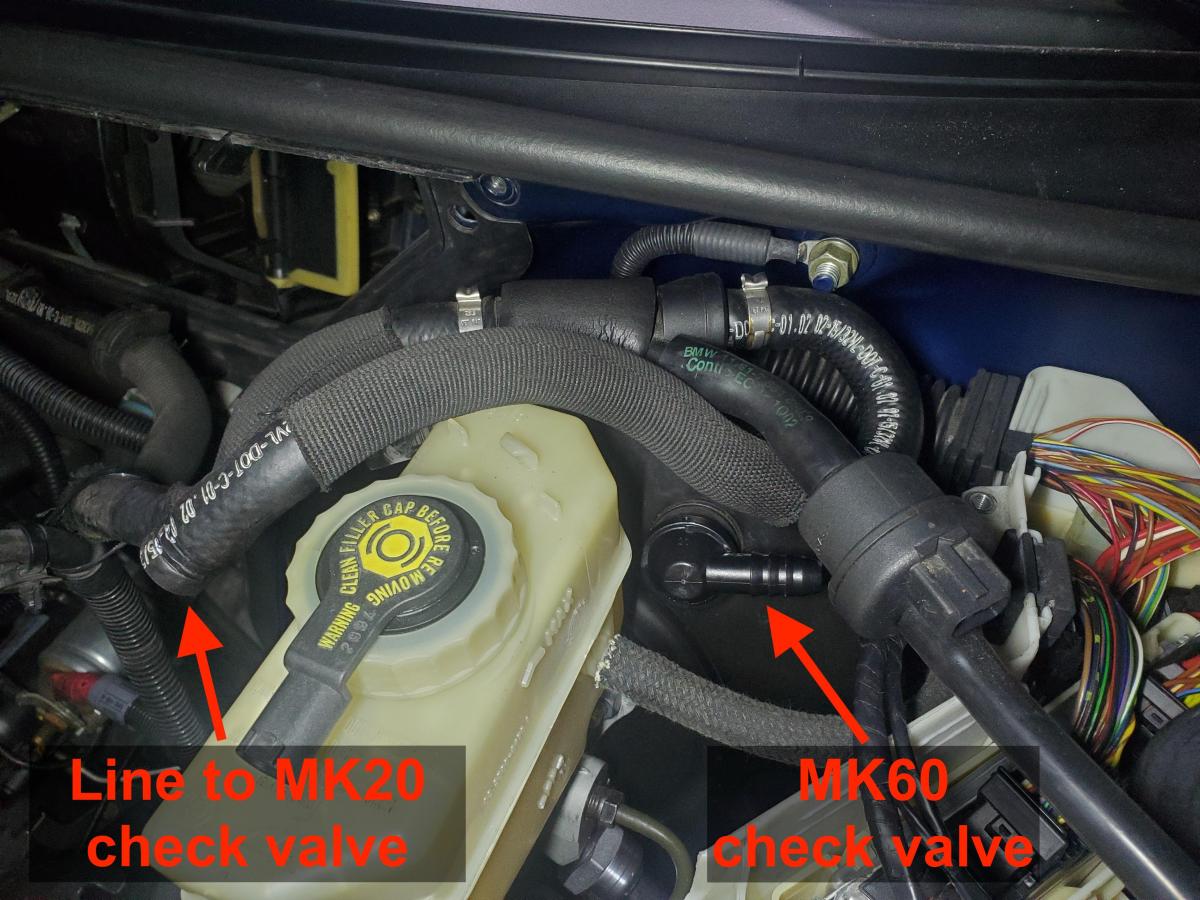
- The MK20 line is longer than the MK60 line, which means that this is one of the few things that you can modify and not spend money on (yay).
- Labeled pic:
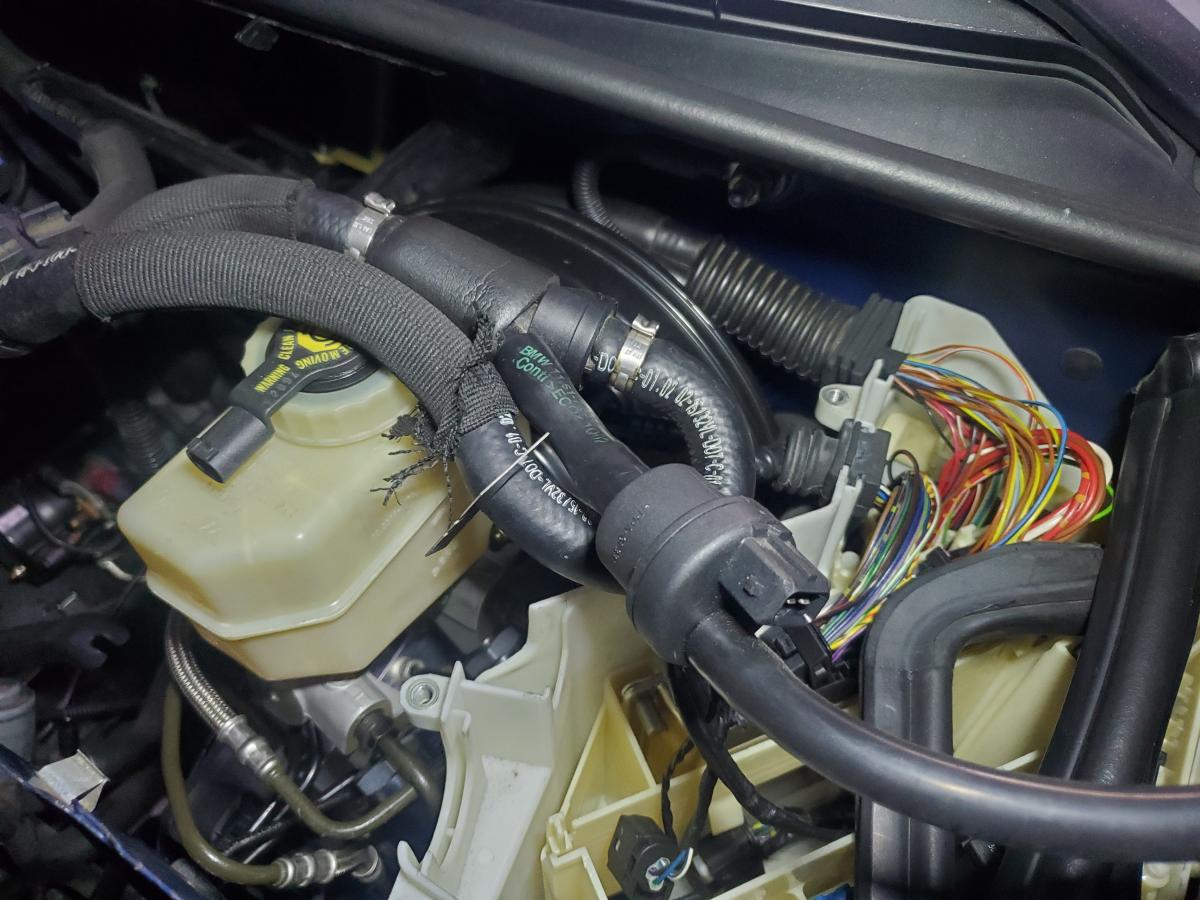
- You should cut right where the razor blade is. I used the razor blade for the cut and it sucked. You should use PVC cutters instead:
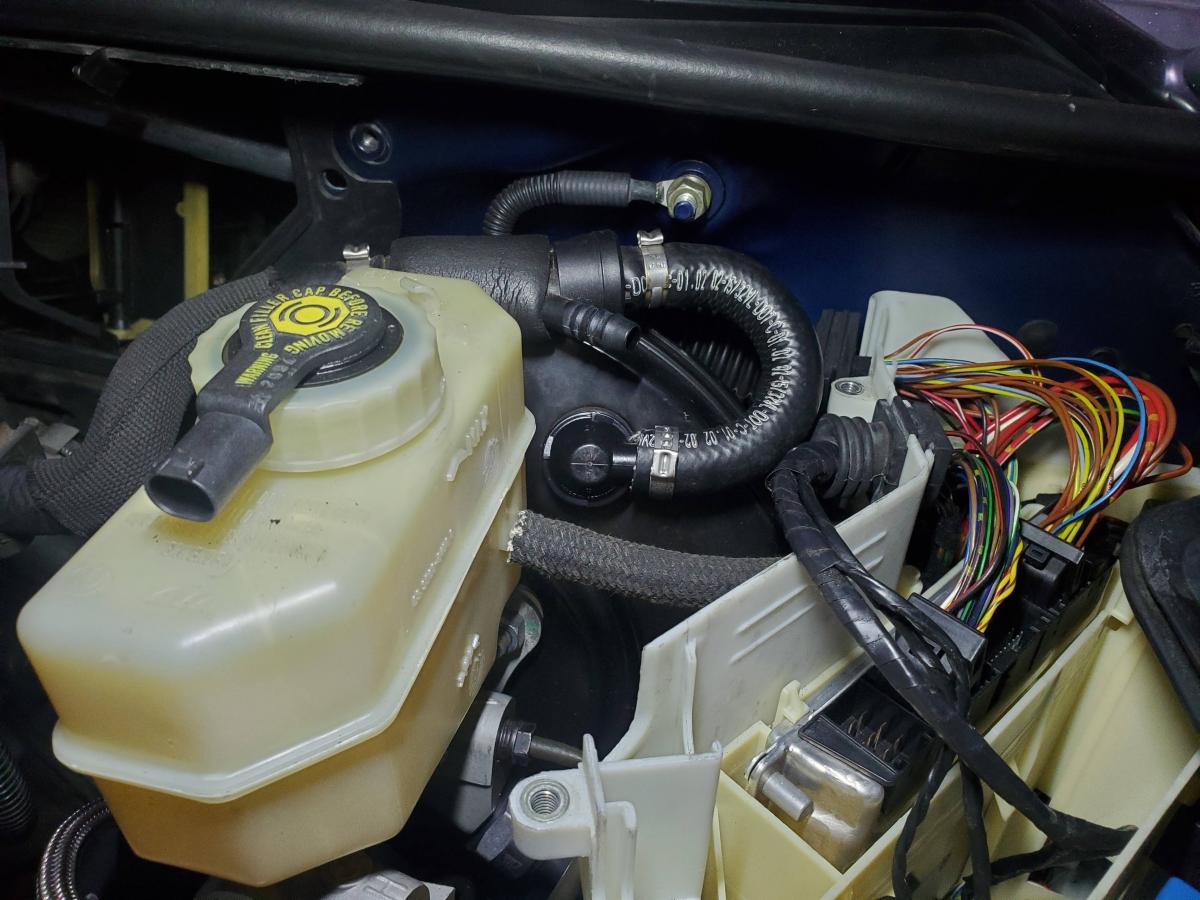
- Crimp the thing onto the MK60 check valve and you're done:
16. Resist the urge to put too much of the engine bay back together.
- Intake, beauty cover and other things like that can go back on, but don't over do it. There's still wiring to do and you'll need access to the MK60 module for that. Just remember that it is extremely annoying to disassemble something that you just reassembled the day before.
- The sensors are different between the two systems so you need to swap the plugs.
- Fortunately the pins are the same so only the connector housings need to get swapped.
- Unpin the old connectors and move the wires to the new connectors, make sure they are in the same spots.
- The front connectors will have three wires running to them, while the new plugs are only expecting two. The middle back one (pin 3) is a ground that is not needed on the MK60. I added some heat shrink around mine and tucked them out of the way.
- Assuming you have no leaks, you should be good to reassemble everything underneath the car.
- Gas tank, driveshaft, heat shields, exhaust, v brace, plastics panels, etc.
- I'm going to do the annoying thing and say that reassembly is the opposite of disassembly.
- Depending on how brave you feel, you can either do this while still on jack stands or with the car on the ground.
- Put it in gear and make sure that pressing the brake pedal means that the wheels stop spinning.
- Chances are that your pedal is going to feel terrible (everything was just recently filled with air after all), so don't worry too much about it. Should only be an issue if it's limiting your braking ability.
- Don't do it immediately. Instead, drive the car around a bit to coerce any stubborn air bubbles into moving through the brake lines, then bleed the brakes again.
- Go out and test your work.
- There will be a million lights on your dash. Look at them for a bit and then tell yourself that this is how old BMWs are and ignore them.
- First make sure that the car stops at slow speeds. If that's good, then progressively start moving up.
- Once you're confident that you can stop, find a quiet street and get up so a decent speed (~45 mph or so) and brake hard. Don't overdo it since ABS will not be working yet. All you want to confirm is that the car brakes straight and doesn't do any weird pulls to one side or the other when depressing the brake or letting go.
- If it all feels exactly the same as before then you're done with the mechanical stuff!

")
Comment