Announcement

Collapse
No announcement yet.

Slon Workshop E46 M3 Carbon Front Triangulating Reinforcement Kit

Collapse
X
 
  • Filter
  • Time
  • Show
Clear All
new posts

    Slon Workshop E46 M3 Carbon Front Triangulating Reinforcement Kit

    Back story:
    SLON has made a front strut tower brace that triangulates loads to the firewall (as BMW has done on newer cars). The result of this is an 18-20% (depending on other mods and chassis condition) torsional rigidity increase (as actually measured on a chassis twister). More torsional rigidity is only better-- better handling, better ride quality, better grip, better NHV. In terms of making your car better, it's right up there with reducing weight. Speaking of reducing weight, this is also 5.5 lbs lighter than stock, on the front end of the car (where it's hard to remove weight).

    This is how it assembles, so the part pictures make sense. The portion behind the cabin air filter housing is structural epoxied to the firewall. The cabin air filter housing needs to be replaced to create the clearance for the brace to fit:

    Click image for larger version  Name:	IMG_5139.jpg Views:	1 Size:	45.2 KB ID:	230021

    These parts are like nothing I have seen in the aftermarket space, or professionally (I'm a product design engineer, in an automotive adjacent space). I hesitate to say it, because it sounds absurd, but they feel like I imagine F1 parts would feel. Super light, super stiff, super precise.

    They're also some of the best packaged parts I've received. Every significant part has it's own custom cut foam hole, so they can't damage each other. They'd have to come by a truly inept shipping company for any hard to come to them.

    Everything is absurdly rigid, all the alu parts are pocketed and ribbed, for weight and structure, and the CF looks perfect. Oh, and the cork filled carbon firewall plug is just next level (more on that)


    Pics:
    Click image for larger version  Name:	IMG_4605.jpg Views:	639 Size:	204.1 KB ID:	230168Click image for larger version  Name:	IMG_4606.jpg Views:	640 Size:	290.1 KB ID:	230169Click image for larger version  Name:	IMG_4607.jpg Views:	641 Size:	298.8 KB ID:	230170Click image for larger version  Name:	IMG_4608.jpg Views:	616 Size:	101.4 KB ID:	230171Click image for larger version  Name:	IMG_4609.jpg Views:	629 Size:	115.4 KB ID:	230172Click image for larger version  Name:	IMG_4610.jpg Views:	639 Size:	283.0 KB ID:	230173Click image for larger version  Name:	IMG_4611.jpg Views:	630 Size:	286.8 KB ID:	230174Click image for larger version  Name:	IMG_4612.jpg Views:	640 Size:	404.4 KB ID:	230175Click image for larger version  Name:	IMG_4613.jpg Views:	639 Size:	401.1 KB ID:	230176​​

    Click image for larger version  Name:	PNG image.png Views:	1 Size:	969.3 KB ID:	230022
    ^accurate mold, can still see the BMW stamp

    Click image for larger version  Name:	IMG_4615.jpg Views:	637 Size:	371.1 KB ID:	230178
    Edit:
    Fun detail I came upon during install-- tiny spacers on the piece that gets epoxied on, to get the optimal epoxy thickness for bonding strength. Also, very deliberately left rough surface, for good epoxy adhesion.

    Click image for larger version

Name:	IMG_4770.jpg
Views:	1903
Size:	98.5 KB
ID:	232003


    Click image for larger version  Name:	IMG_4616.jpg Views:	639 Size:	397.5 KB ID:	230179

    Click image for larger version  Name:	IMG_4614.jpg Views:	633 Size:	436.0 KB ID:	230180

    This last part may be the most interesting of them all. The original version was pure carbon. A Space-X engineer, that's also a member on here (who I don't want to out-- he can self identify if he chooses), bought one of these of that version, and suggested it would be a more effective thermal barrier if it was sandwiched cork, as they do rockets. SLON tested that out, and the results were as below:


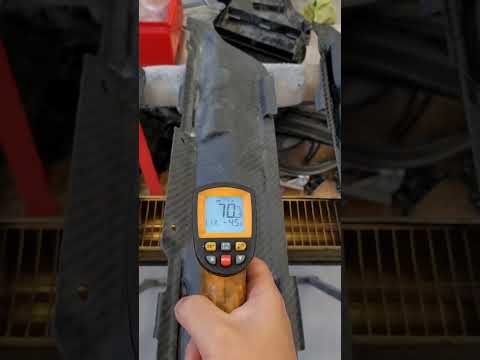
    ^stock vs carbon vs carbon/cork/carbon

    So, that got integrated into the design (and the member who suggested it received the updated version).

    Amusingly for me, that probably means I'll get a comfort upgrade out of this-- I have been running the (NLA) CSL cabin air filter housing for a decade now, and it's lighter but same material as stock-- so presumably it's just thinner, and a worse thermal barrier as a result.

    So, yeah. Consider this the most gushing post I have ever written. As I said back when we had the SLON rear wall group buy, they're making the parts that I have wanted for this chassis for a decade+, that nobody was willing to do.

    Hoping to have time to install it this weekend, so more to follow...

    Not my car, but this is how it should look when done:

    Click image for larger version  Name:	2.png Views:	1 Size:	973.6 KB ID:	230023 Click image for larger version  Name:	3.png Views:	1 Size:	942.4 KB ID:	230024

    No affiliation (though I've never heard anyone say anything bad about IND), but it appears IND has one in stock, if you want one and don't want to wait:
    https://ind-distribution.com/product...5727c149&_ss=r
    Attached Files

    2005 IR/IR M3 Coupe
    2012 LMB/Black 128i
    2008 Black/Black M5 Sedan

    #2
    Review

    I’ve been driving this for around 10 days now, so I thought I’m post up my thoughts.


    In short, this brace is everything I hoped it would be. The car rides better, handles better, responds faster, and is quieter—and the changes are not subtle. Steering is more precise/consistent/accurate. I knew I was in for a good time just pulling out of the driveway—the car used to have clicks run through the chassis as the chassis twisted from the angle of the driveway to the angle of the street, and the interior plastics changed shape. Now, no longer—completely silent.

    I’ve been racking my brain to figure out how to convey what the experience change is like, and I came to what I think is the perfect analogy.
    BMW E46 Convertible 10,500
    BMW E46 Coupe (w/folding seats) 12,500

    According to BMW, the non M coupe is 19% more torsionally rigid than the non M vert. We don’t have numbers for the M vert (we know the M3 coupe is 18,500 nm/deg), but it’s probably a safe assumption that it’s also ~19% less rigid than the M3 coupe.

    This brace has measured an increase of 18-20%, depending on the car—so it’s bang-on identical to the increase in going from a vert to a coupe.
    If you’ve driven both vert and coupe e46s, you know the exact difference this brace makes, and you’ll know it’s not at all subtle—the more rigid chassis car rides better, handles better, turns in better, has better feedback, is quieter, and is more responsive.

    Or, to a less extreme scale, if you’ve driven the same car before and after a roll cage is installed, this is a similar change in feel.

    Interestingly, I have not detected any of sizzle change Bry5on mentioned—and I’m pretty hyper focused on steering feel in cars (as in, I never wanted a newer Suburban after it went EPS because I couldn’t deal with the lack of feel—in a freaking suburban). I’m not sure what the difference is there—maybe it comes down to a camber/caster/toe setting difference? Either way, I’ve only found all aspect of steering (and everything else) to be improved.

    I feel like I already covered this, but, to reiterate, build quality is off the chart. All the CF is perfect, all the alu parts are beautifully machined, everything fits perfectly, everything is actually engineered (not anywhere near a given in aftermarket car parts), and it looks great. This is an expensive part, no doubt—but it’s expensive for a reason. I doubt the profit margins on this are unusually high.

    All told, I freaking love it. I have zero regrets, and highly recommend it. I need to make time to get the SLON Workshop rear bulkhead installed ASAP—not because the car feels unbalanced in any way, but because I want more of this improvement, and I want it now!
    ​​
    Click image for larger version  Name:	fetch?id=232192&d=1693915792.jpg Views:	0 Size:	403.4 KB ID:	233699

    2005 IR/IR M3 Coupe
    2012 LMB/Black 128i
    2008 Black/Black M5 Sedan

    Comment


      #3
      DIY

      I know the car is dirty. I’m currently building a house, and the driveway isn’t paved yet. Keeping the car clean is just a non starter at the moment.

      This was actually a pretty easy project, if slightly scary because you only get once chance to bond the part correctly. The entire project took ~3 hours of labor, taking my time, but with a 24 hour block in the middle where I let the epoxy set. There’s a lot of doing/undoing/redoing, but once the part is installed you won’t have to deal with that again.

      I’m going to steal some pictures from the SLON Workshop instructions and use some of my own.

      The project basically has 5 phases:
      1. Disassembly
      2. Prep work
      3. Test fit
      4. Epoxy, partially assemble, tighten

      (wait epoxy cure time)

      5. Disassemble and reassemble with all the non bracing parts (firewall plug, cabin air filter housing) installed

      The project should be completed with the weight of the car on its wheels (not jacked up). The flatter the surface you can do it on, the better, though that’s less critical than having it on it’s wheels— that’ll let the suspension level the load as much as possible, so you’re not bracing the chassis in a tweaked position.

      1. Disassembly

      Remove all the stock parts- stock strut tower brace, stock cabin air filter housing, stock firewall plug, wiper arms, and the lower windshield cowl (just pull straight up to remove this, it’s push pins). The only part that was a bit tricky here was removing the wiper arm, perhaps because they’ve never been removed from my car in 19 years. Prying is NOT the option to go for here, because the surface below is the glass of your windshield. What I found worked perfectly was a valve spring compressor I bought a while back to rebuild my lawnmower engine— IIRC the tool was $10 at Advance Auto Parts.​​

      Click image for larger version  Name:	fetch?id=232166&d=1693912987.jpg Views:	1 Size:	186.1 KB ID:	232182

      2. Test fit

      I would not skip a test fit! Couple of reasons to do it:
      a) if your chassis is tweaked, better to know this won’t fit BEFORE you epoxy pieces in
      b) Next time you do this, it’ll be under the time pressure of setting epoxy. Good to have a practice run under your belt.

      There are 5 M8 bolts that come with the kit, of 3 different types.​​

      Click image for larger version  Name:	fetch?id=232167&d=1693913027.png Views:	1 Size:	869.0 KB ID:	232183

      Bolt 3 attaches the the mount bracket to the car while the epoxy sets. Take Bolt 3 and use it to temporarily loosely (so that it can still move) affix the mounting bracket (plate that gets epoxied in) behind the center wind shield cowl hole:

      Click image for larger version  Name:	fetch?id=232168&d=1693913060.jpg Views:	1 Size:	371.2 KB ID:	232184

      Install the strut tower brace (reusing the stock strut tower brace hardware, and install the adapter bracket between them. Bolt 2 (2X) in the picture above goes between the strut tower brace and the adapter bracket. Bolt 1 (2X) in the picture above goes between the mount bracket and adapter bracket.

      Click image for larger version  Name:	fetch?id=232169&d=1693913189.jpg Views:	1 Size:	354.3 KB ID:	232185

      Tighten all hardware to 25 nm, check fitment. Assuming everything fits properly and you feel comfortable with how everything bolts together, it’s time to move on to….


      3. Prep work

      Take the adapter bracket and strut tower brace out.

      Close the vents on the HVAC system to prevent debris from falling in. With gentle but steady pressure you can close the fresh air doors on the heater case to keep debris/sanding dust out of the HVAC system while working in the area.

      Use a marker to trace the edges of the mount plate on the metal. Remove the M8 Bolt and mount bracket. Put down some sort of drop towel or paper so that paint/metal dust don’t get into your climate control system area. Use 180-220 grit sandpaper to sand within the area you marked. You don’t have to get down to bare metal, but you do have to get through the paint and into the primer.​​

      Click image for larger version  Name:	fetch?id=232170&d=1693913229.jpg Views:	1 Size:	335.6 KB ID:	232186

      The kit includes a plastic wedge— you can use this to sand the areas that are difficult to get into with your fingers:

      Click image for larger version  Name:	fetch?id=232174&d=1693913442.jpg Views:	1 Size:	155.1 KB ID:	232187

      Don’t half ass this step— it’s what will give your plate a good bond.


      CSL Airbox only step 3B:
      If you have a CSL airbox, you will need to replace the check valve on top with the one SLON includes with the kit.
      If you have a stock airbox, ignore this step and set the check valve aside for when you inevitably get a CSL airbox.

      Click image for larger version  Name:	Check Valve.jpg Views:	0 Size:	418.7 KB ID:	232215


      4. Epoxy time

      First off, practice inserting the mount bracket in such a way that you won’t wipe off the epoxy as you insert it. I found that if you hold the bracket at ~45º to the firewall, and insert it right at the bolt location, you can do so without any contact.

      Next, lightly grease the threads of bolt 3. It will be removed after the epoxy sets, and that’s not going to be easy if it’s structurally adhered. But, you don’t want to use so much that it overflows out of the threads, either.

      Finally, change your greasy gloves and prep the parts. Use a degreaser to throughly clean the area you sanded as well as the bonding surface of the mounting bracket.

      Look over everything, make sure you know where everything you used for the test fitting is. Squirt a little epoxy out of the mixing nozzle, in case the initial bit isn’t mixed. Then, apply your structural adhesive to the mounting bracket mating surfaces:​​

      Click image for larger version  Name:	fetch?id=232172&d=1693913338.jpg Views:	1 Size:	119.2 KB ID:	232188

      More from Bry5on, as he is far more experienced with this kind of bonding than me:

      Originally posted by Bry5on View Post
      For degreaser, I used acetone followed by IPA on the metal, always wiping in one direction with clean towels! For carbon, I did a very light abrade then a wipe with IPA.

      I’d also recommend wetting out the surface of the bracket and where it mounts with a thin coat of epoxy. This will help guarantee a good adhesive bond. Then run your fingers around the squeeze out to create a nice fillet. You’ll have a bit messy of an install since access is tight, but this should ensure you get a good bond. I took pics of this, you can see it’s a little messy.

      Pics

      With that, the race is on.

      a) use your practiced gesture to insert the mount without smearing the epoxy off. Fasten lightly using the (now greased) bolt 3. The goal here is to get this snug enough that it can hold its position, but loose enough you can still move it around a bit as you install the other parts. Use the included plastic wedge under the rear of the mount to ensure good contact between the rear of the mount and metal:​​

      Click image for larger version  Name:	fetch?id=232175&d=1693913263.jpg Views:	1 Size:	177.2 KB ID:	232189

      Click image for larger version  Name:	fetch?id=232173&d=1693913282.jpg Views:	1 Size:	197.1 KB ID:	232190

      b) install the strut tower brace. As much as possible, center it left/right between the towers. Don’t tighten yet.
      c) install the adapter bracket between the mount and strut tower brace
      d) make everything snug, not tight (so parts can move as other parts are fully tightened down)
      e) tighten in the following order:
      1) strut tower brace bolts (6X)— 24 Nm
      2) strut tower brace to adapter bracket (2X) - 40 Nm
      3) adapter bracket to mount (2x) - 40 Nm
      4) mount to firewall— 30 Nm
      The goal here is to not create any tolerance stack ups here that’ll bite you down the road— so use the ability to slightly tweak where the mount is adhered to the firewall to make sure you have good fitment in the future.

      ——————————————————
      With that complete, let your heart rate settle. Instead of wanting the epoxy to cure more slowly, now it can’t happen soon enough. Let the adhesive cure. I gave it a full 24 hours, because more better and I have years to enjoy this... I can suffer through waiting to drive it now...
      ——————————————————

      5. Assembly isn’t opposite of disassembly.

      Take everything out again, other than the epoxied in bracket. But, do remove and discard the 8mm greased bolt that held it the mount in place as the epoxy cured. Don’t forget to remove the plastic wedge you jammed under the mounting bracket!

      Parts have to go together in a very specific order. Failure to do so will result in you doing it twice.
      Parts have to go together in a very specific order. Failure to do so will result in you doing it twice.
      a) install the (cork/CF) firewall plug. Note that the squares on the mount brackets key into the squares on the firewall plug. Align the keyed squares first, then use fasteners (either stock or the ones included with the kit) and included circular spacers to secure the firewall plug in place, holding that keyed location. Reinstall the hardware that attaches the side pod plastic trim to the firewall plug. Reinstall windshield cowl.
      N.B.: use the included circular spacers between the firewall plug and firewall at the hardware wall location.
      If you don’t use the spacers, the firewall plug will likely crack. If you don’t align/key the firewall plug square to the mount bracket, you’ll have changed your clearances and it won’t go back together.​

      Click image for larger version  Name:	IMG_5447.jpg Views:	0 Size:	332.9 KB ID:	232280

      Click image for larger version  Name:	IMG_5445.jpg Views:	0 Size:	136.5 KB ID:	232283

      b) reinstall, for the last time, the strut tower brace. Don’t fully tighten.
      c) run the 2 wires (that get attached to the cabin air filter housing) over the strut tower brace
      d) install adapter bracket, loosely. Fully tighten strut tower brace to strut towers (25 nm). Fully tighten adapter bracket to mount bracket (40 nm). Fully tighten adapter bracket to strut tower brace (40 nm).
      e) remove bolts that attach adapter bracket to mount bracket
      f) transfer gaskets/drains from stock cabin air filter housing to new, SLON version. install cabin air filter housing. The two center fasteners are the fasteners that attach the adapter bracket to the mount. Insert the two included square spacers through the cabin air filter housing, keying them into the mount bracket. Install the two bolts that attach the adapter bracket to mount bracket for the last time, and tighten to 40 nm.​​

      Click image for larger version  Name:	fetch?id=232176&d=1693913505.jpg Views:	1 Size:	283.5 KB ID:	232191

      g) insert cabin air filter
      h) transfer pins from stock cabin air filter cover to SLON CF version. Install
      i) run the engine wires through the SLON wire guide and clip the cover into place.
      j) reinstall wiper blades


      Complete.​​

      Click image for larger version  Name:	fetch?id=232177&d=1693776645.jpg Views:	1 Size:	403.4 KB ID:	232192

      Click image for larger version  Name:	fetch?id=232178&d=1693776659.jpg Views:	1 Size:	414.7 KB ID:	232193

      Click image for larger version  Name:	fetch?id=232179&d=1693776677.jpg Views:	1 Size:	384.1 KB ID:	232194

      2005 IR/IR M3 Coupe
      2012 LMB/Black 128i
      2008 Black/Black M5 Sedan

      Comment


        #4
        Looks really nice but that price, good lawd
        2004 Dinan S3-R M3
        2012 Dinan S1 X5M

        Comment


          #5
          Looking forward to install pics.

          Price is pretty steep, but I've heard from everyone who has driven a car with this on that it's worth it. I've been avoiding driving a car with this because I feel like I'm going to have to immediately go and buy one
          2002 Topasblau M3 - Coupe - 6MT - Karbonius CSL Airbox - MSS54HP Conversion - Kassel MAP - SSV1 - HJS - PCS Tune - Beisan - MK60 Swap - ZCP Rack - Nogaros - AutoSolutions - 996 Brembos - Slon - CMP - VinceBar - Koni - Eibach - BlueBus - Journal

          2012 Alpinweiss 128i - Coupe - 6AT - Slicktop - Manual Seats - Daily - Journal

          Comment


            #6
            And here I was thinking the CSL carbon airbox was probably the most expensive single item I'd want on my car. I wish my job would give me a moderate raise already - just $3k an hour, nothing too crazy.

            Comment


              #7
              Super duper fancy fancy! Very impressive.
              E46 324i k24/dct/turbo Build Thread
              Phoenix Yellow e46m3 Build Thread

              Comment


                #8
                I’m interested to hear if this front bracing without a corresponding rigidity increase in the rear throws off the feel or balance of the car at all. I have no interest in losing my rear pass through with something like the slon rear wall.

                Not that I’m going to pay $5k for it either way tbh.

                Comment


                  #9
                  Looks like an awesome piece!

                  If you're interested in parting ways with the CSL cabin air filter housing, shoot me a message Obioban

                  Comment


                    #10
                    So epic to see this. SLON is really something else. It looks like OEM F1 stuff.
                    We have his dct pan and cf radiator support and front bumper beam in the two M4 GTSs and the quality is incredible.

                    Looking forward to the install and impressions!!
                    Last edited by SYT_Shadow; 08-22-2023, 02:34 PM.

                    Comment


                      #11
                      Amazing looking product, can’t wait for review!

                      Comment


                        #12
                        There is one on the wagon

                        I've been putting off starting this thread for a long time, and each time I work on the car I wish I had a place to drop updates. I'll start off here and fill in the details as I go along. Background: I grew up working at my father's indy BMW/Mini shop, owned many BMWs, several Porsches and one 50 year old jag that's now

                        Comment


                          #13
                          I've been sitting on one of these kits for months and just haven't had the time. Along with a rear strengthening wall for that matter.

                          Thrilled to see some other members grab these. IND still has one in stock, but it is quite the chunk of change.

                          P.S. I don't know if you've seen Slon's install notes, but be sure to sand the firewall area prior to bonding the bracket.

                          Sent from my Pixel 6 Pro using Tapatalk

                          Comment


                            #14
                            Originally posted by C///M View Post
                            IND still has one in stock, but it is quite the chunk of change.
                            Even more so for CA folks, we're looking at $5,113.19​ out the door.


                            2004 Dinan S3-R M3
                            2012 Dinan S1 X5M

                            Comment


                              #15
                              I saw that piece, looks sick and should be functional. I think the metal where the bracket attaches to the firewall is double layer 11ga. Although it is spot welded...not sure if that is a long-term issue?

                              I've been kinda brainstorming how to stiffen up the front end...its a project later down the line. My idea so far is tie the strut towers to the firewall and radiator support. I'm trying to make it one piece which creates an issue with being able to service the car easily.​

                              Originally posted by Obioban View Post
                              This last part may be the most interesting of them all. The original version was pure carbon. A Space-X engineer, that's also a member on here (who I don't want to out-- he can self identify if he chooses), bought one of these of that version, and suggested it would be a more effective thermal barrier if it was sandwiched cork, as they do rockets. SLON tested that out, and the results were as below:
                              That is interesting...I'll have to look into that.

                              Comment

                              Working...
                              X