Announcement

Collapse
No announcement yet.

What did you do for your M3 today?

Collapse
X
 
  • Filter
  • Time
  • Show
Clear All
new posts

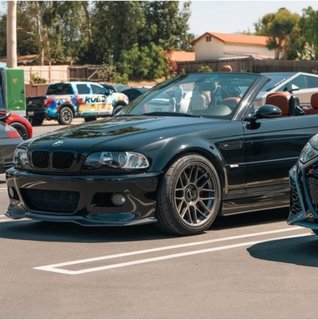
    Drove my car for the first time in 2.5 months today. I had it parked outside on the street by my friend’s house in an attempt to drive property values down in his neighborhood. My wife and I are finally in our own new place after an incredibly stupid and maddening experience with mold at our last house. Now, all of the cars are home, and I can come up with new excuses to not fix them.

    Click image for larger version  Name:	C58B3B85-E125-48AD-98AA-6F9C1CA7DAB0.jpg Views:	0 Size:	161.5 KB ID:	276369
    Attached Files
    http://www.natehasslerphoto.com
    '99 M3, Hellrot/Sand Beige, slicktop
    '01 M3, Imola/black

    Comment


      Originally posted by Projecte46m3 View Post
      Finally got the interior setup:
      Recaro carbon PP ABE
      Karb CSL center console
      Karb CSL door cards
      OEM titan shadow trim

      Still waiting for the oem CSL e-brake boot to get delivered. I adjusted the seat belts to use the pass through holes. lol Click image for larger version Name:	IMG_7107.jpg Views:	0 Size:	68.8 KB ID:	276366

      Looking really good. That’s a serious project to take on all at once. What’s the plan for the back seats?

      Hopefully you were able to utilize my CSL tutorial

      Comment


        Originally posted by Avedis View Post


        Looking really good. That’s a serious project to take on all at once. What’s the plan for the back seats?

        Hopefully you were able to utilize my CSL tutorial
        Thanks! It was definitely a lot but, I took my time. It was more so a waiting game for the oem CSL parts to be delivered and the wiring extension harness. Not to mention trips to multiple Home Depot stores to find the specialty bolts, washers, and screws in stock.

        As far as the back seats, I think I’m going to customize the center sections in alcantara or maybe another fabric to match the front recaro seat cushions. Still deciding if I want a clean look or add some color pop to the interior. I’ve been eyeing all the fabric options on https://p1designs.com/shop/ for a while now.
        2005 E46 ///M3 Interlagos Blue

        BBS - Recaro - JRZ - PFC - Dixis Spirit - Supersprint - Haimus - Vorshlag - RKP - YFCM - Ground Control - DMG Autosport - Diffsonline - Autosolutions - ​Koyo - Mile End Composites - GC

        https://www.instagram.com/justanotham4/

        Comment


          Took delivery today. Man I’ve been waiting a long time for this. Such a fun car!
          06 IB M3 ZCP
          07 Porsche 4.1 Sharky GT3

          Comment


            Originally posted by mr pete View Post
            Took delivery today. Man I’ve been waiting a long time for this. Such a fun car!
            Pics next to the GT3 pls! You’re living my dream lol.
            E46 M3 TiAg/Black - Journal​, IG: sharkmar
            981 Cayman GTS Racing Yellow/Black
            C43 AMG Diamond Silver/Red​

            Comment


              Originally posted by SQ13 View Post

              Pics next to the GT3 pls! You’re living my dream lol.

              After the car comes back from ppf, I’ll grab a shot! Thanks!!
              06 IB M3 ZCP
              07 Porsche 4.1 Sharky GT3

              Comment


                Originally posted by SQ13 View Post

                Pics next to the GT3 pls! You’re living my dream lol.
                +1 - congrats on the purchase mr pete and welcome to the forum

                Comment


                  Originally posted by mtpktz View Post

                  +1 - congrats on the purchase mr pete and welcome to the forum
                  Thank you!
                  06 IB M3 ZCP
                  07 Porsche 4.1 Sharky GT3

                  Comment


                    Not e46 related, but I am sure this can be useful for any BMW with Hella headlights.

                    while aiming my lights I cross threaded the gearbox for the side-side adjustment. To make adjustment from the engine bay BMW designed in a Bowden cable that is twisted by the adjustment gear to finally spin the adjustment screw.

                    Years of debris cause the gears to jam and those plastic gears cannot take much torque. To fix my car I got a free spare from a nice person in FB marketplace and started to look how to remove the adjuster gears. There is very little info on this online so I thought it worth sharing what I did.

                    On the Z4, the up-down adjustment is done by the adjuster gear that provides with a hex-Philips head, this directly spins the black gear which is press fitted to the adjuster screw.

                    Click image for larger version  Name:	IMG_1120.jpg Views:	7 Size:	82.9 KB ID:	276496

                    The side-side adjustment has a gear box, a Bowden cable, and a similar gear and screw. the gears inside the box in my case broke as the mechanism was jammed.

                    Click image for larger version  Name:	IMG_1119.jpg Views:	7 Size:	112.5 KB ID:	276497

                    Click image for larger version  Name:	IMG_1118.jpg Views:	7 Size:	78.2 KB ID:	276493

                    Click image for larger version  Name:	IMG_1125.jpg Views:	7 Size:	81.0 KB ID:	276491

                    To remove the adjustment mechanism, you need to first remove the adjuster levers from inside the headlamp (no photos), this is necessary to disconnect the adjustment screws from the headlamp projector/bulb carrier. then you need to punch out the screws, I used a T25 bit and a hammer for this. This allows to remove the adjuster black gear as shown below, the adjuster white gear just slides out.

                    Click image for larger version  Name:	IMG_1121.jpg Views:	0 Size:	84.5 KB ID:	276502

                    Click image for larger version  Name:	IMG_1123.jpg Views:	11 Size:	123.9 KB ID:	276494

                    Click image for larger version  Name:	IMG_1124.jpg Views:	9 Size:	127.1 KB ID:	276499

                    Here are the bits taken out. you can see the screw has a rubber grommet, and a circular flat seat so it cannot pull out the headlight, the end on which the black gear presses in is knurled to bind onto the black gear. there is no glue, so just friction makes this joint, I will put very little glue when putting it back together if I ever need to use these bits. these are the up-down adjusters

                    Click image for larger version  Name:	IMG_1122.jpg Views:	7 Size:	228.1 KB ID:	276498

                    The next items are for the side-side adjustment, the screw is shorter, has the Bowden cable, and the adjuster white gear is different. the black gear are the same on both adjusters.

                    Click image for larger version  Name:	IMG_1126.jpg Views:	7 Size:	151.2 KB ID:	276492
                    Attached Files
                    Last edited by maupineda; 08-24-2024, 06:03 PM.

                    Comment


                      Some fresh air with a friend.
                      Attached Files

                      Comment


                        Need to grab some more photos when I have time, but got the car back from the detailer and it’s looking pretty nice.

                        Attached Files

                        Comment


                          Originally posted by dukeofchen View Post

                          Cleaning out the condenser / oil cooler from the front, and the radiator from the back with a hose (not a pressure washer) or compressed air only costs time.

                          I used AC coil foam on both for extra cleaning power, but with this route you absolutely must remove the front end to fully expose the condenser / oil cooler, so that you can thoroughly rinse every nook and cranny to make sure no residual product remains. Definitely helped with temps, as evident from the car taking much longer to warm up even at 90+ ambient we've been having.
                          Thanks dukeofchen! I'm seriously considering pulling off the front end to get good access to clean with the AC coil foam. The coils do look like they have a coating of old dirt (it has no aluminum shine to it at all). I just need the time and the weather to cooperate!
                          /// 2005 Silbergrau M3 · Coupe · 6spd · ZPP · Eibach Pro Street S Coilovers · Sportline CS16 CSL Replica Wheels · PS4S 245/275

                          Comment


                            Pulled off the FCABs in anticipation of the new ones coming tomorrow. I'm chasing down a "drifts to the right" issue. Visually, they don't look too bad, but the right side one just slid right off. The driver side one I had to use a 3 jaw puller on. I'm hopeful that the since the right one slid right off it will be the reason for what I'm chasing down.

                            Comment


                              Felt a hard thumping in first gear up to 20mph, felt like a super bent rim but rims were fine...looks like it's center support bearing failure:


                              | 06 6 Speed Vert - JB on Cinnamon| Beisan | ACL Rod Bearings | ST Sway Bar | TMS CSL Box | Megan headers | H.T.E Tune | 550 Injectors | OEM Section 1, 2, 3| 200 Cell Cats | OEM SSK | Bilstein B12| 712 yellow tag |


                              Comment


                                Originally posted by siamkazi View Post
                                Felt a hard thumping in first gear up to 20mph, felt like a super bent rim but rims were fine...looks like it's center support bearing failure:


                                It's a bummer you can only get these genuine BMW. When I did my subframe reinforcement the OEM options were all out of stock or no longer available. They seemed to be quite a bit cheaper too.

                                Comment

                                Working...
                                X