Announcement

Collapse
No announcement yet.

MSS54HP required for MAP?

Collapse
X
 
  • Filter
  • Time
  • Show
Clear All
new posts

    MSS54HP required for MAP?

    Hello, just getting stuff gathered for a karbonius install, i have an MSS54 ecu and am trying to figure out the easiest way to add a MAP sensor. Is this possible if i go with just an HTE tune or do i need to convert to MSS54HP ecu first?

    If this is not an option, then the next option would be to send it to a place like kassel to be converted. Would i need to get the csl tune on top of that, or can i have him send me back the converted ecu to get a hte tune? any other tips would be appreciated, thank you

    #2
    MSS54HP DME with CSL software is required to install a MAP sensor. Kassel should be able to do the conversion. After the conversion, HTE can tune the DME.

    Comment


      #3
      Originally posted by Slideways View Post
      MSS54HP DME with CSL software is required to install a MAP sensor. Kassel should be able to do the conversion. After the conversion, HTE can tune the DME.
      Bringing this one back.

      Can I have Kassel perform just the MSS54 to MSS54HP upgrade and then use either the Mullet or HTE tune, or must I also have Kassel install the CSL software as well?
      Old, not obsolete.

      Comment


        #4
        Originally posted by D-O View Post

        Bringing this one back.

        Can I have Kassel perform just the MSS54 to MSS54HP upgrade and then use either the Mullet or HTE tune, or must I also have Kassel install the CSL software as well?
        Either works. Bryson can remote flash the full CSL FW if needed.

        You just need to make sure they return your DME to you with something on it. The HW conversion involves physically replacing the ROM with new blank chips, which means that the DME will need to be bench flashed before it can communicate with the typical flashing tools.
        2002 Topasblau M3 - Coupe - 6MT - Karbonius CSL Airbox - MSS54HP Conversion - SSV1 - HJS - Mullet Tune - MK60 Swap - ZCP Rack - Nogaros - AutoSolutions - 996 Brembos - Slon - CMP - VinceBar - Koni - Eibach - BlueBus - Journal

        2012 Alpinweiss 128i - Coupe - 6AT - Slicktop - Manual Seats - Daily - Journal

        Comment


          #5
          While I have you guys..

          I understand the IAT sensor can be wired up using pins from the MAF connector. Any reason not to use the kit from Turner on IND for this? Seems like the cleanest way to install it.
          Old, not obsolete.

          Comment


            #6
            Originally posted by D-O View Post
            While I have you guys..

            I understand the IAT sensor can be wired up using pins from the MAF connector. Any reason not to use the kit from Turner on IND for this? Seems like the cleanest way to install it.

            Comment


              #7
              Originally posted by D-O View Post
              While I have you guys..

              I understand the IAT sensor can be wired up using pins from the MAF connector. Any reason not to use the kit from Turner on IND for this? Seems like the cleanest way to install it.
              Depends on how DIY you want to go, but if you're going to use the IAT harness from the MAF connector you can actually go the whole way and build a harness to the MAF connector that does both the IAT and the MAP sensor. you change one pin in the DME connector and you're good to go. Appreciate you might just want to get something off the shelf, but if you're interested in details on this approach let me know and I can share.
              2005 ///M3 SMG Coupe Silbergrau Metallic/CSL bucket seats/CSL airbox/CSL console/6 point RACP brace/Apex ARC-8s
              Build Thread:
              https://nam3forum.com/forums/forum/m...e46-m3-journal

              Comment


                #8
                That's the one I was looking at. For $85 they include the IAT sensor.
                Old, not obsolete.

                Comment


                  #9
                  Originally posted by karter16 View Post

                  Depends on how DIY you want to go, but if you're going to use the IAT harness from the MAF connector you can actually go the whole way and build a harness to the MAF connector that does both the IAT and the MAP sensor. you change one pin in the DME connector and you're good to go. Appreciate you might just want to get something off the shelf, but if you're interested in details on this approach let me know and I can share.
                  That sounds great. I would like to hear more.


                  Old, not obsolete.

                  Comment


                    #10
                    Originally posted by D-O View Post
                    That's the one I was looking at. For $85 they include the IAT sensor.
                    That would work, or FCP has the sensor for $21.

                    Comment


                      #11
                      Originally posted by heinzboehmer View Post

                      Either works. Bryson can remote flash the full CSL FW if needed.

                      You just need to make sure they return your DME to you with something on it. The HW conversion involves physically replacing the ROM with new blank chips, which means that the DME will need to be bench flashed before it can communicate with the typical flashing tools.
                      Thanks Heinz.

                      I guess if I decide to go with Kassel I need to make sure the conversion without CSL software would include bench flashing my standard M3 software onto the new chips.
                      Old, not obsolete.

                      Comment


                        #12
                        Originally posted by D-O View Post

                        That sounds great. I would like to hear more.

                        Cool I'll put something together. I'm at work right now so won't get to it until later, but will send through as soon as I can.
                        2005 ///M3 SMG Coupe Silbergrau Metallic/CSL bucket seats/CSL airbox/CSL console/6 point RACP brace/Apex ARC-8s
                        Build Thread:
                        https://nam3forum.com/forums/forum/m...e46-m3-journal

                        Comment


                          #13
                          Originally posted by karter16 View Post

                          Depends on how DIY you want to go, but if you're going to use the IAT harness from the MAF connector you can actually go the whole way and build a harness to the MAF connector that does both the IAT and the MAP sensor. you change one pin in the DME connector and you're good to go. Appreciate you might just want to get something off the shelf, but if you're interested in details on this approach let me know and I can share.
                          Believe there’s an OTS solution for what you’re talking about if I’m not mistaken. Check this out

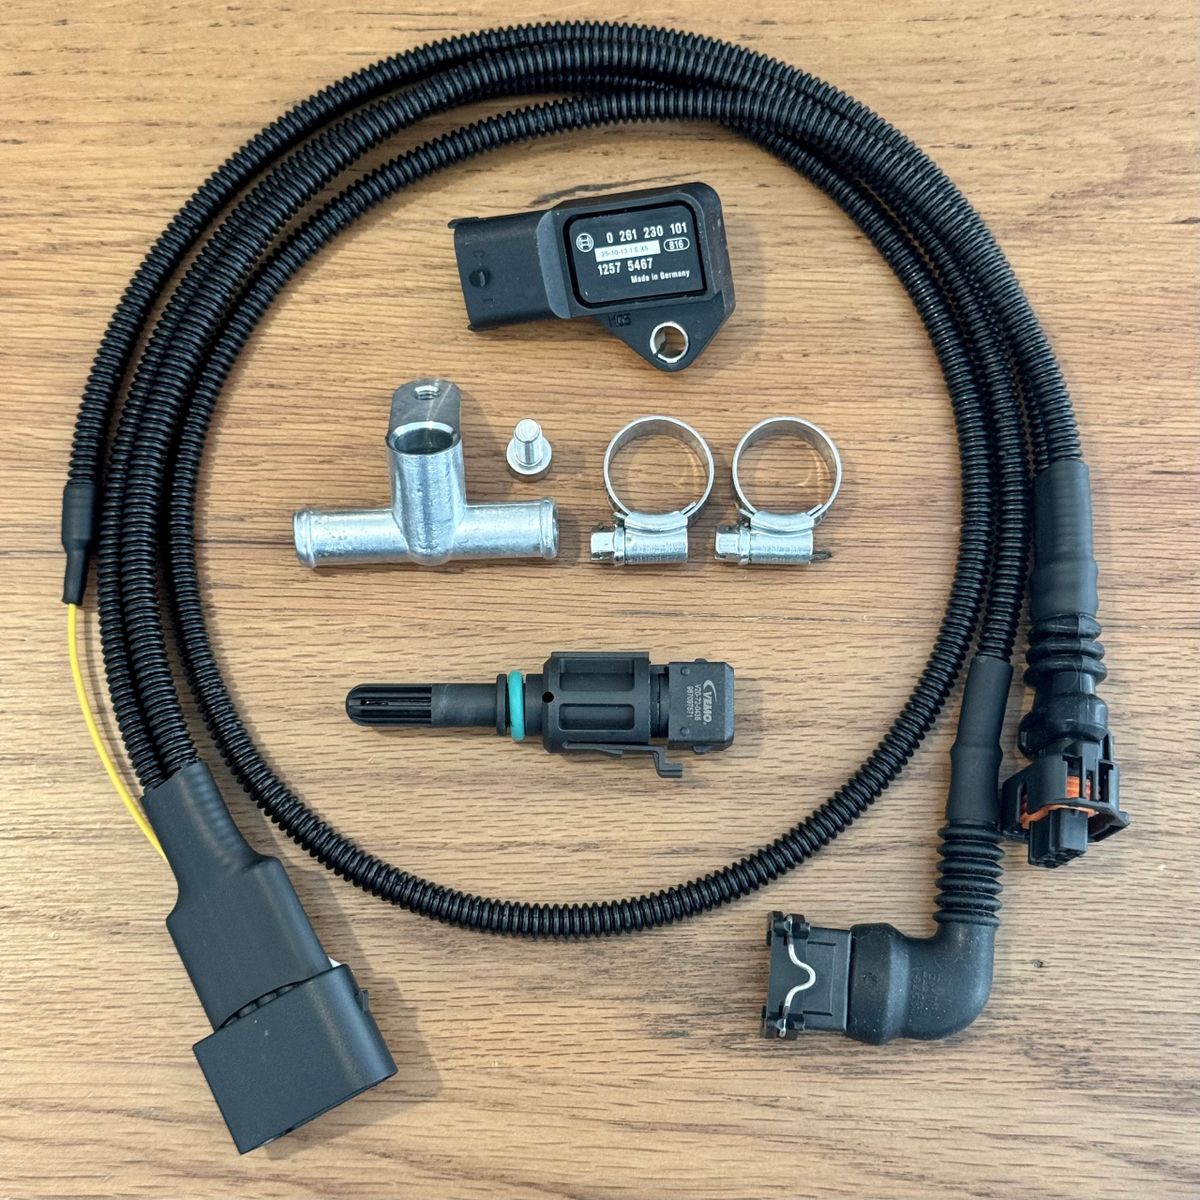
                          BMW E46 M3 S54 IAT relocation and MAP pressure sensor conversion kit This is an all-in-one kit utilising the OEM MAF sensor connector when running any intake setup on your BMW E46 M3 (CSL style airbox/velocity stacks/standard airbox) combined with a CSL clone engine remap. This kit provides a separate IAT sensor and a MAP sensor, mimicking the BMW E46 M3 CSL setup. Please specify when ordering if you require a CSL or threaded style IAT sensor. For fitting into most Carbon airboxes, a CSL style IAT is required (Please check before ordering and contact us if you are unsure). Components included: 1 x IAT sensor relocation wiring harness with MAF sensor removal and MAP sensor pre-wired plug and play loom. 1 x New Bosch MAP sensor All hardware required to fit the wiring loom. Online installation guide to help with fitting. Optional hardware: 1 x NEW Intake air temperature sensor (CSL or threaded style sensor available) NOTE: You will need to run a CSL clone engine ecu tune to utilise the MAP sensor function. Due to stock supply issues, the brand of sensor you receive may not be identical to that in the pictures. Each loom is custom made to order and can take up to 10 working days to be processed. If you require immediate delivery, please contact me directly before ordering to check stock availability.

                          Comment


                            #14
                            Originally posted by shreyas View Post

                            Believe there’s an OTS solution for what you’re talking about if I’m not mistaken. Check this out

                            https://auto3design.co.uk/online-sho...conversion-kit
                            Yes - this is pretty similar - the approach I'm talking about does away with the need to run the separate wire to the ECU box (the yellow wire in the photo).
                            2005 ///M3 SMG Coupe Silbergrau Metallic/CSL bucket seats/CSL airbox/CSL console/6 point RACP brace/Apex ARC-8s
                            Build Thread:
                            https://nam3forum.com/forums/forum/m...e46-m3-journal

                            Comment


                              #15
                              Originally posted by D-O View Post

                              That sounds great. I would like to hear more.

                              Okay, so as I said it is possible, with a CSL airbox install, to route the wiring for both the IAT and the MAP sensor to go via the MAF connector. This is the approach I went with as I wanted the ability to fairly easily swap back if desired.

                              For reference the end result of the extension loom looks like this:

                              Click image for larger version  Name:	IMG_0408.jpg Views:	0 Size:	184.5 KB ID:	311165


                              The reason this can be achieved is as follows:

                              The pinouts for the IAT, MAP sensor and MAF sensor are:

                              CSL IAT Sensor
                              Pin 1 (IAT signal) -> DME X60003 pin 22
                              Pin 2 (Ground) -> DME X60003 pin 25

                              CSL MAP Sensor
                              Pin 1 (+5V) -> DME X60003 pin 7
                              Pin 2 (Ground) -> DME X60003 pin 17
                              Pin 3 (MAP signal) -> DME X60003 pin 18

                              Euro M3 MAF Sensor
                              Pin 1 (IAT Signal) -> DME X60003 pin 22
                              Pin 2 (+12V) -> Fused supply X8680 pin 6
                              Pin 3 (Ground) -> DME X60003 pin 17
                              Pin 4 (+5V) -> DME X60003 pin 7
                              Pin 5 (MAF signal) -> DME X60003 pin 1

                              The wiring diagrams below confirm what I've listed above:

                              Click image for larger version  Name:	Screenshot 2025-07-05 at 7.17.17 AM.png Views:	0 Size:	124.9 KB ID:	311166

                              Click image for larger version  Name:	Screenshot 2025-07-05 at 7.17.31 AM.png Views:	0 Size:	140.8 KB ID:	311167

                              Looking at this we can see the following:

                              IAT signal uses the same pin (22) for both the Euro M3 and the CSL
                              IAT ground uses pin 25 on the CSL and pin 17 on the Euro M3

                              MAP +5V uses pin 7 same as the MAF +5v on the Euro M3
                              MAP ground uses pin 17 same as the MAF ground on the Euro M3
                              MAP signal uses pin 18, which is different to the MAF signal (pin 1) on the Euro M3


                              So we've got two sticking points, MAP signal and IAT ground.

                              IAT ground is easily solved as we can use pin 17. The Euro M3 uses shared ground for the MAF and IAT, the CSL doesn't because they're wired as separate runs from the DME, but for our purposes we can copy the Euro M3 approach and use pin 17 for both (Note this is only okay to do because we know that pin 17 is configured to be used as a ground)

                              MAP signal can be solved by simply re-pinning pin 1 in the X60003 connector to pin 18, this is the only "change" that needs to be made to the stock wiring.

                              So what does our extension harness look like?

                              CSL IAT Sensor
                              Pin 1 (IAT signal) -> MAF connector pin 1
                              Pin 2 (Ground) -> MAF connector pin 3

                              CSL MAP Sensor
                              Pin 1 (+5V) -> MAF connector pin 4
                              Pin 2 (Ground) -> MAF connector pin 3
                              Pin 3 (MAP signal) -> MAF Connector pin 5

                              IMPORTANT! Remember that when you do the install you also need to re-pin X60003 pint 1 to pin 18. I recommend putting a label in the ECU box as a reminder as to what you have done so that it can be reverted in the future.


                              In terms of the construction of the extension loom you need the following parts:

                              1x Bosch 3 pin connector (1928403966) - I recommend buying genuine Bosch. Also make sure that you buy a kit that comes with the pins and seal plugs.
                              1x boot for Bosch 3 pin connector (1928300527) -
                              1x IAT connector (12521427615) - Make sure that you purchase a kit that comes with the pins and seal plugs.
                              1x boot for IAT connector (12521732635)
                              4x 3m of 0.5mm2 insulated wire - I recommend different colours for each pin as you need to know which is which after passing it through the corrugated tube. If you want to go super fancy you can purchase in the original wiring colors for each pin.
                              3m of 4.5mm corrugated tube. Genuine stuff is order-able in 1m lengths as (12517508831). I wanted longer length so bought some knock off from AliExpress which, except for the lack of writing on the outside, is exactly the same.
                              1x male MAF connector kit (see here for how to purchase)
                              Braided heat-shrink tubing for the MAF connector to 2x corrugated tubing

                              Tools required
                              - soldering iron
                              - solder
                              - side cutters
                              - tape (to aid in pulling wires through corrugated tubing)
                              - crimp tool for terminals (or do what I do and tack with a small amount of solder and use needle nose pliers to crimp the terminal
                              - exacto knife (for cutting corrugated tubing)

                              General approach
                              The general approach I followed was to:

                              1: use scrap wire to lay out my desired routing of the extension harness in the engine bay (to work out lengths)
                              2: cut wires and tubing longer than you've measured so you have spare room to work
                              3: make up the MAF connector end first (don't forget the waterproofing plugs!)
                              4: thread the wiring through the 2x corrugated tubings (making sure you get the right wires in the right tubes)
                              put it back in the engine bay and route it, temporarily fixing in place to get the exact lengths you need for the corrugated tubing
                              5: cut the corrugated tubing to length (don't cut the wires)
                              6: work out exactly how much length of wire you need to account for the terminals, position and orientation of the connectors, etc. and cut wires to length
                              7: Don't forget to thread on the waterproofing plugs and your connector boots
                              8: assemble the connectors making sure the end result for both is at the correct orientation
                              9: heat shrink the MAF connector end where the two corrugated tubes meet it
                              10: enjoy your handiwork!
                              Last edited by karter16; 07-04-2025, 12:18 PM.
                              2005 ///M3 SMG Coupe Silbergrau Metallic/CSL bucket seats/CSL airbox/CSL console/6 point RACP brace/Apex ARC-8s
                              Build Thread:
                              https://nam3forum.com/forums/forum/m...e46-m3-journal

                              Comment

                              Working...
                              X