Announcement

Collapse
No announcement yet.

Porsche Brembo 996 BBK conversion

Collapse
X
 
  • Filter
  • Time
  • Show
Clear All
new posts

    DIY: Porsche Brembo 996 BBK conversion


    ​​​​​​​​​​​


    This DIY is focused more on the preparation and painting, rather than install. Others have told me that they're going to make install DIYs. If that doesn't happen, I'll edit this with more of the install process.

    Conversion DIY, this post, post #1
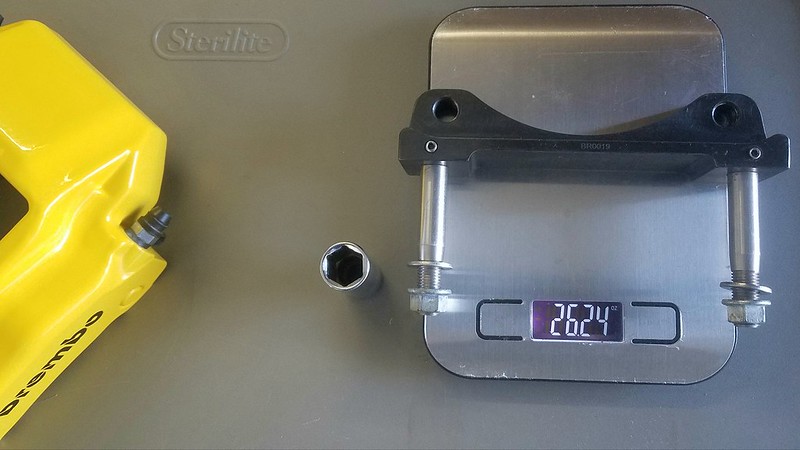
    Rallyroad vs CM (ECS) brackets post #2
    Caliper rebuild & problems post #3


    As always, be careful. You assume full responsibility. I'm not liable for any dangerous situation that you may create for your car's braking. Don't attempt if you're not already familiar with this type of stuff imo (like you've done caliper removal, rotor replacement, etc., and are all set with tools/supplies). This is how I do it, but even I learn things as I continue to do this. That is to say, this is not something straightforward like installing vanos regulator/line, one and done. Many steps, many opportunities to make mistakes, etc. It might not be worth it to you, but I love this type of shit.


    Research & Purchasing

    Left is driver, right is pass.

    Calipers

    Mostly it's Boxster "S" turbos that have the calipers that we can retrofit, but it may be on other models, so it's best to look for calipers by part #s as well as "boxster S or turbo." Fronts 996.351.425 + .426 Rears 996.352.421 + .422. Don't worry about numbers after the 9th digit like 996.351.425."03" - not important to us. Part #s are also cast into calipers, so double check there.


    Rotors

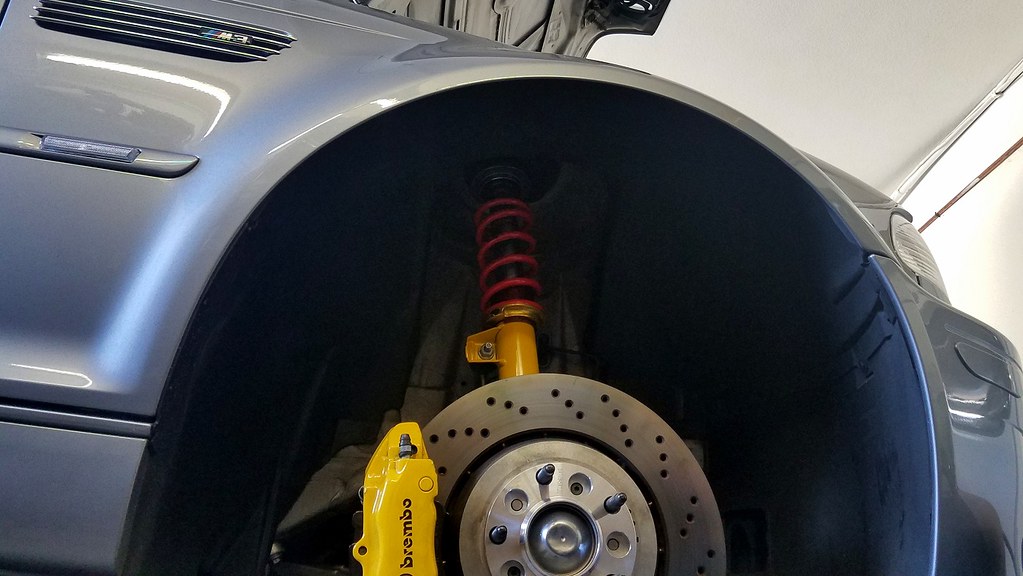
    CSL/ZCP front rotors that are 345mm diameter are used instead of non-zcp 325mm. The rear rotors are all 328x20mm so you can re-use your stock ones to save $ or get csl/euro/zcp/z4 drilled rotors to match the fronts. Front #s 34112282445 + 34112282446 Rear #s 34212282303 + 34212282304 OE BMW or OEM Zimmermann from FCPeuro (lifetime warranty!) or BMWPartsDirect. I've seen people rock aftermarket ones, I suppose to save some $, which I get, but imho, you gotta do this kit with lightweight rotors (2 piece). A lot of the magic of this MBK, is how the loss of unsprung weight makes the car feel. It's awesome!

    Brackets

    From Rallyroad.net or ECS (CreationsMotorsports brand). RR are more expensive, but nicer and lighter. Make sure you're getting E46 M3 not E36 or non-m brackets. Must be for 345mm rotor (front). RR rear brackets also allow for taller pads (D737 from 986/987 fronts) to sweep entire rotor face where ECS' only allow taller pad on outside, which is fine visually, but inside will need shorter, stock 996 rear D738, pad. *See comparison below.

    See Bracket Battle in next post! RR vs. CM

    Lines

    Also from RR or ECS. Again, RR is more expensive. Not sure on quality difference, tho it seems ECS has upgraded their lines to match RR now. I have older CM/ECS and they've been fine. * Lines have 90 degree bend at fitting to accommodate brembo caliper. Stock lines will not work.


    Pads

    Fronts "D917" shape stock porsche pad is OE Textar or replacements like OEM galfer, brembo, Ate. 99635294903
    Rear's stock "D738" shape is 98635293910 - won't sweep entire rotor, see pic below. Shape "D737" will, part # 98635193915.


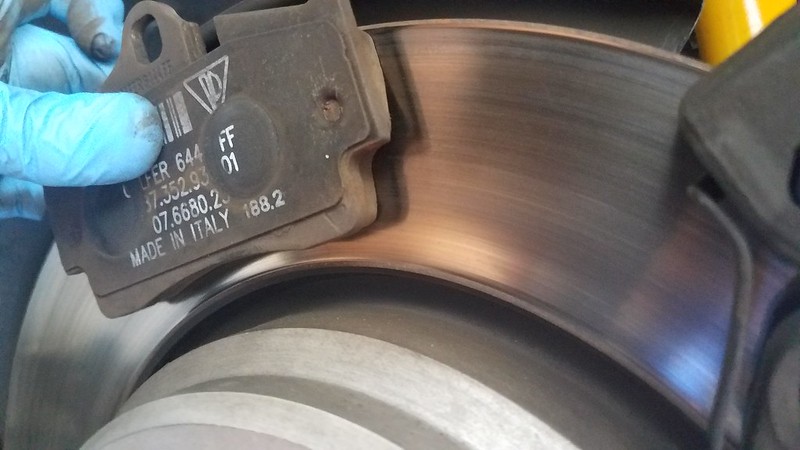
    D738 vs. D737 (5mm taller)


    They'll knock around and make noise, I've found, so if you want, you can get...

    Dampers

    for noise control. Front (both 36mm + 40mm) 99635108802 (x4) Rear 28mm pistons 99635208602 (x4) + 30mm 99635208600 (x4)
    I don't run any; not a fan of extra weight/cost. I don't mind some clunking and squealing bcuz racecar (not really).

    In fact, the newer style pads come with weights, unlike earlier pads, so I think they're even less necessary. (New left with integrated dampers, old right with added dampers)


    Extras (if damaged/missing)

    Bleeders - 2 per kit, F/R L/R all same size M10x1mm. Each caliper would need 1 set - 93035191900. There do exist packs of 2 cheap Doorman bleeders. Longer than needed and not as nice as Brembo, but $4 on amz - https://www.amazon.com/Dorman-13906-.../dp/B0026MAQFO

    Pad spring clip kits (2 in a kit) - Front 99635195901 Rear 99635295901

    Crosspipes - FL 99635196100 FR 99635196200 RL 99635296102 RR 996352296202


    Necessary Actions

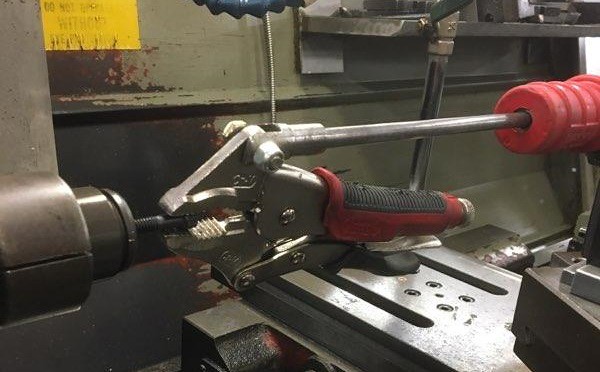
    It is necessary to cut down the front calipers' mounts by 5.5mm to fit properly over our 345mm rotors. Rallyroad will do it for cheap or find a local machine shop. To fit these on E36 M3, if anyone cares, it's 12mm to be removed.


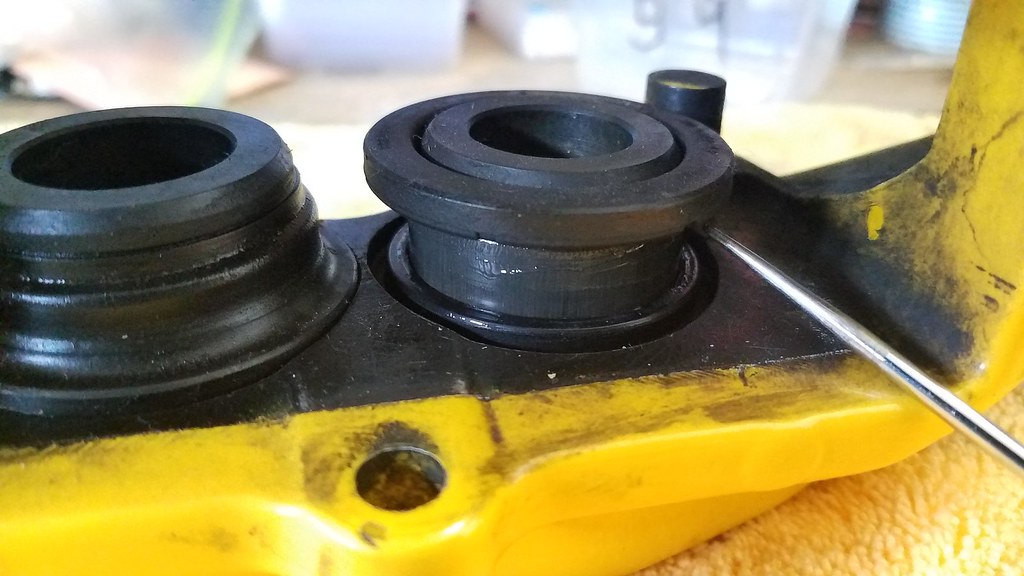
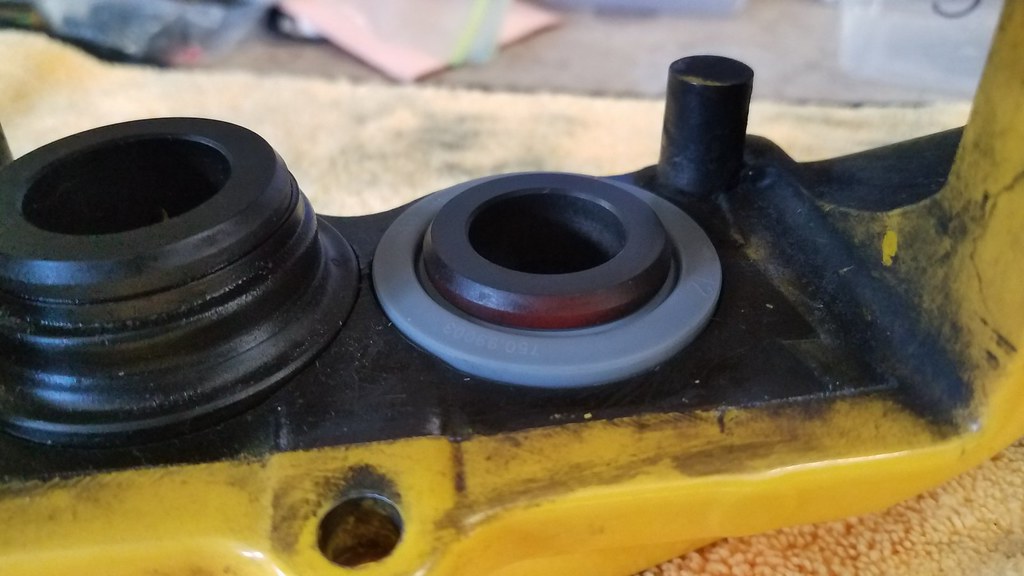
    It is necessary to modify the rear calipers so that the leading piston is the smaller of the two as it's supposed to be. The reason for this action is that Porsche mounts their rear caliper in the opposite way as our E46s, so we must flip it, but also need to move cross pipes to the "bottom" due to gravity- bleeders on top. In order to do so, you're not swapping left caliper to right side and vice versa. Left caliper will still be left, but you're swapping the cross over pipes from left to right and vice versa, but also from front to back. So bleeders will go where the pipe is and pipe from opposite caliper will go where bleeders were on first caliper. To restate, left caliper will take right caliper's cross pipe, but in the opposite side of the caliper (switch with bleeders).

    Not Correct


    Correct


    It is necessary to cut the ends of the rear dust shields to accommodate the larger calipers. Sawzall, dremel, tin snips, your bare hands. About 1.5" off each side is what I've found. You can paint exposed metal to avoid rust.


    *Some have reported that the knuckle of the front hub needs to be ground down as the bracket just kisses it. I didn't find that to be the case for myself with either RR or ECS brackets.

    Testing


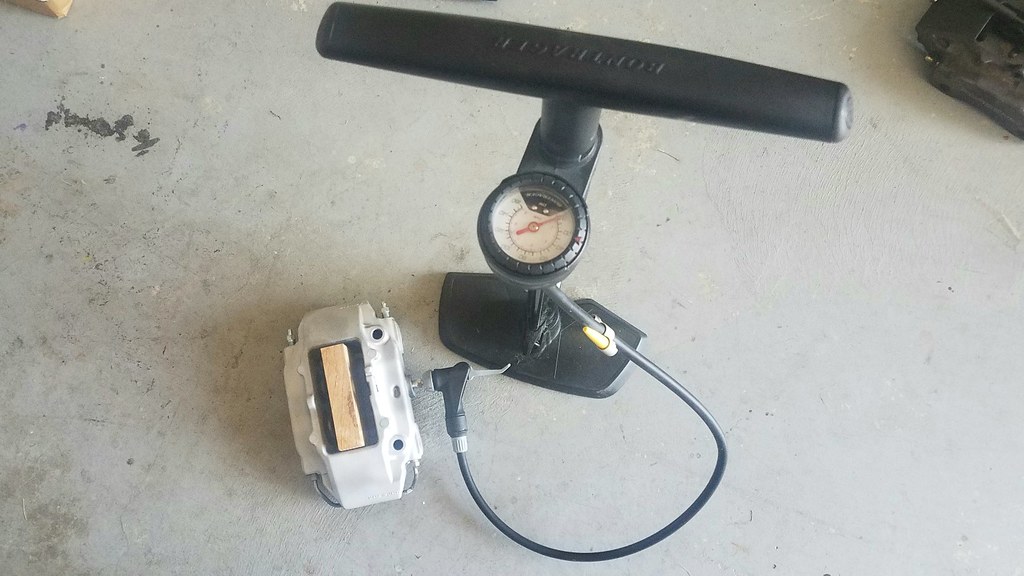
    You can use compressed air or even a bike pump to test the pistons. A rubber tipped air hose handle into the supply port with bleeders tight, will pop the pistons out. THIS CAN BE DANGEROUS - keep fingers out and keep a block of wood or rubber in there. I use a bike pump with a Schrader valve that goes into the caliper. It's pipe thread 1/8"NPT, but it's extremely close to m10x1mm, and gets tight enough to not lose pressure. Link: https://www.ebay.com/itm/x1-1-8-MIC-...AAAOSw5cNYeZi4


    I use wood and rubber blocks, even cardboard to stop the pistons from coming out too far. If one pops out, you lose pressure. You'll often see them move at different rates, but it shouldn't take more than about 50-60psi in my experience. On the other hand, you don't want one coming out with only 10psi as the seal is blown/ripped.


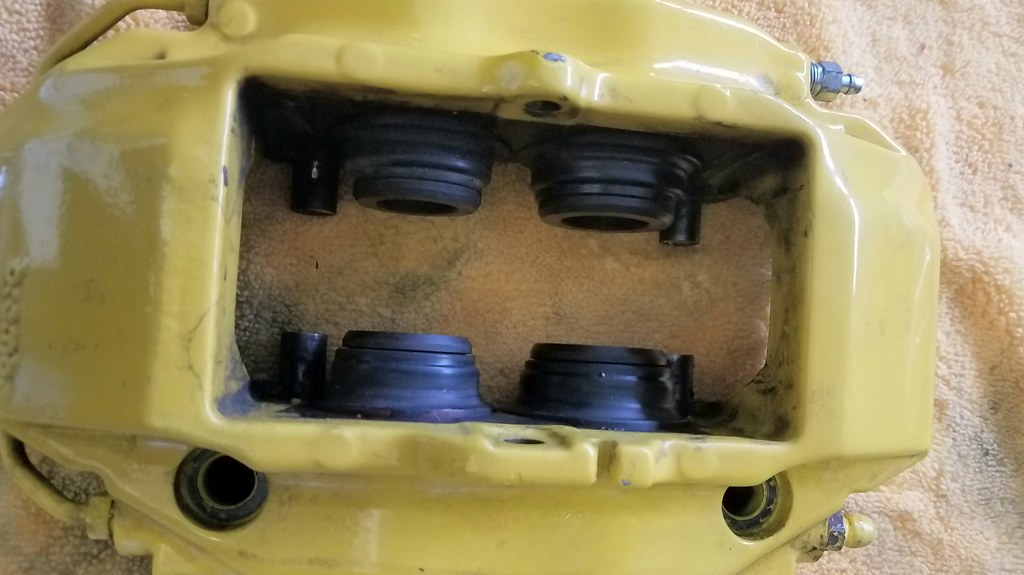
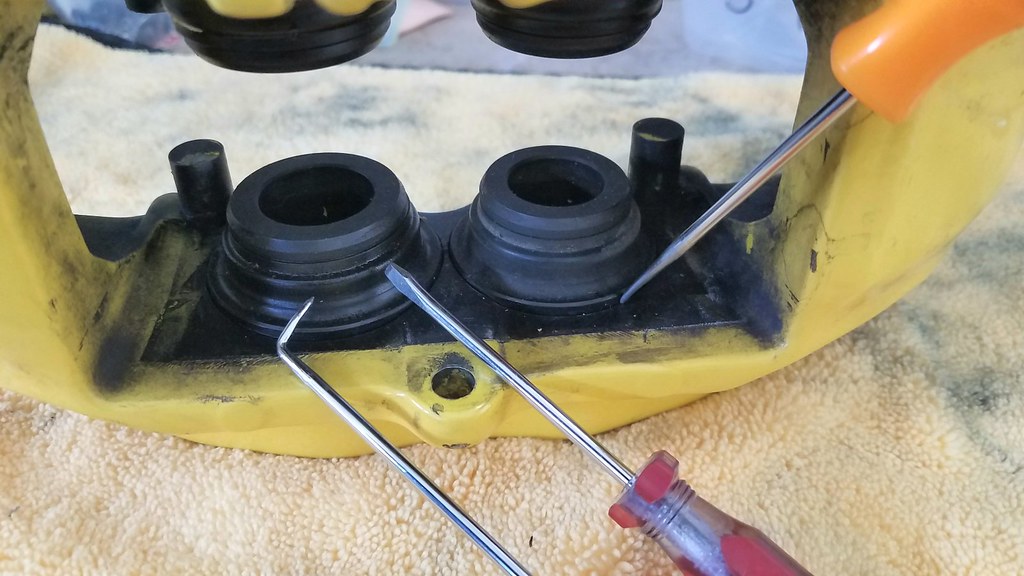
    That's only the first test. The more subtle issue is understanding how brakes work with respect to pistons and seals. The outer is a dust boot, not important to the story. The piston rides on flat edge (important!) o-ring, that's the inner pressure seal. It's the only seal. Outer is a dust boot. The pressure seal is in a square housing within the steel bore. The rubber can not move except for the very inside, so the piston drags that little edge of rubber with it a hair. This elasticity of the rubber pressure seal claws the pistons back once your foot comes off the pedal. This allows the pads to come back, off the rotor. A "sticking" piston or "drag." unless something like debris, is a dead seal. Tight enough to hold pressure, but so worn, it can't pull the piston back.

    So, once you've got all 4 pistons out up against something in the middle (pictured), undo the pump and release pressure from Schrader valve. Now, if the rubber seals are good, the pistons will relax a hair and you'll, fairly easily, be able to push the middle block down and out.

    After testing, leave pistons extended if you're going to rebuild them - see that DIY in post #3. Compress the pistons (undo at least one bleeder or supply port, be careful of fluid) if you're going to use the calipers with existing seals.

    See caliper rebuild below if things don't go well in testing or if you just want to redo them, depending on test results. It's a judgment call on using existing seals. I go off year, mileage, general condition, condition of dust boots (can pry up [see diy below] to inspect for debris), and test results. You can also choose to rebuild re-using the existing seals, by removing, cleaning, relubing, and reinstalling. You might do this if test results were fine, but you see or hear sand or dirt around the pistons.


    Prep

    - red/green scotch pads, wire brush or media blaster: D
    - solvent like lacquer thinner, brake cleaner
    - rags, shop towels. MF towels for later stages
    - duct tape
    - brake cleaner
    - masking tape strip, less sticky kind if possible

    - q-tips
    - 10mm/11mm open wrenches, flare nut is suggested, in addition
    - Dollar tree orange foam ear plugs or something to plug holes
    - hi-temp decals (search, many on ebay). I've seen different sizes and colors and some even metallic - lots of choices!
    - oven, toaster oven (need at least 200-250 degrees)
    - blocks for calipers to sit on or hang them
    - have the bleeders ready to plug holes for baking or, better yet. get extras for supply port hole and bleeder holes - see cheap dormans above, 6 packs to have a full set. * Brake fluid coming out will ruin your finish. Only bleeders can properly keep the tapered hole closed, not some wad of paper or even an m10x1mm plug or bolt. Again, If you bake the calipers without closing the ports with bleeders, fluid will come out and ruin paint.

    Disassemble your calipers. Prepare to spill brake fluid. Take precaution with your eyes if pressure builds. Undo bleeders with 11mm spanner, flare nut style preferred. 10mm for the pipes. Drain as much as you can. Pushing the pistons in will expel fluid. Use a c-clamp, 4"is fine, to push difficult pistons in. * Being difficult here might not mean you have a problem - see the testing section for determining the seals/pistons' condition.


    Clean your calipers well. Media blasting is best, otherwise, scotch pads and wire brushes and some lacquer thinner or solvent. Brake cleaner is good to blow out dirt you've loosened. I like using q-tips dipped in solvent to clean the ports and their threads. I spray brake cleaner through the cross pipes to make sure they're clear. Same with bleeders, note where holes are in regards to your safety.

    Alcohol is good for a final wipe down before paint.


    Then, I plug the bleeder and supply holes with extra bleeders or cheap (sacrificial) bleeders. I plug bolt holes and pin holes with earplugs (foam, squeeze then down to fit) that I cut in half. Small half into pin holes, larger ones tapered down into bolt holes. I put duct tape on the mount surfaces, the pins and to cover seals/pistons. The pins are metal, and the metal pad plates ride on them, so I believe it's best not to gunk it up with paint.


    This is why I don't paint pins:


    Painting

    It's not a bad idea to send the calipers out to a powdercoater, but this is a DIY so here we go.

    There are some different paints out there, but I use VHT brand. Not always their caliper paint however, as I've found their engine enamel to offer a lot more colors. Now, it's 550 degree vs. 900 degree caliper paint, but if you're covering with 900 VHT clear, then my guess is it's ok.

    Here's an example of how colors can vary, even between brands owned by the same company! Also from batch to batch which has screwed me lol.


    V = VHT 900f D= Dupli-color 500f caliper paints

    So it might take some testing to get it right. VHT paint (caliper and enamel) can be bought locally at auto parts stores usually. vatozone and o'rlys here in Socal. Check out VHT's website for full palette. Unfortunately, VHT caliper clear is not sold in stores and is more expensive than the colors, on Amazon and other sites, for whatever reason 🙄

    I would say you'll need 2 cans of color and 2 (1 might even do it if you go lightly) of clear for a set of 4 calipers. Follow instructions on the can, they are very accurate. *Note - baking (especially longer or higher temp than instructed) will cause the color and clear coat to darken a hair. Even the VHT 900 clear coat, without baking, will darken the color coat a bit. It's not perfectly clear. Their engine enamel 550 degree clear coat is way more clear if you're ok with only 550 degree (I'm testing it now). It's very frustrating to get the color just right only for it to come out darker after baking. I would advise to find a base color that is brighter/lighter than you actually want, then use the 900 degree clear and bake them and they'll darken a bit. Not a big deal on black or silver, but for colors, it's noticeable.

    Time for paint! Make sure there's good weather, not too cold, humidity below 60% iirc, little wind. If you have an inside booth, even better! Personally, I turn the caliper upside down and do the bottom first, then flip it over onto a wood block. There's an infinite number of ways to do this. This is my way. I do 2 light coats, then a heavier last coat for the bottom, then again for the top. Follow the can's instructions, they're perfect.


    Once dry to the touch, move the caliper to a safe place to sit for 7 days before adding the decal and clear coat. I've tried to speed this portion up, even baking them lightly to hasten the curing, but each time, the results have been sub-par, with the paint doing weird things. You must wait a week (6 day works too, but don't push it!) in between coats.

    Now add your decal. I use a strip of masking tape to make a straight line across the pins. If you're good enough, you can eyeball it. I place it, visually, in the middle of a level front view, of the caliper (which is slightly higher than the middle of the lower flat face that the decal goes on).Take your time, promote good adhesion by applying pressure to decal before removing clear film. Remove film by wiggling it up and down as you pull it across and off so as not to pull decal with it.


    Time for clear. Similar to color coat, but I actually only do 2 coats as the heavier you go, the less translucent the clear becomes and it can possibly ruin the final product (too dark). One or 2 very light coats, almost a dusting. Then the last coat should be medium-heavy to get that smooth finish.


    Time to bake! An hour at 200-250 is what I do. I say that because my oven starts at 250, but there is a warm up range setting right before it, so I set the temp right before 250 (see pic below). If you go higher than that, the color will start to darken too much. Don't think the temp you bake at correlates to the temperature rating of the paint. You only need 200-250 degrees to create the necessary chemical reaction for the paint to cure.


    Look at that gloss! You MUST bake in order to get that gloss and hardness to repel brake dust and pebbles.


    Technically, you're done at this point and paint is cured, but I let the calipers at least cool overnight before removing tape, plugs, bleeders and inserting new/clean bleeders and caps.

    I have a clean MF towel that they sit on while I do that work, to protect the finish. Even though the paint is caliper paint and you've baked it, it's still not going to be as good or durable as OEM paint like Brembo/Porsche, so be gentle with them, especially during install. It's very easy to knick them with tools or whatever.

    Color Examples. Keep in mind, some photos are taken by an old S7 cellphone, and some by Nikon D90. Not to mention various screens y'all using.

    VHT light ford blue (engine enamel, not caliper paint)


    Same Ford light blue, but cleared with VHT 900, so they're not as bright as uncleared base coat. The lighting and camera make it seem darker too though.


    Here's a front, but with brighter lighting (VHT engine light blue w/ vht caliper clear)


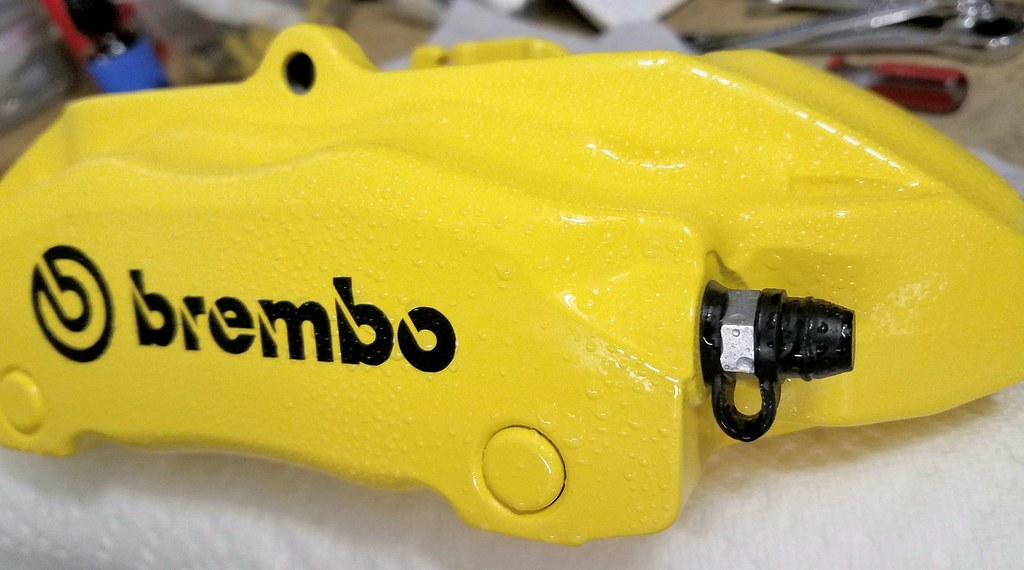
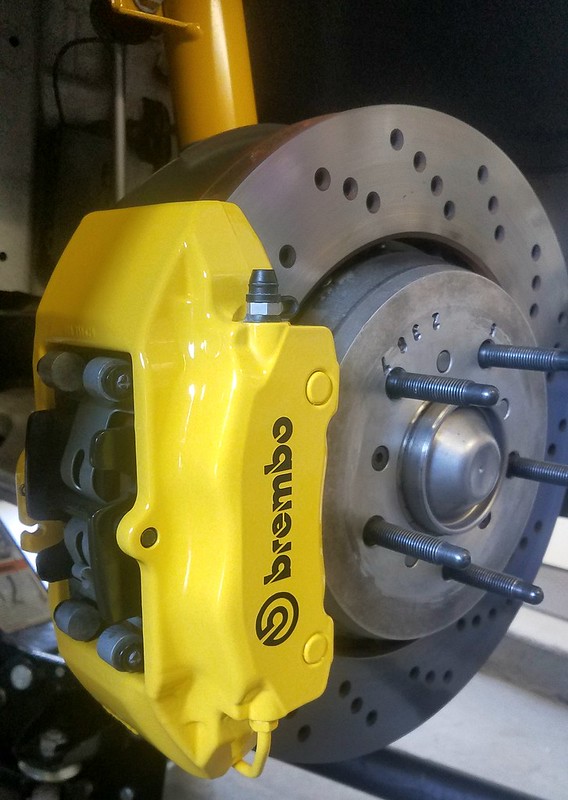
    VHT Yellow 900 with VHT 900 clear

    (indoor lighting)

    (outdoor lighting)
    ​​​​​​​
    VHT 900 Yellow, cleared with VHT engine 550 (testing if 550 degree is good enough)


    VHT Red 900 w/ VHT 900 clear

    ​​​​​​​​​​​​​​​​​​​​​​​​​​​​​​​​​​​​​​​​​​​​​​​​​​​​​​​​​​​​​
    Last edited by Tbonem3; 06-10-2020, 09:27 AM.
    DD: /// 2011.5 Jerez/bamboo E90 M3 · DCT · Slicktop · Instagram
    /// 2004 Silvergrey M3 · Coupe · 6spd · Slicktop · zero options
    More info: https://nam3forum.com/forums/forum/m...os-supersprint

    #2
    Bracket Battle!
    CreationsMotorsports (ECS) vs. RallyRoad

    Only have done fronts. RR felt lighter in my hand so I wanted to see if it was real. It is! 26.24oz vs. 14.63oz, almost half!
    *Note - CM take a 6pt 14mm socket where RR take a 12 point deepwell 13mm socket!

    CM


    RR

    Last edited by Tbonem3; 04-04-2020, 08:54 PM.
    DD: /// 2011.5 Jerez/bamboo E90 M3 · DCT · Slicktop · Instagram
    /// 2004 Silvergrey M3 · Coupe · 6spd · Slicktop · zero options
    More info: https://nam3forum.com/forums/forum/m...os-supersprint

    Comment


      #3
      Rebuilding 996 calipers In progress

      Source new pressure seals (and dustboots maybe), either OE Brembo or OEM Centric (stoptech). I like OhioPerformanceSolutions as they make kits with great prices (he just raised prices by 20% :/ ) and special lube included. There's Zekenhausen as well as others. You can order outer dustboots as well, but I've rarely seen them need replacement (look for holes, tears, cracking). Their job is simply to keep debris out, so you can certainly reuse them if they're not in bad shape. Stoptechs are supposed to be high temp, so may be better for tracking. Ohio kit comes boots and seals, but maybe they'll sell seals alone?

      I think you can find OE brembo seals on ebay, maybe from foreign sellers. Maybe find a Brembo dealer, but be prepared to shell out the dosh.

      Part #s I'll add later, but they're posted later by someone else ITT.

      Here's OhioPerformanceSolutions:


      https://www.ebay.com/usr/ohioperform...53.m1438.l2754


      Depending on how you want to go at it, it can be nice to have some containers (pay no mind to #s) or some sort of safe place to keep the pistons, and a towel to work on, various picks and flat blades to get boots and seals off/out. Caliper rebuild lube is not brake fluid and is a better rebuilding fluid to use. OPS supplies a bountiful dropper, it's size notwithstanding. You can rebuild piston by piston, or you can remove all pistons at once and begin replacing seals.


      See the Testing section above to get the pistons as extruded as possible. If you wish to use air pressure to pop the pistons out, take precaution as it can be dangerous. Have some towel wadded up in there. You can pry the dust boots off for this part, see below. Without blocking their exit, it's likely that one piston will pop out before the others, at which point pressure is lost and the others won't move. You can cover the bore with thick rubber or wood or something solid, with a c-clamp and continue popping them out, one by one if you have to, repeating the c-clamp trick.


      Remove the boots. Wedge a small flat head or an ice/dental pick and pry up. The OE Brembo seals are surprising durable (unlike the Stoptechs)


      If you don't have the supplies to pop the pistons out with air pressure, you can try another method. This method does require sure-handedness. You going to be calling upon your trusty friend, Archimedes. Find a fulcrum that is a good height and get a thick/strong flat head and carefully, surely pop the piston up. I like to help it by pulling with my fingers on the opposite side (it helps a hair, mostly pressure in opposite direction, not so much the pulling up). Take care with tools around the surface of the piston, the part that rides on the inner seal. It's hardened, but can still be ruined.


      Twist the piston back and forth to wiggle it free at the end. Wipe it off and put it somewhere safe.


      I like to run my finger in there to feel for any sand or debris, before pulling the seal out. Then get the pointy end of a angled pick under the seal and scoop behind it and pull out. Take care not to scratch the bore's wall with the pick! They make wood and plastic picks, but they break kinda easily. If you take care, you'll be fine with a metal pick.


      Here's the Brembo dust boot and seal on the left, the Stoptech seal and dust boot on the right. Notice that Brembo seals have blue and white markings (visible in pic). This makes it easy to discern what brand a seal is, should you misplace it or forget!


      Using the supplied lube, squeeze a few drops onto your new seal and smear it around, especially the inside where the piston will ride.


      Insert the new, lubed seal into its home. Start with one sport first, then help it in the rest of the way. Getting the last bit in can take some work. Just be smooth and gentle. Once you believe the seal is all the way in, run your finger, with lube, around and around it making sure that it has seated perfectly well and flat.


      Now the piston is ready to be inserted. You can pop the new dust boot on now or later, doesn't matter too much. Doing it now is more difficult as the piston isn't being held by anything, but you can pull the boot down easily to make sure it's fully seated. Doing it once the piston is in the caliper is easier in one way as the piston is being held firm, freeing your hands, but then you won't be able to pull the dust boot down all the way to fully seat it (if you've already inserted the piston past the pressure seal). When we extend the pistons again at the end, the dust boot should seat itself well at that point. So, either way has a pro and con.


      Lube her up, smear it around. Focusing on the bottom half of the piston (the part that will make contact with seal)


      Inserting it is similar to removing it earlier (same pic). Spin it back and forth to make sure it's smooth and not catching at all. With very even pressure (usually both hands or a palm of one), push it evenly past the seal. Don't force it. Don't use a c-clamp - it should go in with hand pressure. If it will just not go down, take it out and re do it all, re lubing again as well. If it STILL won't go in - see my note at the end of this for a little trick. Worst case, you'll need to ask your vendor to send you another seal. I don't envisage this happening with Brembo seals; it has happened to me with Stoptech's - they're not all cut perfectly.


      Either this is what you're looking at, or pop your dust boot on now to get to this point. Be careful with stop tech dust boots. They're quite thin and fragile, unfortunately.


      Don't attempt to seat the dust boot into the caliper with the piston up too high. Push the piston down most of way. I've found it's also difficult to seat a dust boot with the piston completely collapsed. in the pic below, it's most, but not all the way down.
      Ok, push down on the edge of the dust boot, going around in a circle. use your hands. Do not use a block of wood or tools, even non-metal tools as they'll likely tear the dust boot - trust me when I say that they're fragile! Your fingers and palm will be sufficient.


      Fully seated. Notice that a fully seated dust boot might not look fully seated due to the cast of the aluminum. Some parts are higher and lower than others, so it can look odd. When you're done with all 4, test their function!


      *Note -Centric (stoptech) inner seals are not cut perfectly, they vary a tad in size sometimes. You may run into a situation where a piston will just no go past the seal, even though everything is well seated and lubed. Here's a trick. If you can remember, was another, same sized, seal a little too easy to get the piston past? If so, swap it with this one. I had this happen recently. one was a bit loose; one was a bit tight. I swapped them and presto! both felt great. if this is the first seal of it's size to give you trouble, pull it out and try others in that size. Try to remember if one feels loose so that you can swap it later with your too tight one. Worst case, contact the vendor who, if like OhioPerformanceSolutions, will be kind and send you one free of charge.


      Damper stuck in piston?

      I've come across some calipers that look like they've been at the bottom of the ocean for a while. Unfortunately, sometimes, the previous owner elected to use pad dampers. They insert into the piston. Rears do as well, but it's different and shouldn't be an issue, but the fronts can get stuck. If you have access to a machine shop...


      Insert piston into a "soft" collet. Drill a hole for whatever tap you want to use. Spray some penetrant into where the damper and piston meet.


      Tap the hole for whatever bolt you want to use to push the damper out


      Insert your bolt. You can try a slide hammer to knock the damper out


      If that doesn't work, simply turn the bolt (right, tight) to "push" the damper out. With penetrant in there, and the strength of your homemade "press," it should come out.

      Last edited by Tbonem3; 04-15-2020, 12:35 PM.
      DD: /// 2011.5 Jerez/bamboo E90 M3 · DCT · Slicktop · Instagram
      /// 2004 Silvergrey M3 · Coupe · 6spd · Slicktop · zero options
      More info: https://nam3forum.com/forums/forum/m...os-supersprint

      Comment


        #4
        For the rears I found that you can buy a set of Stoptechs 12834054L 12834054R. Since they are straight vanes you put them on opposite sides so they can match the pattern with the front CSL rotors. I bought them a while back from rockauto for about $75/each. Yes, they are not floating rotors. I’m pretty sure there’s other brands like ECS V4? they might be the same.

        (Read #4)
        Click image for larger version  Name:	79C1F48B-B2DD-46DA-8E83-22F9AE57D705.jpeg Views:	6 Size:	143.2 KB ID:	3184
        Last edited by COVID-19; 03-27-2020, 01:14 PM.
        06 ZCP SMG | HTE CSL MAP QuaranTune | SL CSL Airbox | Eventuri Scoop | DMG Strut Bar | RE El Diablo | CPI Euro200R | AP Headers | Porsche BBK | ST XTA | TMS 3-Pulleys/F-Sway/Mono FCAB | AKG Trans/diff/Subframe/RTAB | SPL RCA | SGT SCZA Trunk | ACL | Beisan | Redish | AFD E85 |

        Budget CSL MAP Conversion

        Comment


          #5
          Yes I think you're right. Good find for a lower cost option!
          DD: /// 2011.5 Jerez/bamboo E90 M3 · DCT · Slicktop · Instagram
          /// 2004 Silvergrey M3 · Coupe · 6spd · Slicktop · zero options
          More info: https://nam3forum.com/forums/forum/m...os-supersprint

          Comment


            #6
            Im 3/4 way done with my install. Im documenting the steps. I'll also have tips on what to do and how to avoid the pitfalls I have encountered. It will rain the next two days so I'll probably get my install finished on Monday. Hope to have a DIY writeup by end of next week.
            Attached Files
            Last edited by xpme46m3; 03-27-2020, 06:36 PM.

            Comment


              #7
              Thank you for re-creating this.
              2004 Jet Black/Cinnamon 6spd ///M3
              Build///Journal
              IG: Khan_Art_

              Comment


                #8
                Can stock size front rotors not be used with the 996 calipers?

                Comment


                  #9
                  Originally posted by Daniel View Post
                  Can stock size front rotors not be used with the 996 calipers?
                  No you cannot. You will have to get the CSL/ZCP rotors - 345mm vs 325mm. If you want to keep the stock rotors from the front, You will want to source E31 Calipers.

                  Comment


                    #10
                    On e36 m3. On e46, RR doesn't, but CM (ecs) has a 325mm option bracket. I don't see how you can only take off another 6.5mm and expect to drop down to 325mm from 345 OD. Unless, maybe, the bracket is machined differently somehow the extra 3.5mm needed as far as I can tell. BUT, look at the pics of the brackets on ECS, I can't see any difference between them. And no explanation anywhere that I've seen. Plus I seem to remember threads of ppl with problems doing it. But who knows, give it a shot.


                    Originally posted by KhanArt View Post
                    Thank you for re-creating this.
                    You're welcome!
                    Last edited by Tbonem3; 03-30-2020, 09:15 PM.
                    DD: /// 2011.5 Jerez/bamboo E90 M3 · DCT · Slicktop · Instagram
                    /// 2004 Silvergrey M3 · Coupe · 6spd · Slicktop · zero options
                    More info: https://nam3forum.com/forums/forum/m...os-supersprint

                    Comment


                      #11
                      I stand corrected 😁

                      Comment


                        #12
                        Originally posted by Tbonem3 View Post
                        Brackets - From Rallyroad.net or ECS (CreationsMotorsports brand). RR are more expensive, but nicer and lighter. Make sure you're getting E46 M3 not E36 or non-m brackets. Must be for 345mm rotor (front). RR rear brackets also allow for taller pads (D737 from 986/987) fronts to sweep entire rotor face where ECS' only allow taller pad on outside, which is fine visually, but inside will need shorter, stock 996 D738, pad.
                        So I bought CM brand brackets from ECS for the rear, thinking they were exactly the same as the RR brackets. However, I followed the RR instructions and ordered a set of "2000 Boxster 2.7 liter FRONT brake pads" - are you saying these are the wrong pads for the CM brackets? I figured they were identical since they used the same 328x20mm rotor.
                        E46 324i k24/dct/turbo Build Thread
                        Phoenix Yellow e46m3 Build Thread
                        Melbourne Red e93m3

                        Comment


                          #13
                          RR bracket is machined differently, so as to allow the taller d737 to fit and not make contact. CM is not. BUT, you can run the taller pad on the outside where there's no bracket. The difference is 5mm.
                          DD: /// 2011.5 Jerez/bamboo E90 M3 · DCT · Slicktop · Instagram
                          /// 2004 Silvergrey M3 · Coupe · 6spd · Slicktop · zero options
                          More info: https://nam3forum.com/forums/forum/m...os-supersprint

                          Comment


                            #14
                            Originally posted by Tbonem3 View Post
                            RR bracket is machined differently, so as to allow the taller d737 to fit and not make contact. CM is not. BUT, you can run the taller pad on the outside where there's no bracket. The difference is 5mm.
                            well poop. I guess I'll have to buy another set of pads.
                            E46 324i k24/dct/turbo Build Thread
                            Phoenix Yellow e46m3 Build Thread
                            Melbourne Red e93m3

                            Comment


                              #15
                              Originally posted by xpme46m3 View Post
                              Im 3/4 way done with my install. Im documenting the steps. I'll also have tips on what to do and how to avoid the pitfalls I have encountered. It will rain the next two days so I'll probably get my install finished on Monday. Hope to have a DIY writeup by end of next week.
                              Thanks!! Looking forward to your DIY. This is on my quarantine project list and hoping to tackle it very soon.
                              2005 BMW M3 ZCP Black/Black - HTE Tuning | Kassel CSL DME | 288/280 Schrick Cams+DLC Followers | Lang Head | Dinan TBs | Bosch 550cc | Radium Fuel System | Karbonious CSL Airbox+OE Snorkel | SS V1 Stepped+Catted Sec 1+Resonated Twin Pipe+Race | 3.91, 3 stage clutch | FCM 400/600 | Vorshlag Camber Plates, RSM | Rogue ASP | AKG FCABs, SFBs | TMS Front Sway, Camber Arms, Monoball RTABs, Pullies | Mason Race Strut + X-Brace | AS 30% SSK | SPAL | Redish Plates | Turbo Toys V2 Hub | WPC Rod Bearings

                              Comment

                              Working...
                              X