One of the things that's been on my list for quite some time now is sorting out the topside reinforcement of the RACP. My car had the rear mounts reinforced with the BMW epoxy foam process in 2011 before I owned it, and the underside reinforced with epoxied plates in 2017. Since then I've put very few km on the car but deciding on the right approach for topside reinforcement has been on my mind since then. Part of the reason it's taken me so long to sort is because of all my family/kids dramas, but the other reason is that I've really been struggling to decide on the best solution in my circumstances.
I'll probably get some flak for this but I'm not really keen on weld-in solutions in general. In most welding situations I don't see how it's possible to control corrosion prevention well enough given the application, and then add in welding to thin sheet metal that has been through 20 years of stress cycles and it just doesn't appeal to me. Another reason is that welding around the rear mounts, in my case, is complicated by the presence of the foam epoxy reinforcement. Lastly is the permanence of the change - I've seen several comments from people who bought the early version of the CMP bar, etc. who say they wished that they could use the newer, less visible, option. Likewise there's no certainty there won't be better options available in another 5 years.
In the work that I do on the car I want to keep it as close as possible to original, so that if I realise at some point in the future that I have bad taste in modifications I can restore to stock. That goes, as far as possible, for things like RACP reinforcement as well.
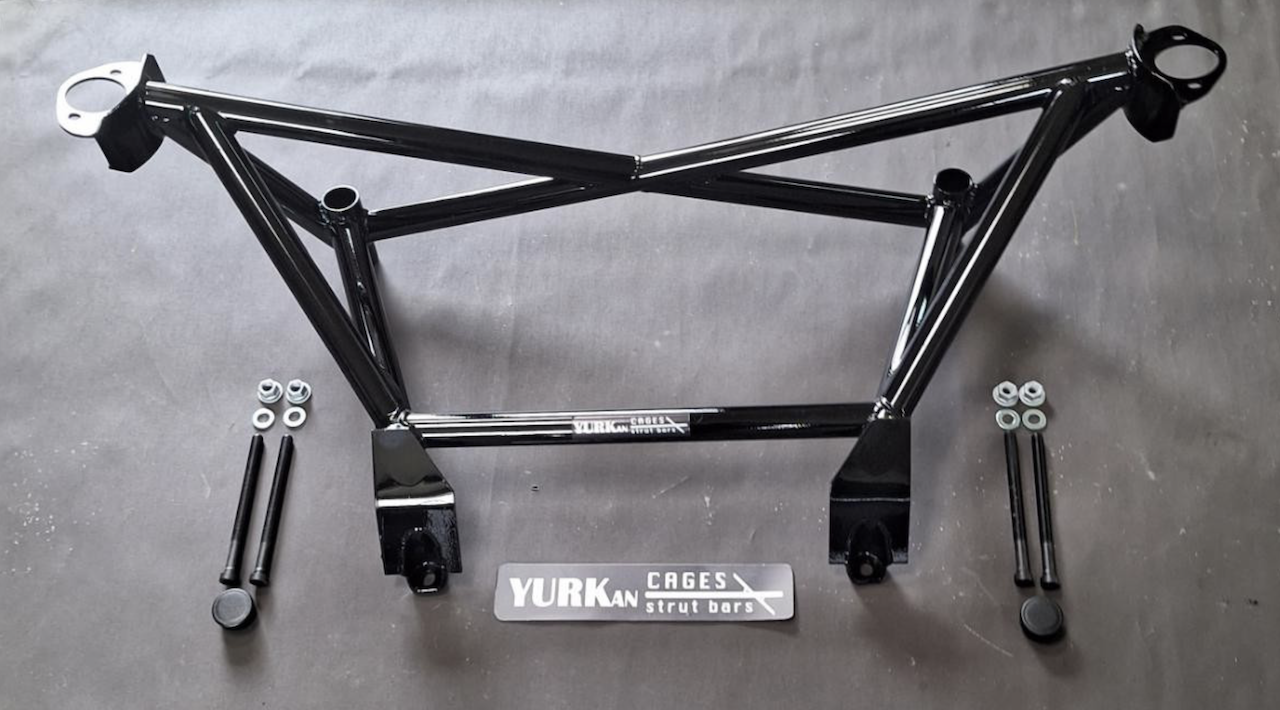
To this end I've ordered a variant version of the Yurkan Cages YC46W6. This is a welded single piece brace that ties both the front and rear RACP mounts to the rear shock mounts.

This design allows for the rear seats and fold-down functionality to be maintained without interference. I don't need the fold-down feature anyway, but I certainly want to keep the rear seat unaffected (although again it's only to look nice, I only ever have a single passenger in the car, so I essentially use it as a two seater anyway.
The variant I've ordered includes an additional bar directly between the two rear shock mounts. Probably overkill, but for the small amount of extra weight I'd prefer to have a direct link between the two to help stiffen things up as much as possible.
With this solution all I need to do is cut the top cosmetic layer of sheet metal above each of the 4 RACP mounts and bolt all the way through from the subframe to the brace. While this does require some cutting of the body, it is about as minimal as I'm going to be able to achieve while still providing for topside reinforcement. Yurkan do make a version of this brace with separate brackets for the rear shock mounts that the brace then bolts to, but given I need to cut the interior carpet, etc. either way, I decided to opt for the welded one piece option for additional stiffness. My plan with the carpets, etc. is to pick up a spare set from a wrecker to cut up and I'll put my current set unmolested on the shelf.
Once this is installed I'll be able to finally stop thinking about the RACP, and should also have the added bonus of a bit of extra stiffness in the rear.
I placed the order today and expected manufacturing time is about 20 days, so with shipping, getting lost at the East Tamaki depot, etc. I expect I'll receive this around the middle of the year.
I also ordered a replacement steering giubo recently - looking forward to getting that installed and hopefully getting rid of the slight play in the steering.
I'll probably get some flak for this but I'm not really keen on weld-in solutions in general. In most welding situations I don't see how it's possible to control corrosion prevention well enough given the application, and then add in welding to thin sheet metal that has been through 20 years of stress cycles and it just doesn't appeal to me. Another reason is that welding around the rear mounts, in my case, is complicated by the presence of the foam epoxy reinforcement. Lastly is the permanence of the change - I've seen several comments from people who bought the early version of the CMP bar, etc. who say they wished that they could use the newer, less visible, option. Likewise there's no certainty there won't be better options available in another 5 years.
In the work that I do on the car I want to keep it as close as possible to original, so that if I realise at some point in the future that I have bad taste in modifications I can restore to stock. That goes, as far as possible, for things like RACP reinforcement as well.
To this end I've ordered a variant version of the Yurkan Cages YC46W6. This is a welded single piece brace that ties both the front and rear RACP mounts to the rear shock mounts.
This design allows for the rear seats and fold-down functionality to be maintained without interference. I don't need the fold-down feature anyway, but I certainly want to keep the rear seat unaffected (although again it's only to look nice, I only ever have a single passenger in the car, so I essentially use it as a two seater anyway.
The variant I've ordered includes an additional bar directly between the two rear shock mounts. Probably overkill, but for the small amount of extra weight I'd prefer to have a direct link between the two to help stiffen things up as much as possible.
With this solution all I need to do is cut the top cosmetic layer of sheet metal above each of the 4 RACP mounts and bolt all the way through from the subframe to the brace. While this does require some cutting of the body, it is about as minimal as I'm going to be able to achieve while still providing for topside reinforcement. Yurkan do make a version of this brace with separate brackets for the rear shock mounts that the brace then bolts to, but given I need to cut the interior carpet, etc. either way, I decided to opt for the welded one piece option for additional stiffness. My plan with the carpets, etc. is to pick up a spare set from a wrecker to cut up and I'll put my current set unmolested on the shelf.
Once this is installed I'll be able to finally stop thinking about the RACP, and should also have the added bonus of a bit of extra stiffness in the rear.
I placed the order today and expected manufacturing time is about 20 days, so with shipping, getting lost at the East Tamaki depot, etc. I expect I'll receive this around the middle of the year.
I also ordered a replacement steering giubo recently - looking forward to getting that installed and hopefully getting rid of the slight play in the steering.
Comment