Phenomenal work truly!
Announcement
Collapse
No announcement yet.
Karter16's Silbergrau E46 M3 Journal
Collapse
X
-
Over the break I've been pretty busy working on the house and having fun times with the family. Since finishing the rear view mirror I've done a few bits and pieces on the car.
I've pulled the 6CD changer and bluetooth module out of the boot. I have no need for them right now, and indeed I have to pull the CD changer apart and figure out what's wrong with it. I've therefore packaged them up and shelved them, along with the two big brackets. Might as well save on the weight while the car is not completely stock.
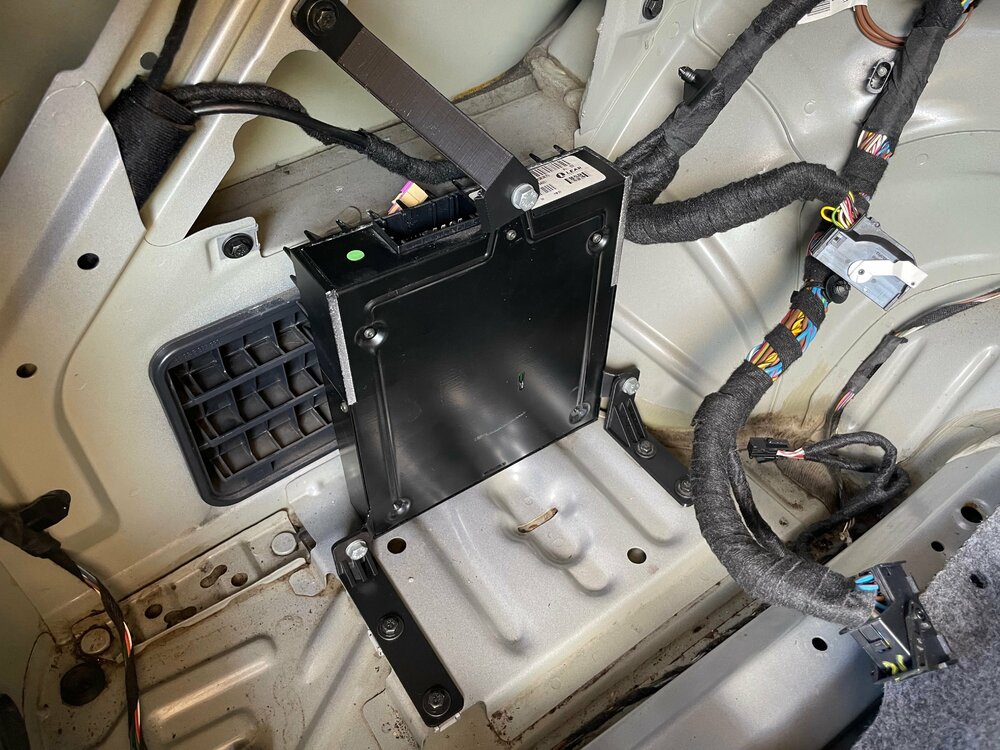
Relatedly I've also been doing some CAD work to mock up some brackets for the OE amplifier. I could buy the BMW part, but it weighs half a kilo and would cost me $75, whereas if I 3D print some brackets they'll weigh next to nothing and will be free.
I've done a first mockup to check fitment etc. and even at 3mm thickness it's held in surprisingly well. I'll make a number of design revisions and add a bunch of reinforcement and hopefully get a final design.
I also took the passenger seat out of the car today to do a bit of work on the back seat. I've removed the ISOFIX fittings as they have surface corrosion and need cleaning up and repainting. While the seat was out I also took the opportunity to examine the tilting bracket.
The CSL seats seem to have a tendency over time to develop a bit of a clunk, which doesn't really come up in normal driving but if you move fairly violently in the seat, or are driving very spiritedly then it can occur. From my investigations this seems to be caused by two things.
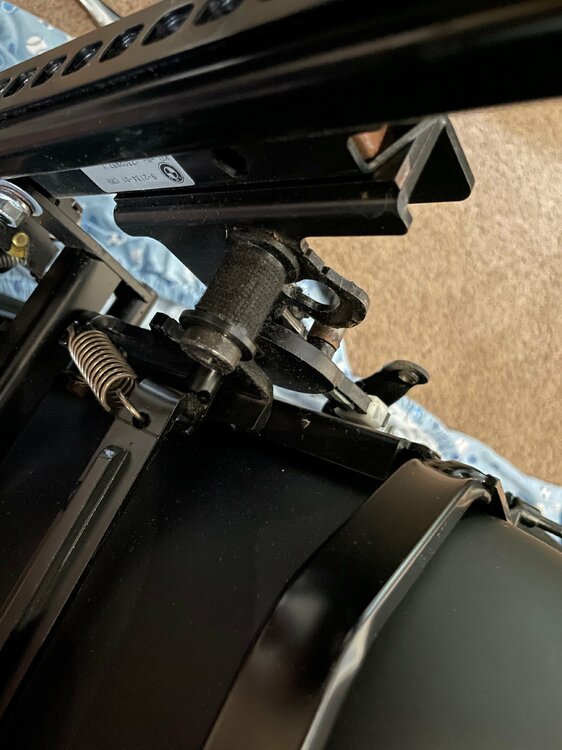
Primarily it is caused by the catch on the tilting mechanism, this seems to wear a little over time and then allow some movement which causes the clunk. I don't know if there's already a community DIY fix for this as I wasn't able to find anything on CSLRegistry or the like about it, other than an acknowledgement that it happens. Anyway, I was able to come up with my own fix, a short length of fleece tape wrapped around the fixture like this:
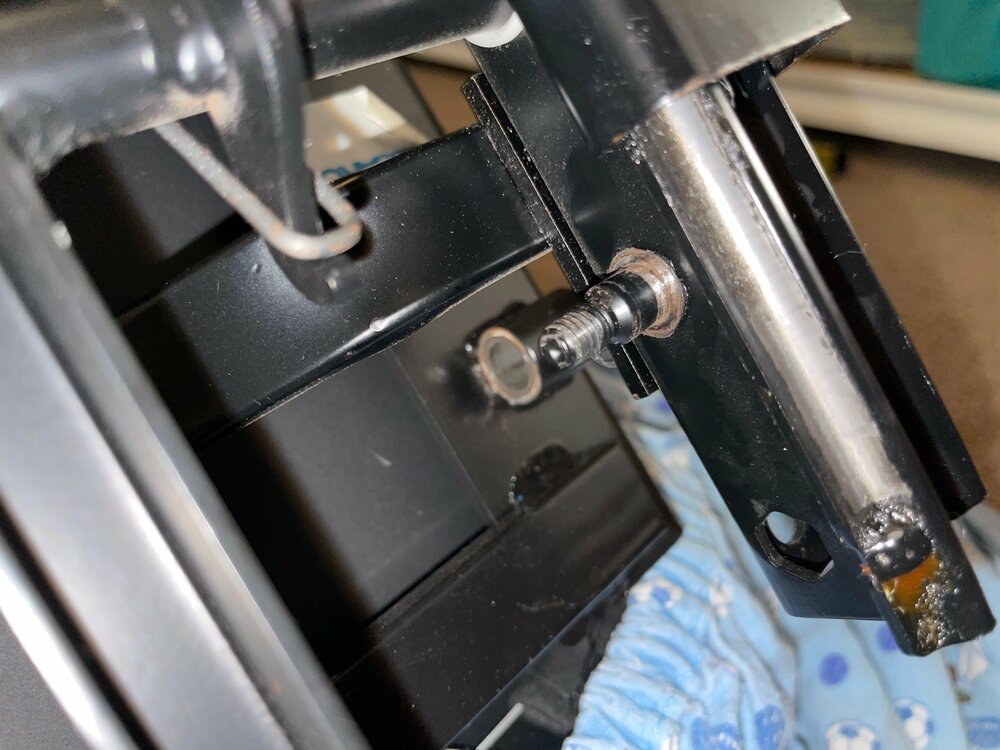
The second, more minor, contributor to this is the front pegs that the arms which attach to the tilting mechanism rotate on. The pegs are surprisingly small, and again seem to wear over time. This allows for a small amount of movement. In practice I don't think that this really contributes much to noise or felt movement, but thought I'd have a go at addressing it anyway.
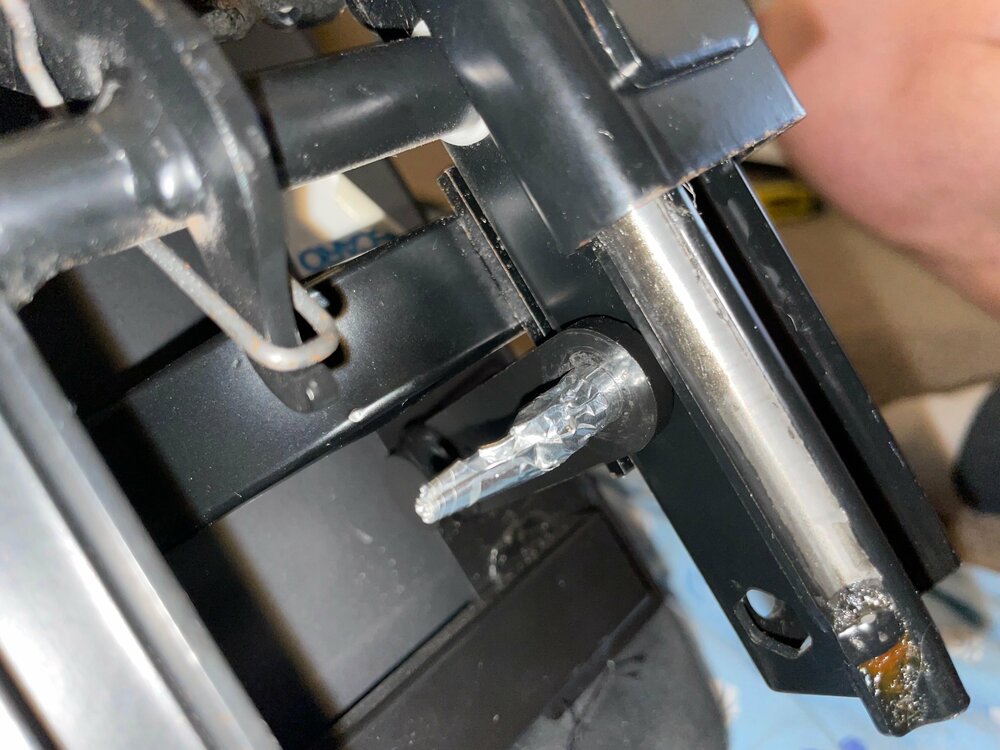
It's only a very small amount that it needs to be cylindrically shimmed. To address this I used a small amount of tin foil wrapped around the peg. This compresses when you fit the arm and takes up the gap. Being aluminium I expect over time it will wear as the tilting mechanism is used (which will probably only be once a year when the WOF man checks the rear seat belts). Hopefully though the aluminium wears away and the steel doesn't further.
It seems like a fairly ghetto fix, but once it was all back together I gave it a good wiggle and it seemed solid. I did a few back and forths on the tipping mechanism and it still seemed good. I then put the seat back in the car and sat in it and jerked about and the clunking is gone! Mission accomplished!
I'll do the same to the drivers seat when I take it out to do the wiring for the side mirror controls which should be imminent. Just waiting on delivery from Schmiedmann of replacement clips etc. for the drivers door, which I'll do at the same time to address the clunk in the door. Hopefully by the weekend I'll get the brackets for the amp sorted and the G7AT rear seat into the car, plus the wiring done for the mirror controls.
Last edited by karter16; 04-24-2024, 11:50 PM.2005 ///M3 SMG Coupe Silbergrau Metallic/CSL bucket seats/CSL airbox/CSL console/6 point RACP brace/Apex ARC-8s
Build Thread: https://nam3forum.com/forums/forum/m...e46-m3-journal
- Likes 2
Comment
-
Thanks for posting this! I have this issue with the driver side CSL seat and will be trying this fix for sure. Cheers.Originally posted by karter16 View PostOver the break I've been pretty busy working on the house and having fun times with the family. Since finishing the rear view mirror I've done a few bits and pieces on the car.
I've pulled the 6CD changer and bluetooth module out of the boot. I have no need for them right now, and indeed I have to pull the CD changer apart and figure out what's wrong with it. I've therefore packaged them up and shelved them, along with the two big brackets. Might as well save on the weight while the car is not completely stock.
Relatedly I've also been doing some CAD work to mock up some brackets for the OE amplifier. I could buy the BMW part, but it weighs half a kilo and would cost me $75, whereas if I 3D print some brackets they'll weigh next to nothing and will be free.
I've done a first mockup to check fitment etc. and even at 3mm thickness it's held in surprisingly well. I'll make a number of design revisions and add a bunch of reinforcement and hopefully get a final design.

I also took the passenger seat out of the car today to do a bit of work on the back seat. I've removed the ISOFIX fittings as they have surface corrosion and need cleaning up and repainting. While the seat was out I also took the opportunity to examine the tilting bracket.
The CSL seats seem to have a tendency over time to develop a bit of a clunk, which doesn't really come up in normal driving but if you move fairly violently in the seat, or are driving very spiritedly then it can occur. From my investigations this seems to be caused by two things.
Primarily it is caused by the catch on the tilting mechanism, this seems to wear a little over time and then allow some movement which causes the clunk. I don't know if there's already a community DIY fix for this as I wasn't able to find anything on CSLRegistry or the like about it, other than an acknowledgement that it happens. Anyway, I was able to come up with my own fix, a short length of fleece tape wrapped around the fixture like this:

The second, more minor, contributor to this is the front pegs that the arms which attach to the tilting mechanism rotate on. The pegs are surprisingly small, and again seem to wear over time. This allows for a small amount of movement. In practice I don't think that this really contributes much to noise or felt movement, but thought I'd have a go at addressing it anyway.

It's only a very small amount that it needs to be cylindrically shimmed. To address this I used a small amount of tin foil wrapped around the peg. This compresses when you fit the arm and takes up the gap. Being aluminium I expect over time it will wear as the tilting mechanism is used (which will probably only be once a year when the WOF man checks the rear seat belts). Hopefully though the aluminium wears away and the steel doesn't further.

It seems like a fairly ghetto fix, but once it was all back together I gave it a good wiggle and it seemed solid. I did a few back and forths on the tipping mechanism and it still seemed good. I then put the seat back in the car and sat in it and jerked about and the clunking is gone! Mission accomplished!
I'll do the same to the drivers seat when I take it out to do the wiring for the side mirror controls which should be imminent. Just waiting on delivery from Schmiedmann of replacement clips etc. for the drivers door, which I'll do at the same time to address the clunk in the door. Hopefully by the weekend I'll get the brackets for the amp sorted and the G7AT rear seat into the car, plus the wiring done for the mirror controls.
- Likes 1
Comment
-
I spent some time this afternoon getting some bits and pieces done.
First up I installed the extension wiring loom for the side mirror control relocation from the driver's door to the CSL centre console. For the wiring loom I sourced, nearly, matching wire colours. I wasn't able to get blue with a green stripe, so went for plain light blue instead.
I bundled up the 4 wires into a loom, wrapping them with fleece tape as I went.
I then attached the connector I found that's a match for the OE one to the end that connects to the mirror control switch.
I then started at the console end, working the loom down the centre tunnel to the pedal box (cable tying as I went to stop it rattling). @Avedis's DIY guide is excellent and I referred to it frequently as I went.
And then across and out through the door pillar conduit.
Getting it through the rubber conduit was fairly easy, you just need something like a coat hanger to help guide it through. From there I routed it through the door (again cable tying as I went). I then cut it to length and attached the pins for the female socket. The MQS connectors, like many, are supposed to have the pins crimped with a special tool (like many various connector types). When you've done it before as I have it's fairly straightforward to tack the wires to the pins with a little solder and then crimp the pins with some pliers, like so (note, not all are finished in this photo):
And voila! the extension loom is complete:
I then hooked it up and wrapped it up with some more fleece tape to make sure it's held fast and won't knock about:
Connect up the switch and pop it in and we're all done!
While I had the driver's door apart I also took the opportunity to replace the missing bowden cable clip (as per here: https://nam3forum.com/forums/forum/m...le-clip-broken), as well as tighten up the regulator bolts and adjust the latch in an effort to make my door sound more like my passenger side door and less like a glazing truck that has been in an accident. It's a lot better, but still not as nice as the passenger side. I think further improvement will need to wait for total disassembly and replacement of the regulator and latch mechanism.
When I put the door panel back on I replaced the clips with the improved version that have foam dampening rings on them:
I also popped in the new window switch to replace the one that had surface damage from when the mirror leaked prior to my ownership.
If I get some more time over the weekend I'll get to work on the rear seat.
Oh, and just cause no project is complete without an issue, when I was tightening up the negative terminal on the battery the tensioner bolt thing snapped off (guess I've been using it too much due to so many projects), so now I need to get a new one of these 😑
Last edited by karter16; 04-24-2024, 10:58 PM.2005 ///M3 SMG Coupe Silbergrau Metallic/CSL bucket seats/CSL airbox/CSL console/6 point RACP brace/Apex ARC-8s
Build Thread: https://nam3forum.com/forums/forum/m...e46-m3-journal
Comment
-
Nice work!
Those battery T bolts love to snap off. There's some aftermarket replacements though, like this one: https://www.bimmerworld.com/Safety-R...le-T-Bolt.html
Can probably also find them on amazon, eBay etc. I've got a bunch of them in the garage for the next time I break one off.2002 Topasblau M3 - Coupe - 6MT - Karbonius CSL Airbox - MSS54HP Conversion - SSV1 - HJS - Mullet Tune - MK60 Swap - ZCP Rack - Nogaros - AutoSolutions - 996 Brembos - Slon - CMP - VinceBar - Koni - Eibach - BlueBus - Journal
2012 Alpinweiss 128i - Coupe - 6AT - Slicktop - Manual Seats - Daily - Journal
Comment
-
So yesterday I dropped round to an NZ forum member's house to pick up the CD stacker he kindly offered me. Another member was there as well, so was great to meet them both and talk BMWs and see their amazing cars 😍
And today is the final day of my summer holiday before I head back to work. This morning before it got too hot I finally got around to doing the work on the rear seat. First up I removed the black leather seats and bolsters, and then I was able to install the rear seat sound mat that arrived a couple of months ago. It fits really well and was no problem to install, at less than half the weight of the rubber/butyl one and not likely to disintegrate like the original I'm very happy with this:
You can see there are a couple of cut outs that aren't needed on the M3, presumably they are for the E46 compact or similar, but aside from that it all fits in very nicely.
I was then able to install the G7AT interior (which I've been cleaning and drying over the last week) from NZ_M3 and now finally have an (almost) matching interior.
I took the covers off the headrests and put them through the washing machine (gentle cycle, no spin) and wet vac'd the bolsters, seat bench and backs.
The bolsters needed new clips at the tops, as they seem to ALL break. I ordered new ones in one of my orders last year, so had these on the shelf ready to go. Originals were black, these new ones are white, maybe they're also stronger 🤣
Then it was just a case of putting everything in, and soon it was all done! (apologies for the terrible photos and dusty car, am rebuilding a retaining wall at the moment and the clay dust gets into everything).
I also got to take the car for a drive today. With the work I've done on the drivers door, and the cloth rear upholstery, a good 90% of the rattles and such that were present in the car seem to be gone! I thought there were going to be a bunch still to hunt down, but appears I have one in the dash by the drivers door, and aside from that any other noises were pretty infrequent!
Now I just need to give the car a good wash!
Last edited by karter16; 04-24-2024, 10:54 PM.2005 ///M3 SMG Coupe Silbergrau Metallic/CSL bucket seats/CSL airbox/CSL console/6 point RACP brace/Apex ARC-8s
Build Thread: https://nam3forum.com/forums/forum/m...e46-m3-journal
- Likes 4
Comment
-
They're from the standard 3 series coupe - M Sport interior - 9002 Alcantara (which is very close in colour to the Amaretta on the CSL seats) and the same Laser cloth. G7AT is the upholstery code.Originally posted by 0-60motorsports View PostLooks awesome. What are the rear seats from? They look like a good alternative to the OE CSL seats.
Sent from my iPhone using Tapatalk2005 ///M3 SMG Coupe Silbergrau Metallic/CSL bucket seats/CSL airbox/CSL console/6 point RACP brace/Apex ARC-8s
Build Thread: https://nam3forum.com/forums/forum/m...e46-m3-journal
- Likes 1
Comment
-
Ah ok got it. Not going to be easy to find lolOriginally posted by karter16 View Post
They're from the standard 3 series coupe - M Sport interior - 9002 Alcantara (which is very close in colour to the Amaretta on the CSL seats) and the same Laser cloth.
Sent from my iPhone using Tapatalk
Comment
-
Still easier than finding CSL parts though hahaOriginally posted by 0-60motorsports View Post
Ah ok got it. Not going to be easy to find lol
Sent from my iPhone using Tapatalk2005 ///M3 SMG Coupe Silbergrau Metallic/CSL bucket seats/CSL airbox/CSL console/6 point RACP brace/Apex ARC-8s
Build Thread: https://nam3forum.com/forums/forum/m...e46-m3-journal
- Likes 1
Comment
-
One of the other things I did recently was to take advantage of the EQ built in to the headunit. I'm not an audiophile by any means, but figured I might as well make it as decent as possible.
To do this on a budget I took advantage of a very nifty iOS app called HouseCurve, which comes with a profile that flattens out the microphone response and makes it suitable to measure a response curve.
I used HouseCurve to take several measurements and average them out:
Which gave me the default response of the system.
HouseCurve has a built in mechanism to EQ the system and generate PEQ values, however the EQ on the Xtrons is a 16 band fixed frequencies EQ, rather than full parametric, so I wasn't able to take advantage of that directly.
I could have adjusted each of the EQ bands manually to try and optimise, but I'd rather get the calculated optimum. So what I did was to export the measurements from HouseCurve and import them into REW which has a generic EQ which allows for specifying the fixed frequencies for each band. You can then optimise on just the Gain and Q values to the target curve you're seeking (I chose to use the AudioFrog curve).
This gave the following (blue = target curve, dark green = original curve, light green = optimised curve):
The graph of the filters looks like this:
I was then able to take the calculated Gain and Q values for each filter and set them in the EQ in the Xtrons:
And the difference is night and day. Sounds so, so much better, and such an easy thing to do to improve the end result!
Last edited by karter16; 04-24-2024, 10:42 PM.2005 ///M3 SMG Coupe Silbergrau Metallic/CSL bucket seats/CSL airbox/CSL console/6 point RACP brace/Apex ARC-8s
Build Thread: https://nam3forum.com/forums/forum/m...e46-m3-journal
- Likes 3
Comment
-
Have been slowed down a bit the last week or so with medical stuff, but got to try out the latest version of the amplifier brackets that I'm designing.
This latest version the pieces have been reinforced and weigh in at 21 grams each. For reference the CD stacker rack weighs in at 1.2kg and the BMW Amp only bracket weighs more than 550 grams according to realoem.
The top bracket needs a little bit more adjustment, but I think that the bottom two are finalised - they're extremely sturdy and hold the amp in the exact position the OE bracket does.
I'll make the *hopefully* final tweaks to the top bracket and get it printed. The mistake I made was not making quite enough space for the black bolt and washer that attaches the bracket to the body - I'll get that sorted and hopefully this little project will be done!
Last edited by karter16; 04-24-2024, 10:39 PM.2005 ///M3 SMG Coupe Silbergrau Metallic/CSL bucket seats/CSL airbox/CSL console/6 point RACP brace/Apex ARC-8s
Build Thread: https://nam3forum.com/forums/forum/m...e46-m3-journal
- Likes 2
Comment
-
Would you happen to have the part number for those new clips? Had a hard time trying to find them on realoem. Great build! Thank youOriginally posted by karter16 View Post
The bolsters needed new clips at the tops, as they seem to ALL break. I ordered new ones in one of my orders last year, so had these on the shelf ready to go. Originals were black, these new ones are white, maybe they're also stronger 🤣
- Likes 1
Comment
-
Hey sure - 52207157536 is the one :-)Originally posted by ugaexploder View Post
Would you happen to have the part number for those new clips? Had a hard time trying to find them on realoem. Great build! Thank you
Thanks!
Sent from my iPhone using Tapatalk2005 ///M3 SMG Coupe Silbergrau Metallic/CSL bucket seats/CSL airbox/CSL console/6 point RACP brace/Apex ARC-8s
Build Thread: https://nam3forum.com/forums/forum/m...e46-m3-journal
- Likes 1
Comment
-
As an aside, I was talking to Xtrons support about something else and asked them about this at the same time.Originally posted by Slideways View PostLooking forward to your review on the headunit. Did you consider the "automotive grade" version? - https://xtrons.com/bmw-rover-mg-andr...b-rom-pe8246bl
Their answer was basically that the PE8246BL was unique at the time that it came out in that it had “automotive grade” hardware in it. The IX series which followed has the same “automotive grade” hardware but the advertising point had dropped off by then apparently.
Sent from my iPhone using Tapatalk2005 ///M3 SMG Coupe Silbergrau Metallic/CSL bucket seats/CSL airbox/CSL console/6 point RACP brace/Apex ARC-8s
Build Thread: https://nam3forum.com/forums/forum/m...e46-m3-journal
Comment

Comment