If you ever wanna come back to ECR on a member day, shoot me a message. My e46 should be coming back from CA in June and would be a comparable setup to yours from weight, aero, and tires. I'm also around the 2:08 times, but looking to dip into 2:04's after aero and weight reduction.
-
2018 Grigio Telesto F80 M3 DCT | :: Bone Stock ::
2004 Titanium Silver E46 M3 6 Speed | :: Track Car :: -
My composite doors from MA Shaw (http://mashaw.com/) arrived yesterday. They are 10 pounds each. Should save some weight, even over gutted stock doors.Originally posted by Gt4 View Post
Feff
Comment
-
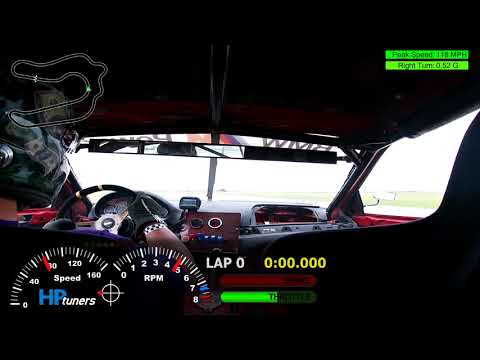
Ran MSR Houston clockwise in May. Me and this direction have never gotten along. I don't think I've ever ran a full 8 session weekend this direction. Something ALWAYS happens. So the car was smoking again on left turns. WTF!!! Ran 3 sessions and then parked it. Rained like crazy on Sun so wouldn't have been able to run much anyway.
Ran a 1:43.8 on NT01s as usual. I can see a 1:40 lap with a clean running (i.e. no break downs or issues).
Figured out the leak. Engine oil, PS, and brake fluid - all full. Pulled the slave cylinder - dry. Closer inspection reveals the passenger side of the transmission is wet. I thought it was a bad switch crush washer? It was wet on top. I'm so tired of dealing with it, I decided to pull the transmission. Found that I lost the R detent spring. Left turns would slosh the fluid out the hole for the detent pin/spring for the R gate.
This makes sense. Go back in time 3 years ago. I was swapping in my 5 speed. Had to do the detent springs, had the 5th gear lean. I had to take the R pin out a couple of times since I didn't realize I needed to orient the pin in a certain way. I'm guessing the c-clip was slightly compromised from being removed and reinstalled a couple of times and eventually worked itself free.
I hope to get to the track in on Jun 27 to do a shakedown. Tired of missing track time which puts testing and driver improvement on hold or at least slows progress.Last edited by bigjae46; 08-08-2021, 08:26 PM.Comment
-
Jun 27 went well…except I forgot to secure the PS reservoir cap. I borrowed a cap from a buddy’s X5.
The pump also started whining so time for a new pump. I think I’m going to put the OE cooling loop back in.
I’ve finished my first composite mold of an E9X M3 front reinforcement plate Not terrible and I learned a lot. Next up, E46 M3 reinforcement plate.

Sent from my iPhone using TapatalkComment
-
Making some carbon fiber floor mounts to replace my aluminum ones. Will save weight and add a little bit of headroom (should be about 1/2 thickness).
Here is one half which is made of 14 layers of 400gsm unidirectional carbon and a top layer of red 2x2 twill.
Need to make the other half (another 10 layers) and bond them together.


My second composite mold which is an E46 M3 reinforcement plate came out pretty good. It was a lot trickier than the E90 plate. More sharp edges which makes it difficult to layup. Gonna need some gel coat repairs and had some PVA issues (the dark spots). Switching to a chemical release which is much easier.
Need to repair wet sand and polish the mold. Let sit for a week and then I can make a carbon plate. Should be 3 lbs, less than 1/2 the weight and should be about 2x stiffer than the OE part (rough calculation, could be wrong).
I think this part will be the first of its kind. Not sure anyone would spend the time to make a carbon part that no one will ever see.
There is some risk.
First, I wonder how the bolts and threaded body inserts will hold up. Much of the load will be transmitted to the bolts and threads. A little worried about the bolts which thread into the aluminum FCAB housings.
Second potential issue is durability and impact resistant.
Third is galvanic corrosion. I will bond titanium washers to the bolt holes which should take care of any issues

Sent from my iPhone using TapatalkComment
-
Progress on CF floor mounts and new race seat is here...
Carbon Fiber Floor Mount Adaptors - NA M3 Forums
Next up...CF front reinforcement plate
Comment
-
Clutch issues at Eagle’s Canyon this weekend.


The SAC mechanism broke.
I have a ZF320 mated with an E46 M3 JB Racing flywheel, E34 M5 clutch and an OE E46 M3 pressure plate. The E34 disc works…just goes in only one way. Or the springs interfere with the SAC.
Going to use an E36 pressure plate with the same clutch (looks like new).


Sent from my iPhone using TapatalkComment
-
The previous splitter still flexed at the outer corners so the splitter would scrape quite often. So enter front splitter V2.1. Similar process. Wet lay, bleeder and pull vacuum on it. I used a heavier CF fabric and incorporated unidirectional tape running to the outer edges. It replaced some pieces of angle aluminum I riveted to V2.0.
Still using a foam core that I punched holes in. Still get some air entrapment on the mold side. Again, should have bought foam with channels cut into the surface so air pulls the epoxy through the mold surface. Much stiffer! To the point where I'm having a balance issue. The front axle is sharp and allows trail braking super deep down to the apex. The rear axle is now too loose. I will add a gurney flap and larger end plates to the rear wing which should help the balance.


Comment
-
After 13 full years of going to the track, first track incident back in Dec. I consider myself extremely lucky because it could have been a lot worse. An oversteery car with too much confidence ended up biting.

I couldn't collect the car and I had some traffic behind me that I just passed. Instead of potentially hitting an expensive Porsche, I decided to just give it up and go off. It is an open area, the drainage ditch is a ways down the straight. Somehow...I managed to hit the only thing in a huge field....the corner worker station. Fortunately I just brushed it. I couldn't imagine how it could have been better. Wouldn't say I was happy...I think fortunate is a better way to describe my feelings.


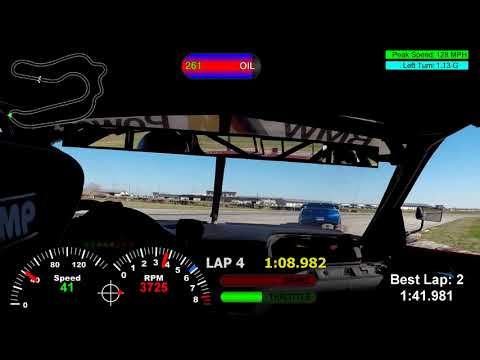
The car is fixed. Installed 3.91 gears, relatively straight forward. I reused the same pinion shim and swapped the carrier shims side to side. The carrier preload was 10 in/lb, pinion preload is 14 in/lb, and the backlash was .0035".... everything is in the sweet spot! No issues although the diff does whine a lot more.


Over the short TX winter, I wanted to improve rear downforce. I know the car is very well balanced without the aero. I spent a lot of effort getting that right before putting a wing and splitter on. The front end is very sharp and turns in accurately at all speeds. The issue is the rear tends to be a little nervous at low and mid speeds, especially coming out of slower corners.
My wing is a $400 NRG wing that I bought using Hilton Honors points on Amazon...lol. Before I spend $2000 on an AJ Hartmann wing, I am going to try larger end plates and then a gurney flap. Off to my first event of 2022. Goal...don't crash and test out the diff and end plates.

The first event went well. Had some minor issues (exhaust broke, crossover fuel line from left pump came off, and an EML light for the gas pedal), all of which I fixed at the track.
I'm pretty sure the larger end plates helped although I wasn't really pushing. The 3.91 diff worked well. At MSRH there is only one straight where I now have to shift to 5th. With the 3.73, I was right at the redline at 128mph. Best ever top speed is 130mph. I think I can get to 133-134mph so I'd have to shift to 5th either way. For now...I plan on keeping the 3.91.
Comment
-
Glad you were able to sort the "custom" exhaust at the track.
I rewatched my spin going into jawbone. Got pretty lucky...
Sent from my LM-V600 using Tapatalk
Comment
-
Its been awhile since I've updated...back in May I added a gurney flap on the rear wing. 1/8" aluminum angle with aluminum tape to smooth the edges.

The end plates reduced the over steer tendency but the gurney flap made a significant different in the aero balance. I really have to try and break the rear end loose, it actually is causing some understeer when on throttle. I think its right about where I want it. My top speeds are down from about 5-6 mph on the back straight at COTA. Hit 143mph last year, this year with the gurney and end plates - 137mph with a better exit before the straight.
Other than various issues and the carbon plate, nothing majorly new. I had an issue where sometimes there would be a bunch of smoke after coming out of right turns, finally figure out it was a leak right side diff seal.
Averaging 10 days on brake pads, 30 heat cycles on tires, and about 8 MPG. The red drift machine has been really good on the consumables!

Comment
-
Here is an update on the carbon front reinforcement panel - overall I rate it as a success with some possibilities for improvement!
Comment
-
Removed the front end. Takes about 15 min to remove, not usually necessary to do this stuff
Chasing an oil leak. I noticed some oil around the lower half of the freeze plug. I’ve pulled the solenoid and cleaned that area up so I’m pretty sure that is a leak point. Also signs of an oil filter housing gasket leak. Hopefully that’s it for oil leaks.
I tapped the bottom of the plug to get it to rotate in the hole.
Then pliers to pull it out!
The VANOS solenoid plug came apart. There is a replacement socket - 61-13-8-383-300. That does not include the pins. As long as the wires, pins and insert are intact you’re good! Waiting on the part, I’ll post details.
Comment
-
Do I only use 1 rotor bolt instead of 2 to save weight? Absolutely!
I also trim off some other unnecessary things. Seems minor but do 15-20 of these things that’s 2-4 lbs removed!
Comment
Comment