Originally posted by Slideways
View Post
-
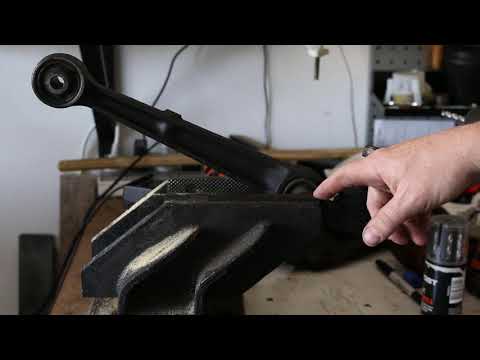
The washer just needs to have enough surface area to cover the bushing so that the bushing doesn't slip through the bolt head. And yes the dampers were torqued at ride height prior to this failing, which is why I was so confused. -
Rubber bushings are not designed like a poly bushing with a sleeve. Even with the washer, the sleeve is still detached from the rubber in the bushing. Since you bought them used, the previous owner might not have torqued them at ride height. The rubber bushings also do wear over time.Originally posted by gaiakai View PostComment
-
I only get that when I browse from my phone and it opens up in Private Browsing mode.Originally posted by Cubieman View PostComment
-
Shock bushings see no rotational forces. It does not need to be torqued at ride height.Originally posted by Slideways View Post
The torque at ride height thing on this forum is weird. First sway bar endlinks, now shock bushings? Do you torque motor mounts at ride height? Exhaust hangers?Comment
-
2002 Topasblau M3 - Coupe - 6MT - Karbonius CSL Airbox - SSV1 - HJS - Mullet Tune - MK60 Swap - E86 Front Triangulation - ZCP Rack - Nogaros - AutoSolutions - 996 Brembos - Slon - CMP - VinceBar - Koni - Eibach - BlueBus - Journal
2012 Alpinweiss 128i - Coupe - 6AT - Slicktop - Manual Seats - Daily - JournalComment
-
Could just give it 10 ugga duggas and "send it" to the moonOriginally posted by jayjaya29 View Post
Or follow the TIS specs per manufacturer recommendationsComment
-
I was wrong then. I don't understand why though.Comment
-
If the rubber bushing is tightened at full droop, it will heavily preload and twist the bushing when at ride height. If it is done at ride height, the rubber bushing will have little to no preload and can twist in its normal operating range. Front sway bar end links, outer rear lower control arm and spring perch ball joints can be tighten without the car being at ride height. On a ball joint, the inner ball is not fixed to the outer sleeve. On a rubber bushing, the inner sleeve is directly connected to the outer sleeve via rubber.Originally posted by jayjaya29 View Post
Comment
-
I understand why bushings like RTAB and inner upper/lower control arms needs to be tightened at ride height. But the amount of rubber and location of the lower shock attachment point is not going to impart any meaningful force on the suspension or be rotated enough during suspension travel to tear the rubber.Comment
-
The size of the bushing does not matter. RTABS, upper control arm, upper spring perch and lower rear damper bushings are all the same style. Granted, the RTABs will probably fail the fastest out of the four.Comment
-
Does anyone know a shop (other than Troy Jeup) that can machine AluSil blocks, S85 blocks for instance?2004 Silbergrau Metallic 6MT
Karbonius/OEM Snorkel/Flap/HTE Tuned
Ssv1/Catted Sec. 1/SS 2.5" Sec. 2/SCZA
OE CSL Bootlid/AS SSK/TCK Vorshlag/4.10 Gears/ Sportline 8S Wheels/Cobra Nogaros
RACP Plates/Vincebar/CMP/Turner RTAB/Beisan
2006 M6 Black Saphire SMG
InstagramComment
-
For those with true rear coilovers, is there stronger hardware recommended for the rear lower shot mount? That bolt carries a lot more load....Comment
-
I’m having an annoying time getting the two front mounting bolts for the rear subframe. I believe these are 31mm(?) and of course no one has that size of anything in stock. Tried using channel locks, as the bolts come out they get progressively tighter to the point where the pliers just slip. I wonder if the previous owner in his infinite wisdom put loctite on these. I ordered a deep 31mm socket and I think I’m going to go caveman and just cut the bolt off and use the socket and a blowtorch. Unless you guys can instruct me on the correct method. I need these off asap so I can keep going on the project.
Comment
-
Shocks don't move in a 100% exact up and down axis, there is a slight amount of rotation but probably not really perceptible to the naked eye.Originally posted by jayjaya29 View Post
Sway bar end links are the same, they are technically supposed to be assembled onto the sway bar with something like turpentine (similar to an E36 front LCA bushing). Once the turpentine dries it "sticks" the bushing to the sway bar in a fixed location. If you don't do that then the bushing can twist on the sway bar and eventually wear itself out.
What are you building?Originally posted by Cubieman View Post
Might try Peter Partee with Partee Racing.
They might be seized or rusted up inside the chassis, you could be running into an instance where they are galling the threads on removal. Maybe try some heat and work them back and forth Cutting them flush is not a bad idea if you can replace them.Originally posted by Nate047 View Post'09 HP2S, '12 R12GSA, '00 Black 323iT, '02 Alpine 325iT (Track Wagon), '02 Alpine 330iT
Instagram @HillPerformanceBimmers
Email to [email protected]Comment
-
Thank you, yea I am going to drive them back in, heat them up, and hope they are not rusted haha. I suppose anything is possible but the car is *mostly* rust free. I think the studs were used to hold the plates in place while the epoxy dried. So I feel like the epoxy is what is making my life difficult, and thus, hoping some heat will help.Originally posted by George Hill View PostComment
Comment